Help Documentation
Sportix Wordpress Theme
Thank you for purchasing our theme ! Please take the time to read through the following sections before asking for support. As many support related questions can be answered simply by re-reading the documentation.
 Envato
 Facebook
 Behance
1 - General
Installation - General
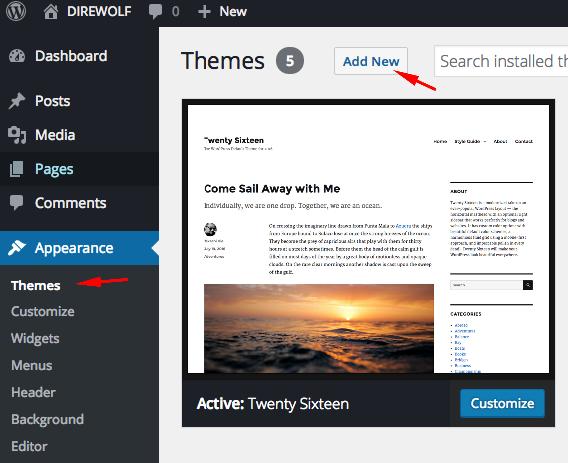
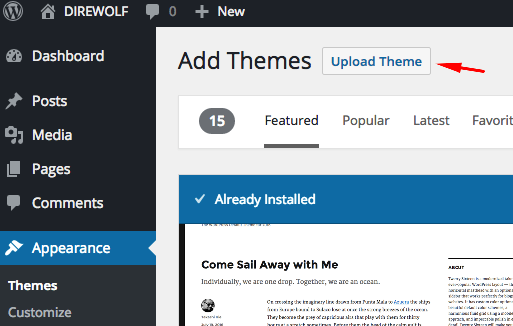
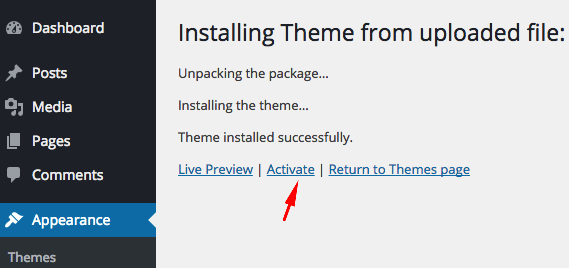
The first thing you need to do when you want to install a new WordPress theme is to login to your site admin page. Once there, go to Appearance -> Themes. Here, you will see all the themes you have currently installed in your application. To add another one, simply click on the Install Themes tab. Upload the zip package which you have downloaded from Themeforest from your local hard drive.

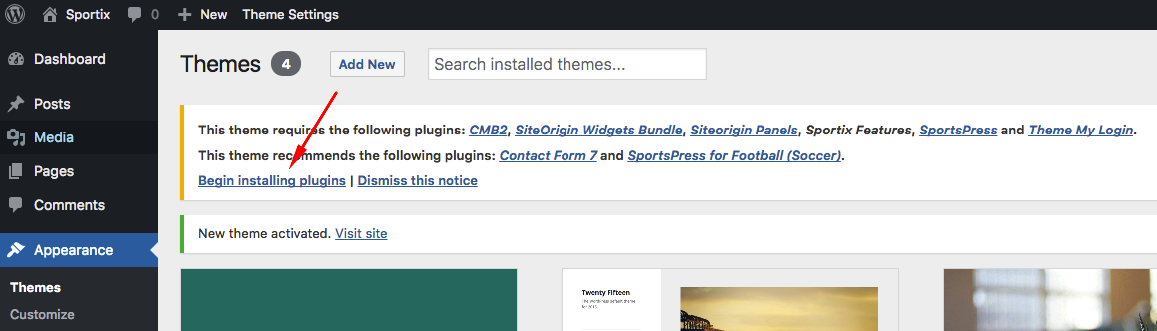
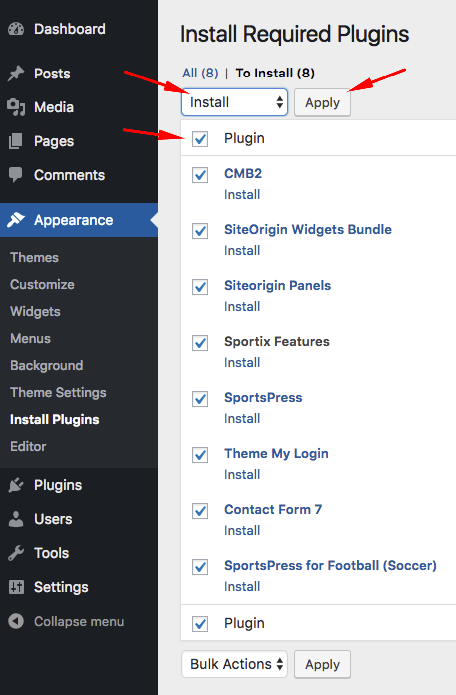
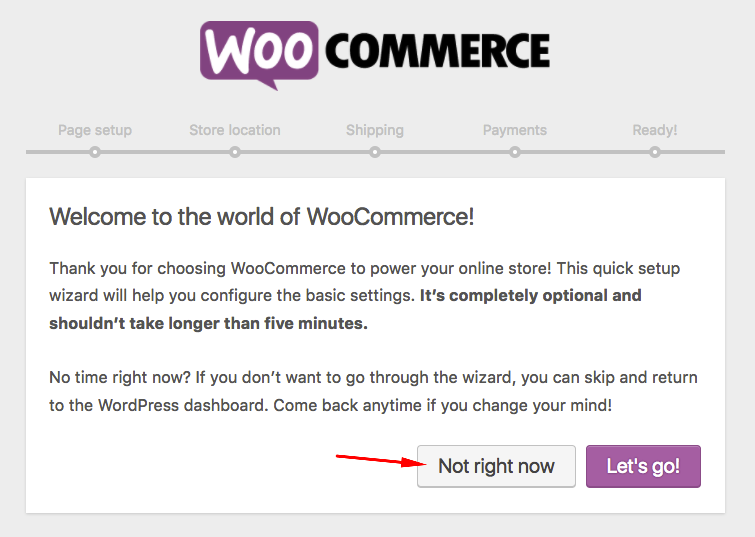
After activating SportsPress (and Woocommerce), you will redirected to a separate set up page. If you will upload the demo content, you can skip these steps.
Import Demo - First Steps
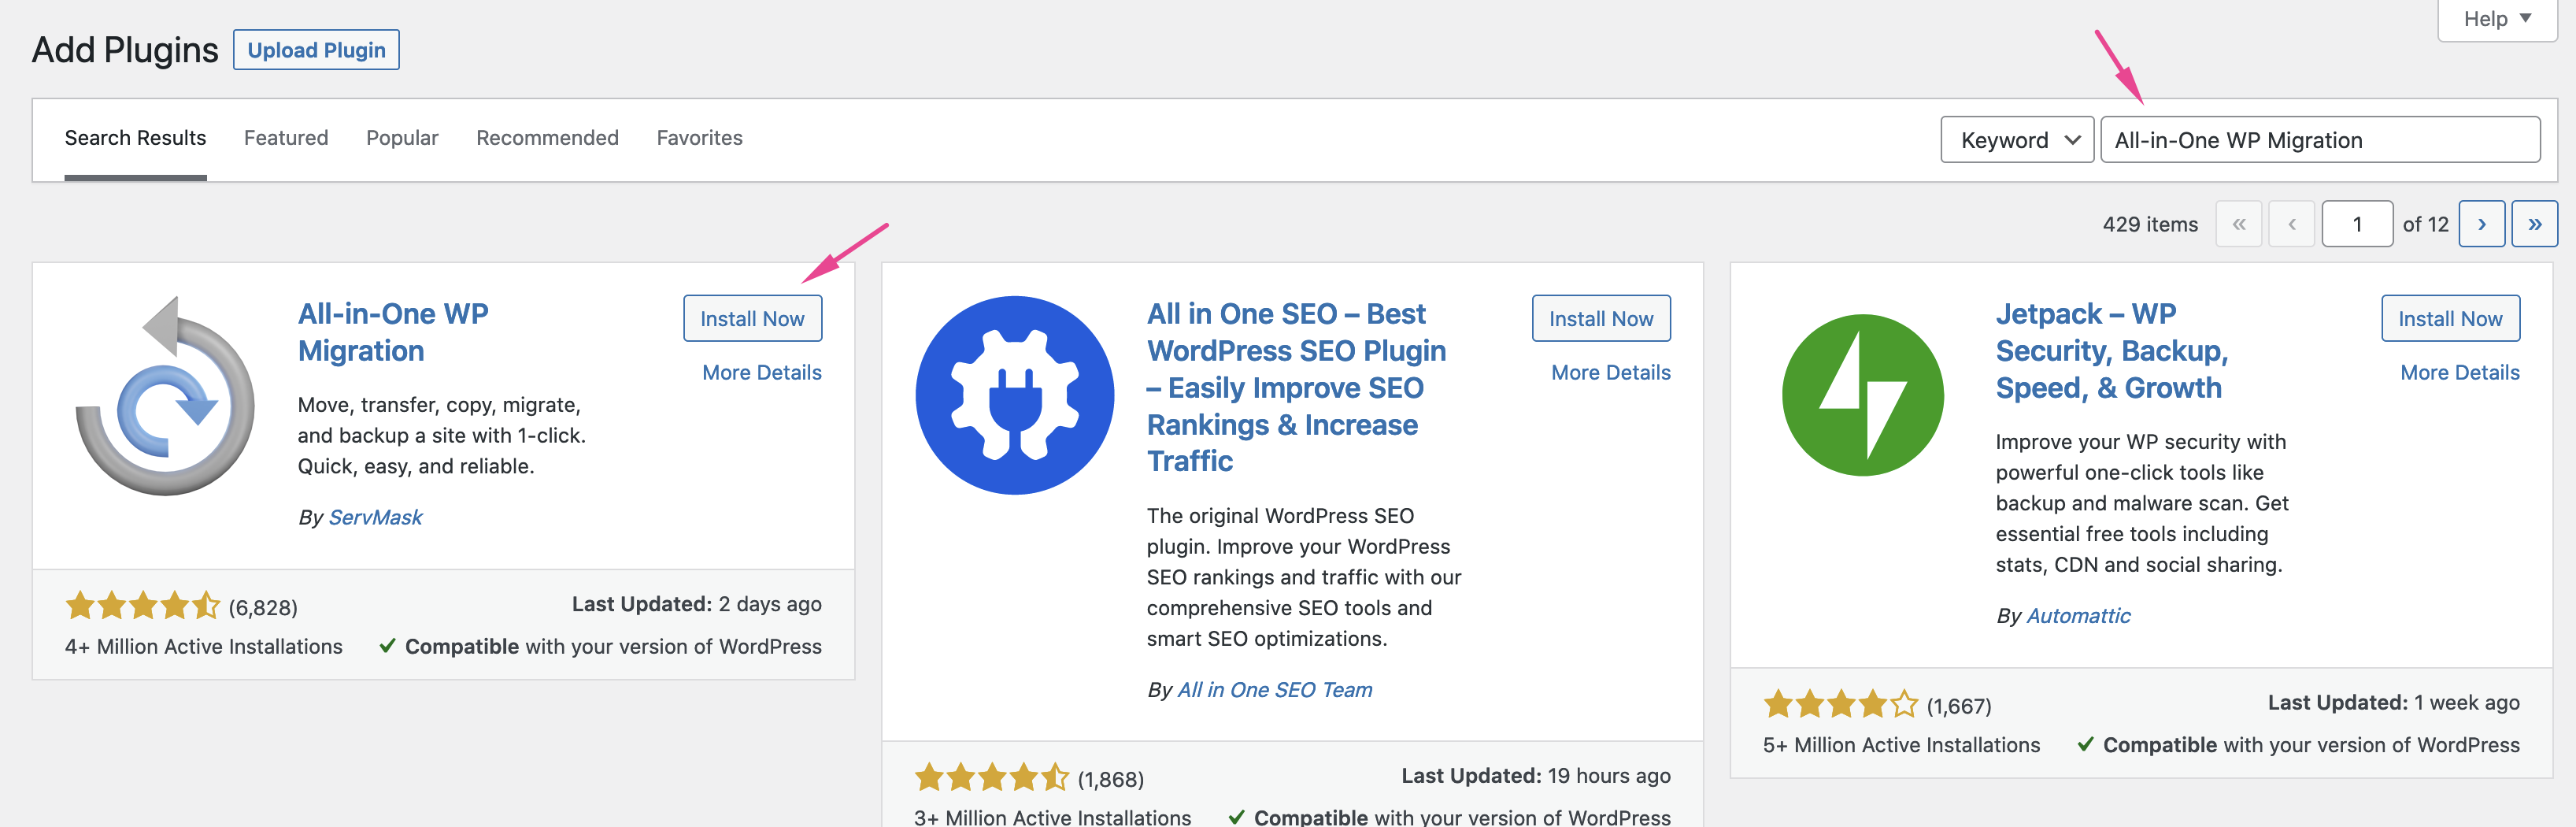
1) Go to Plugins->Add New and install "All-in-One WP Migration" plugin.
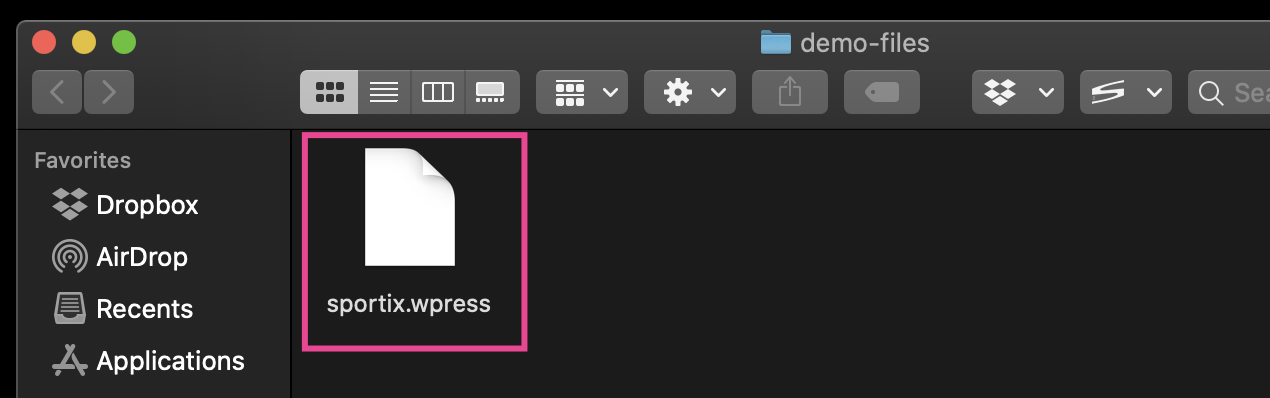
2) Download the demo file: Open the zip file which you've downloaded from your Themeforest account (All files & Documentation). You will find sportix.wpress file in "demo-files" folder.

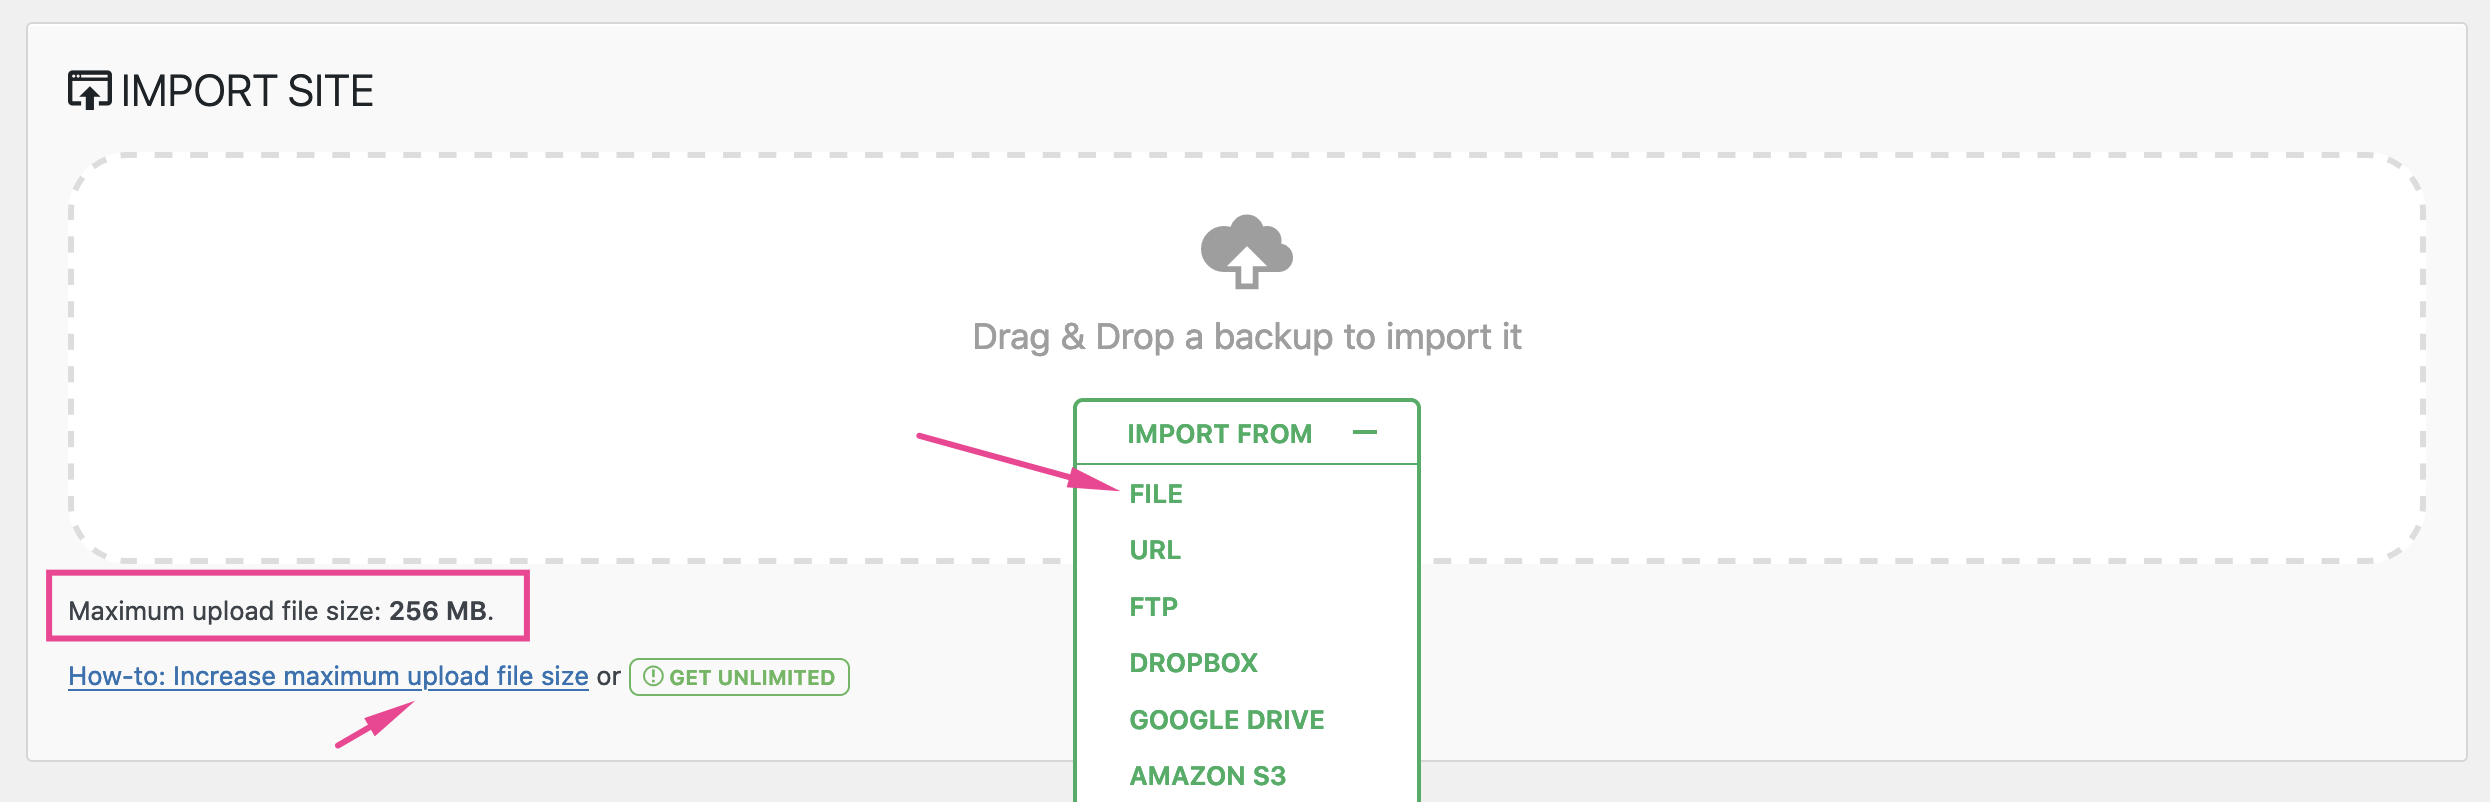
3) Go to All-in-One WP Migration->Import, select sportix.wpress file and follow the steps to finish the installation.
"Maximum upload file size" must be minimum 50 MB. How to Increase Maximum Upload File Size in WordPress.
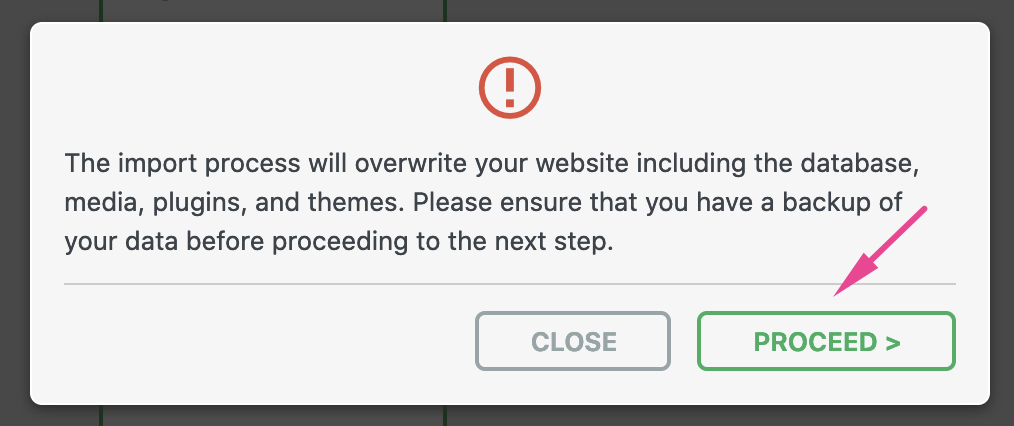
4) When the installation process is finished, you will be logged out. As mentioned before, import process will overwrite the users. You can only login to the dashboard using the following credentials;
Username: admin
Password: 246810
After the first login, we strongly recommend you to create a new admin user with a strong password and delete the old one.
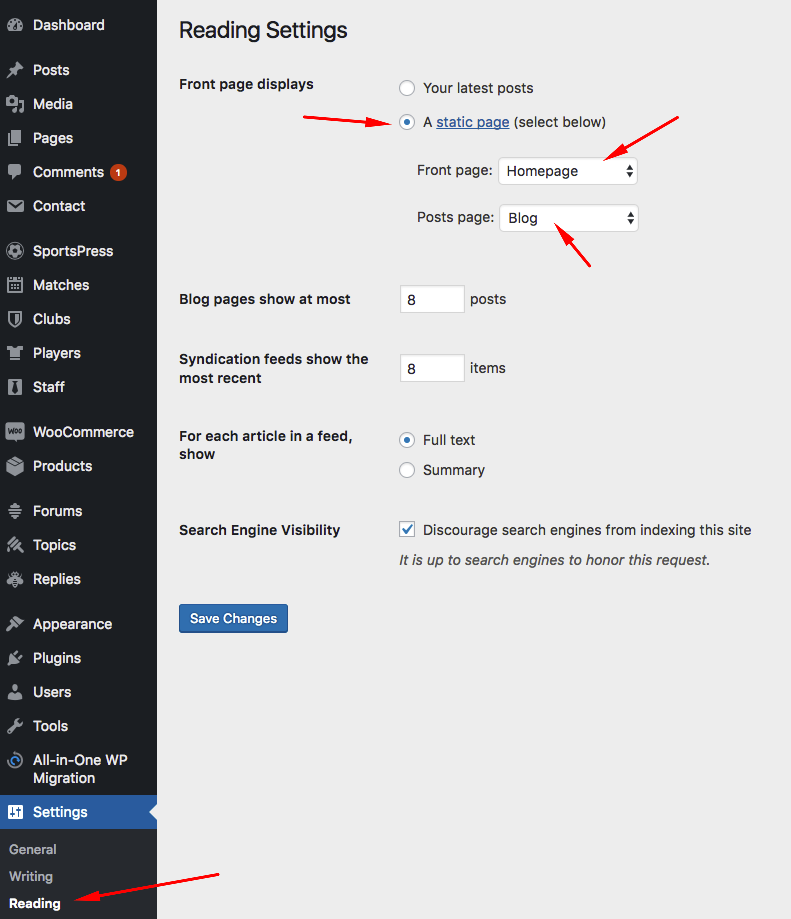
Creating Front Page & Blog Page - General
First of all, you should create a new page for your frontpage display.
Go to Settings->Reading and select in the drop-down box this page for the front page display.
To create a blog page, create a blank page.
Go to Settings->Reading and select in the drop-down box the name of the Page that will now contain your latest posts. You can also use one of the blog page templates to create a page which displays all your posts. For more information please look at Page Templates section.
Adding Logo - General
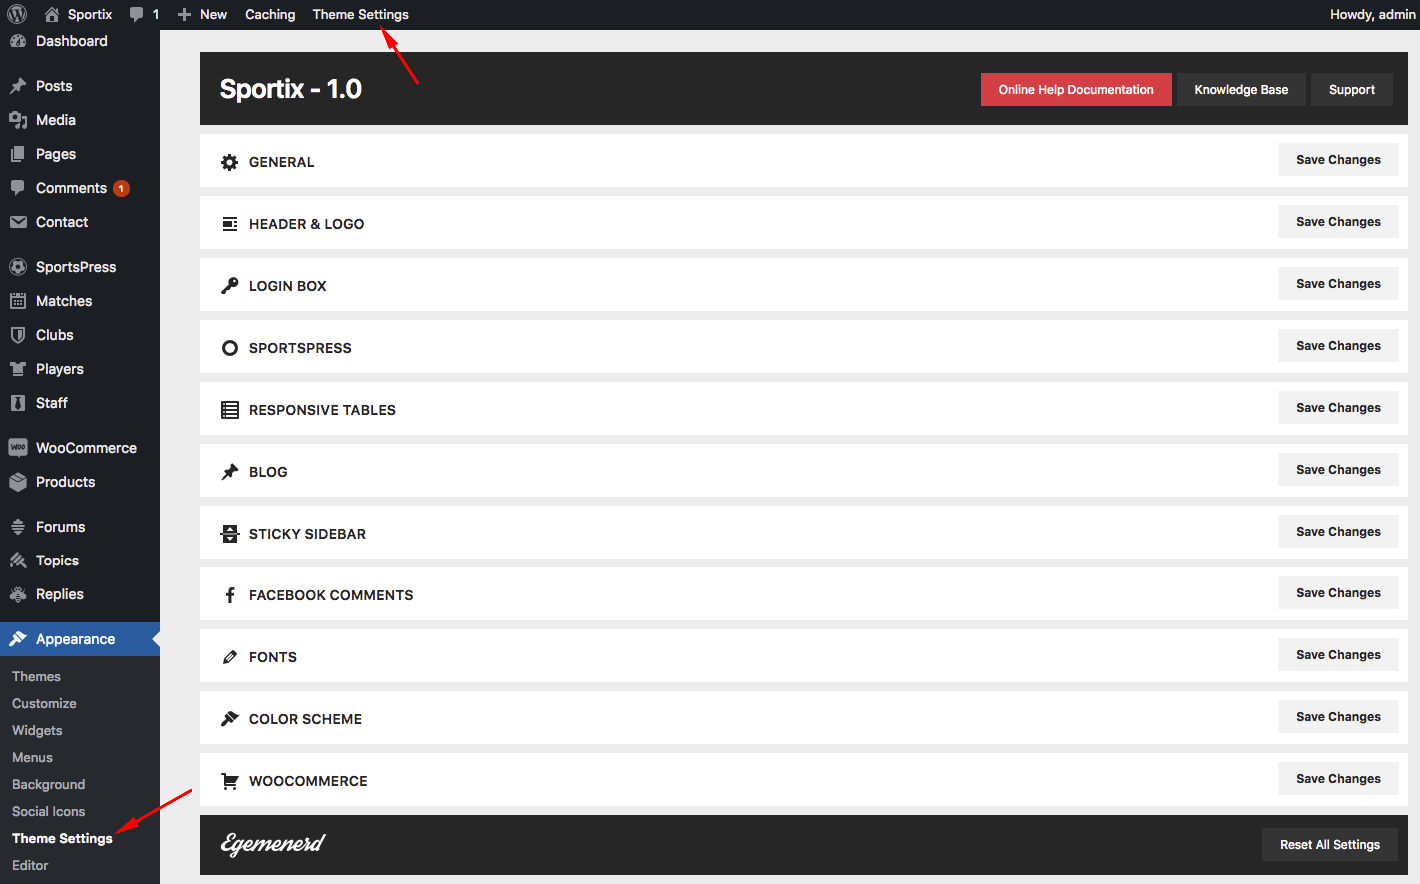
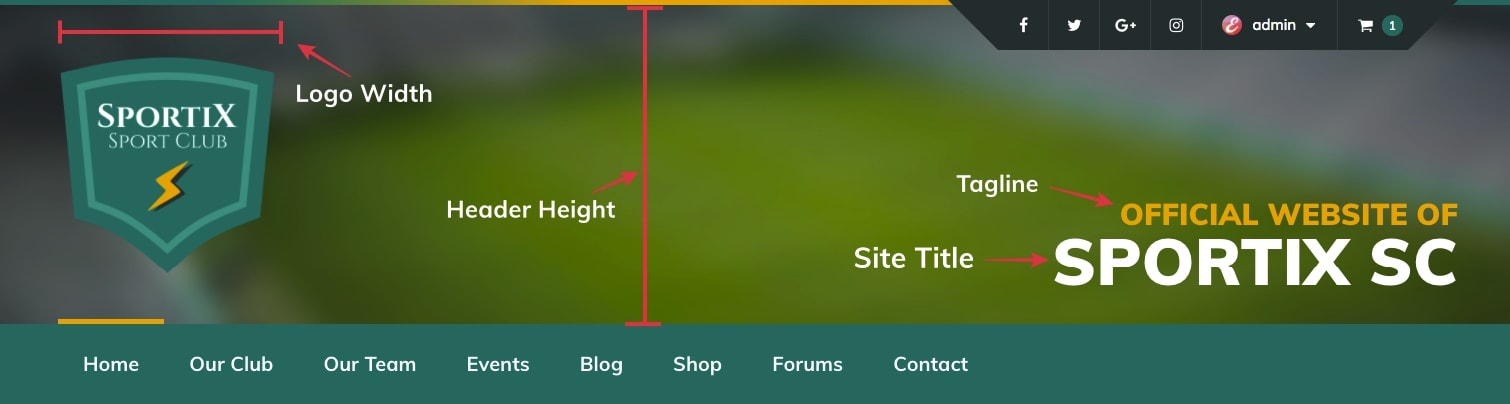
You can upload your logo from Appearance->Theme Settings->Header & Logo section.
According to your logo size, you may need to play with "logo width" setting.
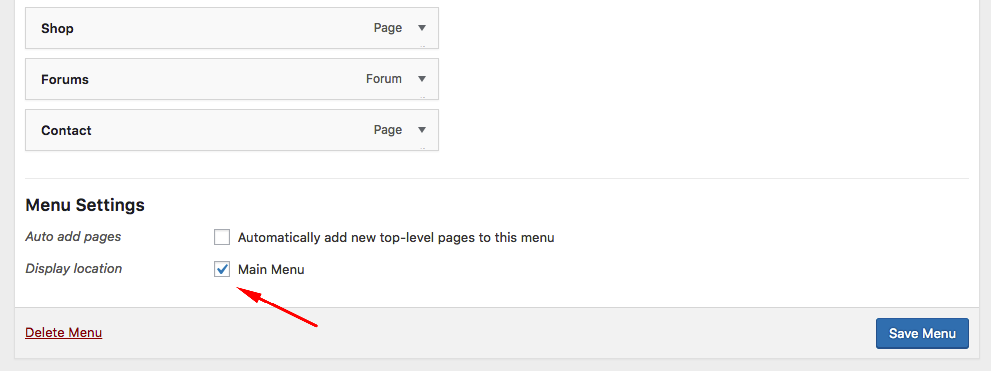
For more information about WordPress menus, please read the WordPress menu guide
You can create menus from Appearance->Menus page.
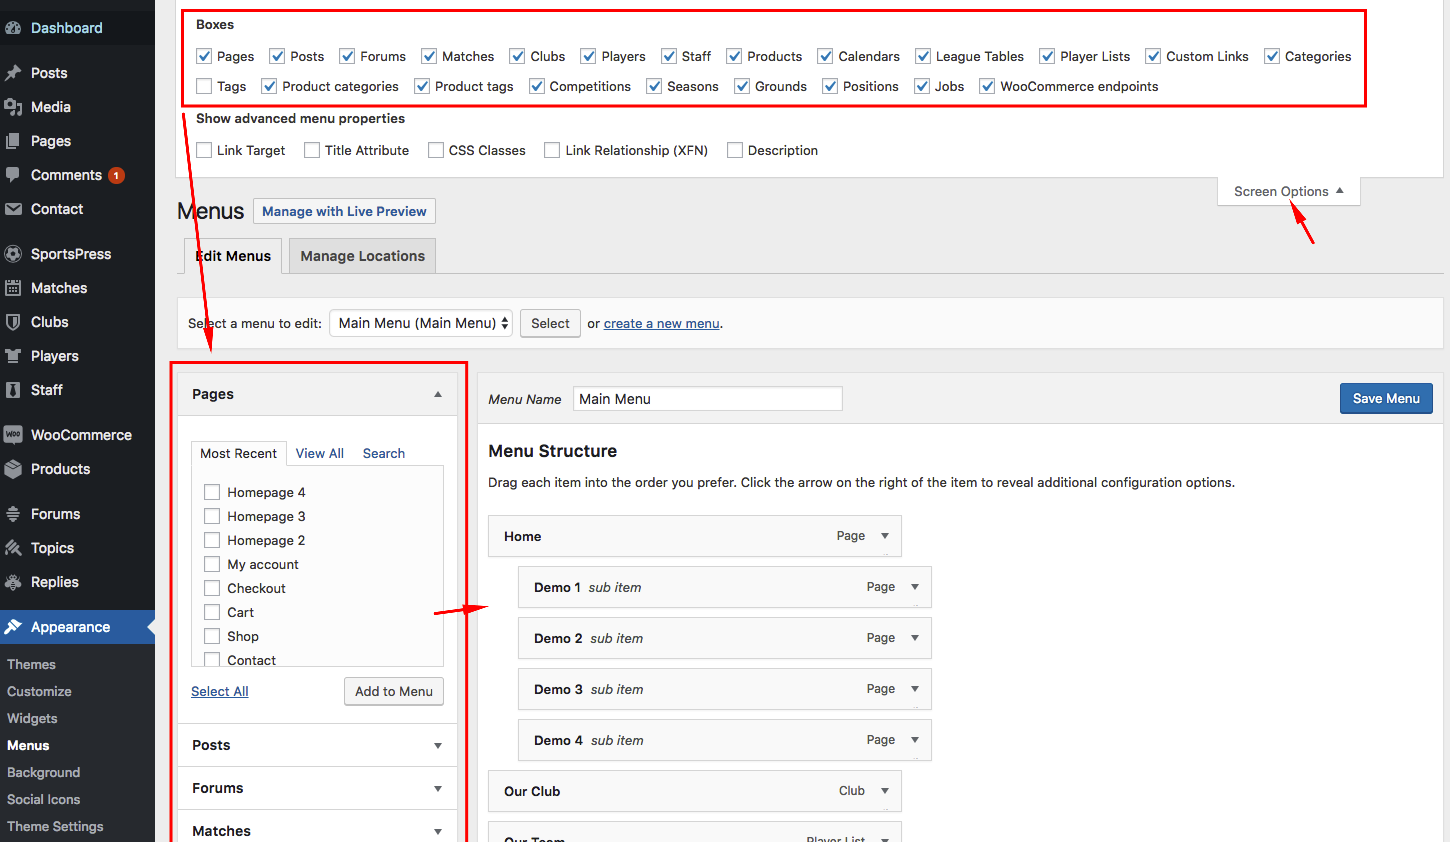
After creating your menus, you must manage your menu locations.
FontAwesome Icons
You can use FontAwesome icons instead of menu texts. To do this, you should add FontAwesome code to the "Navigation Label" field. For example if you want to add a home icon, you should add the following code;
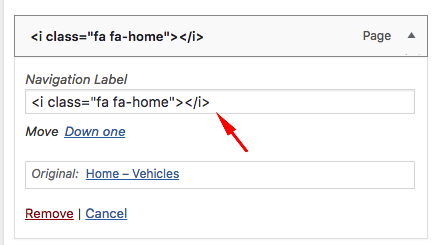
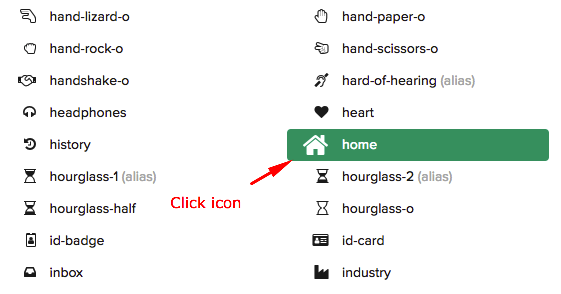
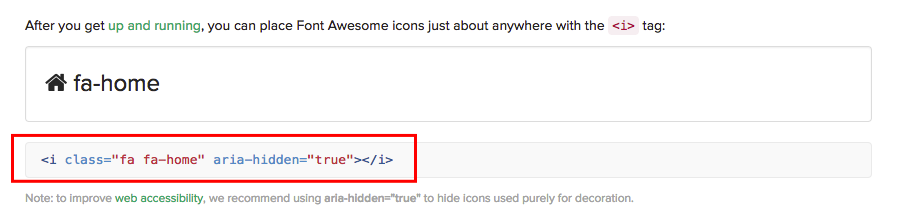
To find icon codes, please visit FontAwesome official website
Custom Menu
Another way to use a WordPress menu is using custom menu widget. You can use this widget to add your menus to any widget area.
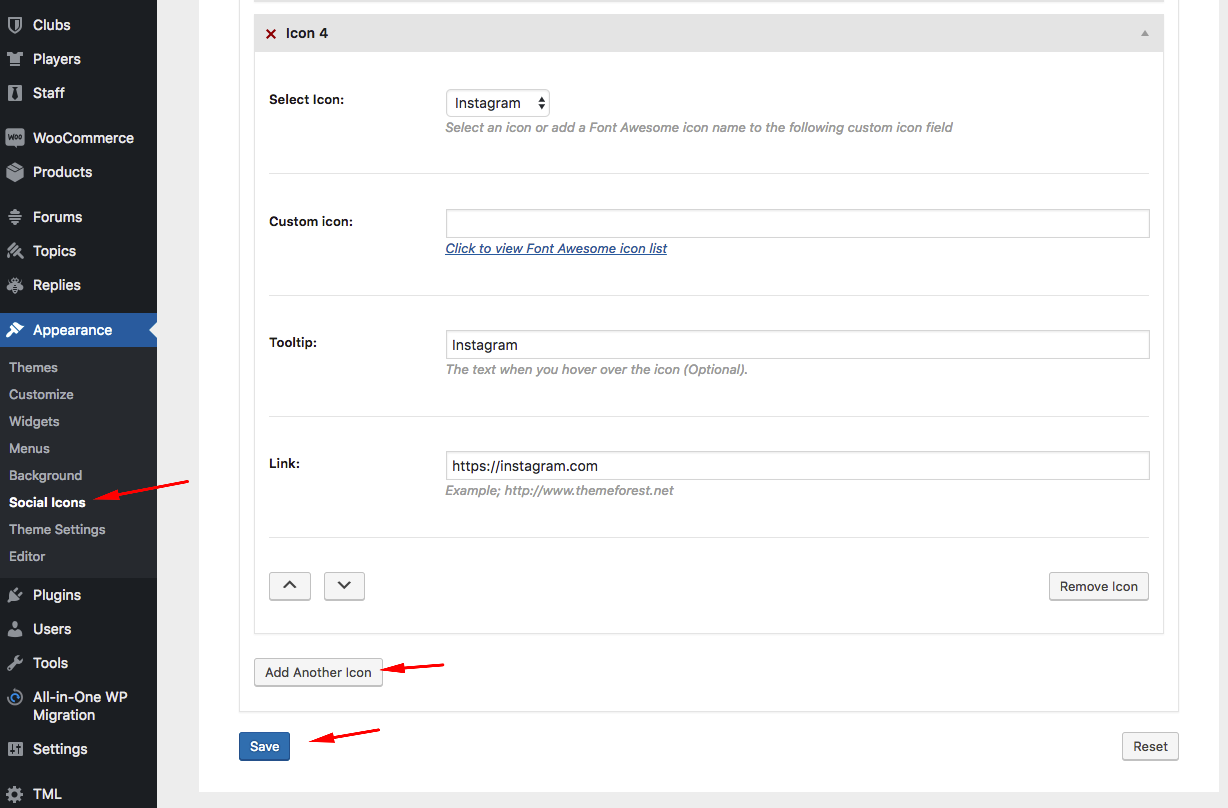
You can add social media icons to the footer from Appearance->Footer Icons. Just fill the required fields and click "Add Another Icon" to add a new icon or click "Save".
You can also use SiteOrigin Social Media Buttons widget to add social icons to any widget area. To use this widget, you should upload/activate SiteOrigin Widget Bundle plugin.
Page Templates - General
Page templates are files which tell WordPress how to display different types of content. Page templates allow you to individualize any part of your WordPress site without affecting the rest of it.
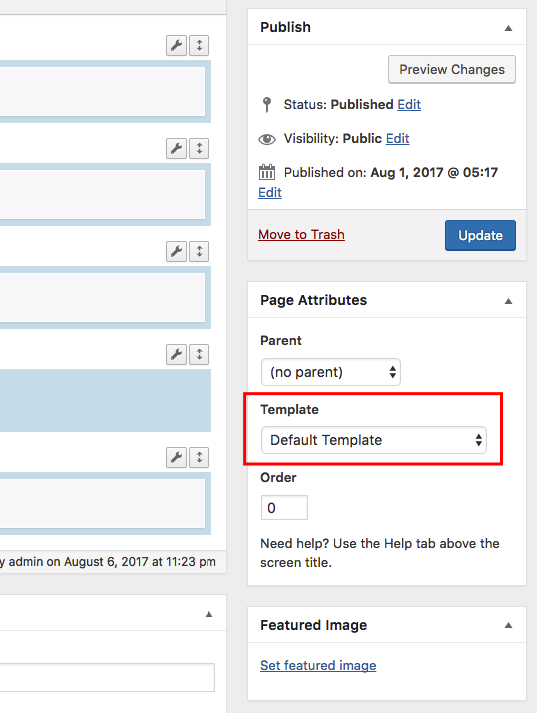
- Default template
- "Default template" is the standard full width page template.
- Blog templates
- These page templates displays your latest posts in different layouts.
- Page templates
- These page templates displays your page content with the selected sidebar.
- SportsPress templates
- You can use these page templates to display upcoming matches and latest results easily.
Posts - General
If you are an unexperienced WordPress user, we suggest you to read the following article;
How to Add a New Post in WordPress and Utilize all the FeaturesExcerpts
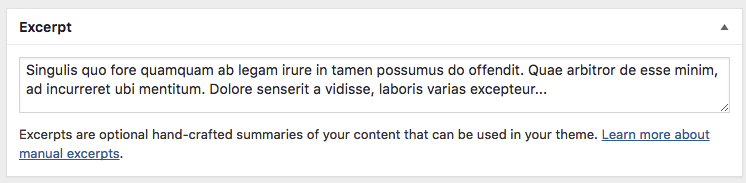
An excerpt in WordPress is a term used for article summary with a link to the whole entry. An excerpt can be auto generated by a WordPress theme.
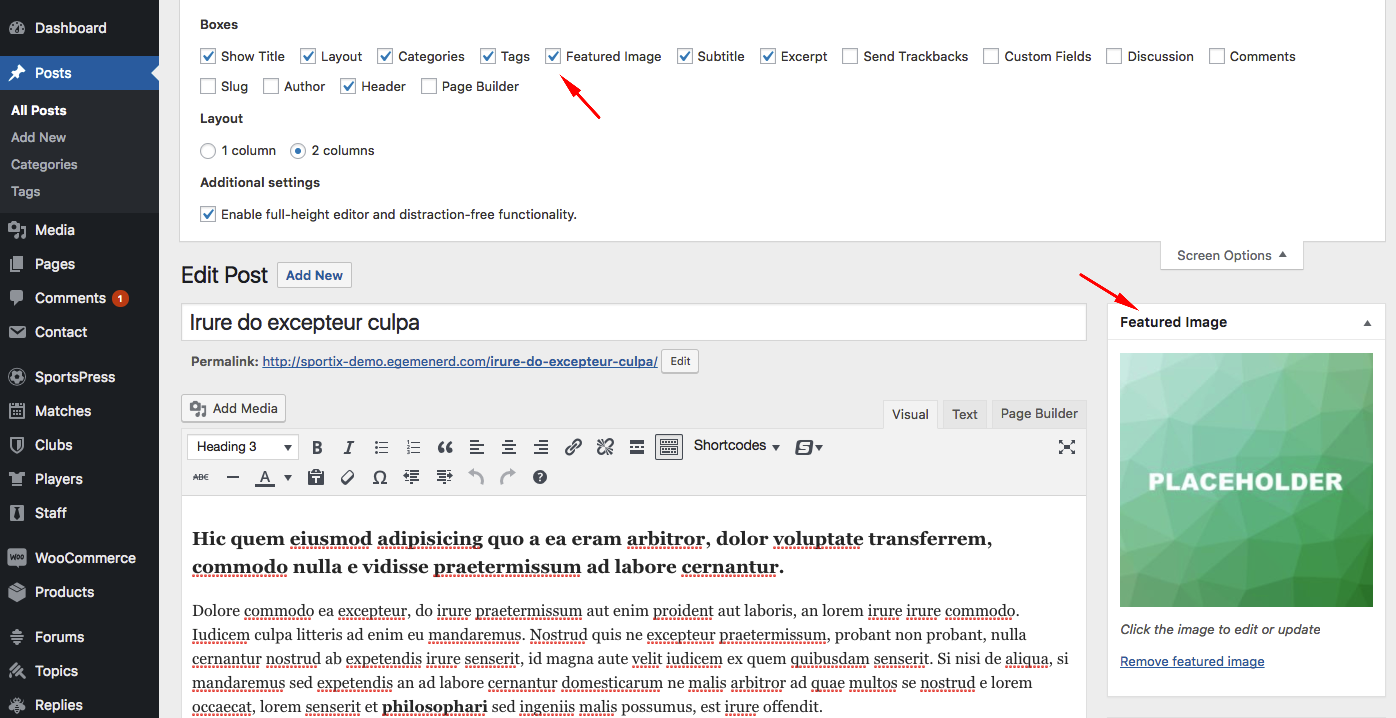
Another way to create excerpts for a WordPress post is by entering the summary of an article in Excerpt field on Post Edit screen. This field is not displayed in the post edit screen by default. To enable it a user needs to click on Screen Options button on the top right corner of post edit screen and then enable it.
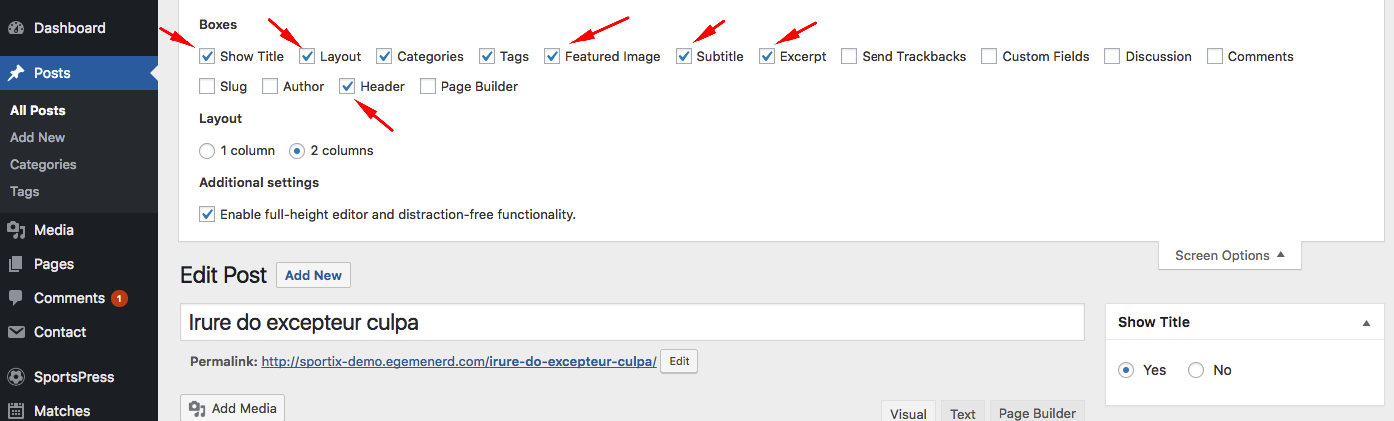
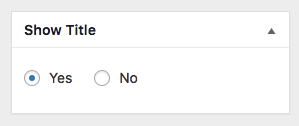
Show Title
You can show or hide the post/page title.
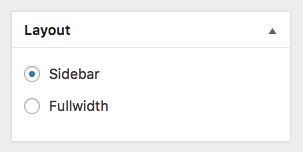
Layout
You have two options for the single post page layout. If you don't want to display a sidebar on the page, select "Fullwidth".
Subtitle
You can add a subtitle to your posts or pages. It is recommended for SEO.

Featured Image
The Featured Image (also known as post thumbnail) is a WordPress theme feature which allows you to add a representative image to the posts.
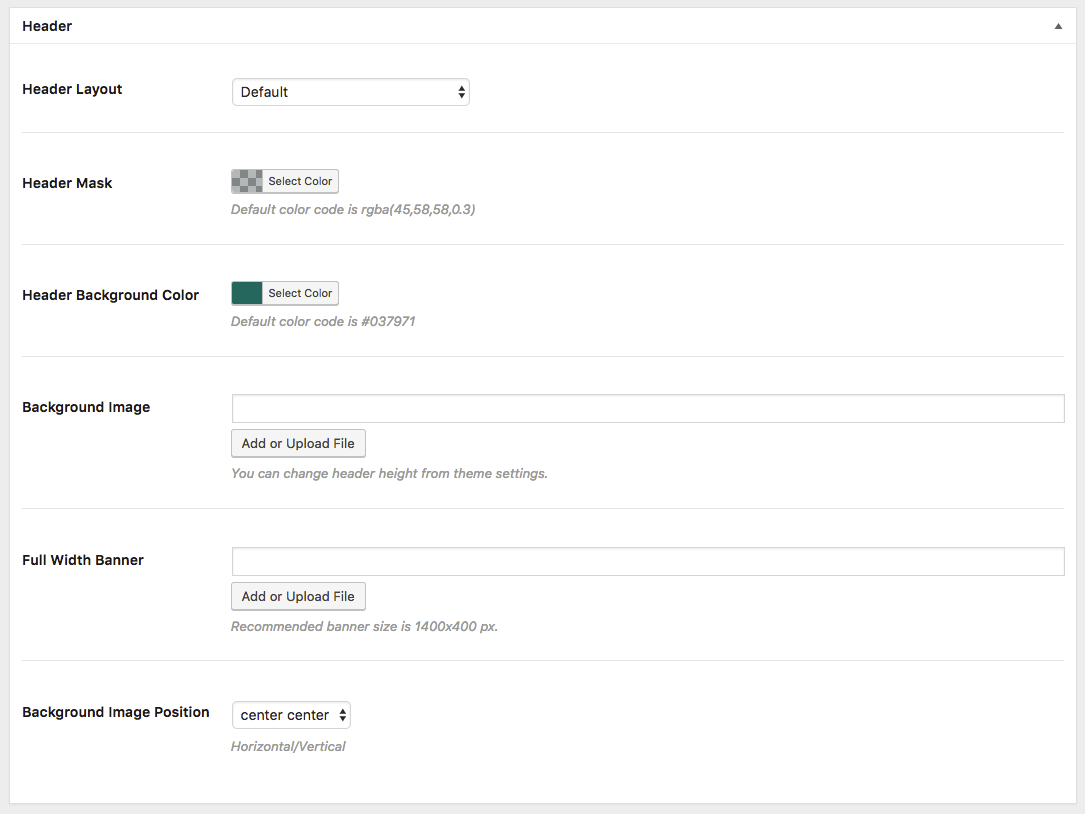
Header
You can add a different header image to each post/page or change the header layout of each post/page. You can change default site header settings from theme settings.
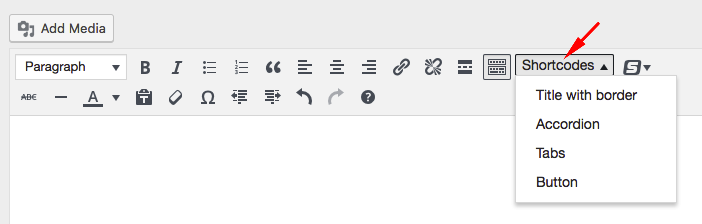
Shortcodes
You can use shortcode menu which is on the editor to add shortcodes to your posts/pages.
Accordion - Shortcodes
Adds an accordion. All sportixaccordion shortcodes must be in sportixaccordioncontainer shortcode.
You can find all icon names at official Font Awesome page.
Tabs - Shortcodes
Adds a tabs. All sportixtab shortcodes must be in sportixtabgroup shortcode.
type: default or vertical
URL: Destination url
Button text: The text of the button
Open in a new tab: yes or no
Style: large, medium or small
2 - Theme Settings
General - Theme Settings
- Custom CSS
- You can add all your custom CSS here and avoid modifying the core theme files, since that'll make upgrading the theme problematic. Your custom CSS will be loaded after the theme's stylesheets, which means that your rules will take precedence. Just add your CSS here for what you want to change, you don't need to copy all the theme's style.css content.
- Footer Text
- If you don't need to add a copyright message to your website, leave this field blank.
Header & Logo - Theme Settings
You can play with these settings to customize your website's header.
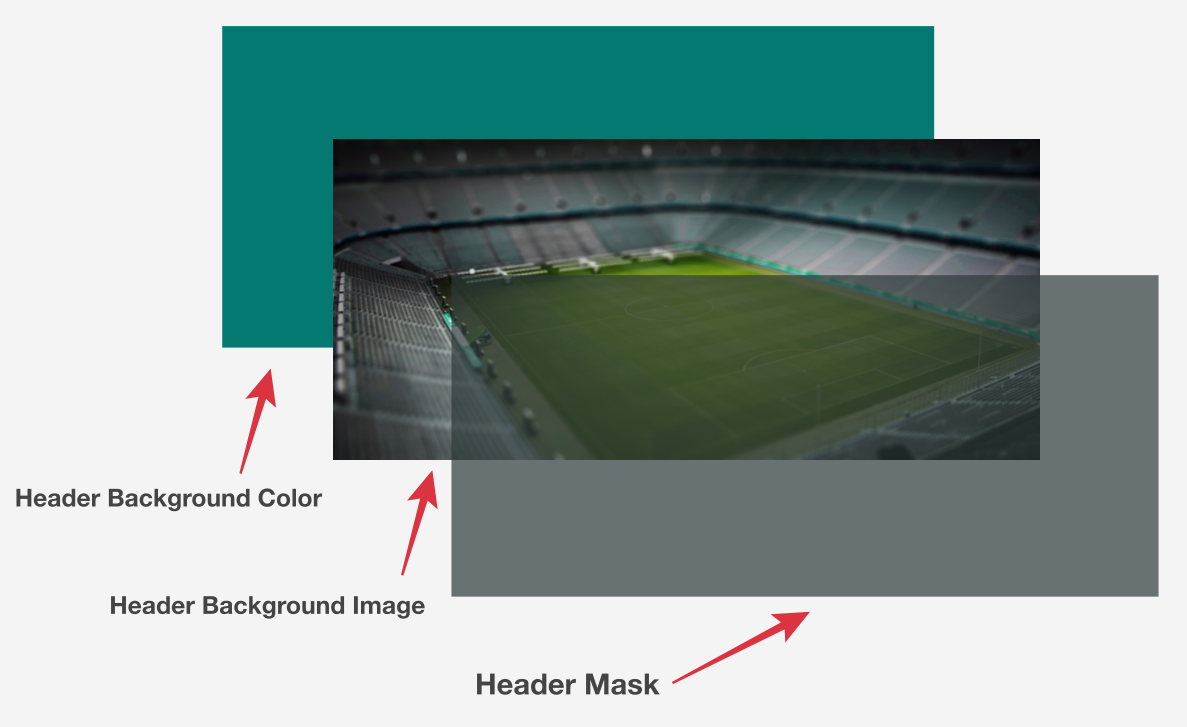
- Default Header Background Image (Optional)
- You can add a background image to the header. This is the default header image. You can also add individual header images to your posts or pages.
- Fixed Menu
- To stick main menu at top after scrolling, switch on.
- Dropdown Menu Width
- Width of the dropdown menus in the main menu.
Login Box - Theme Settings
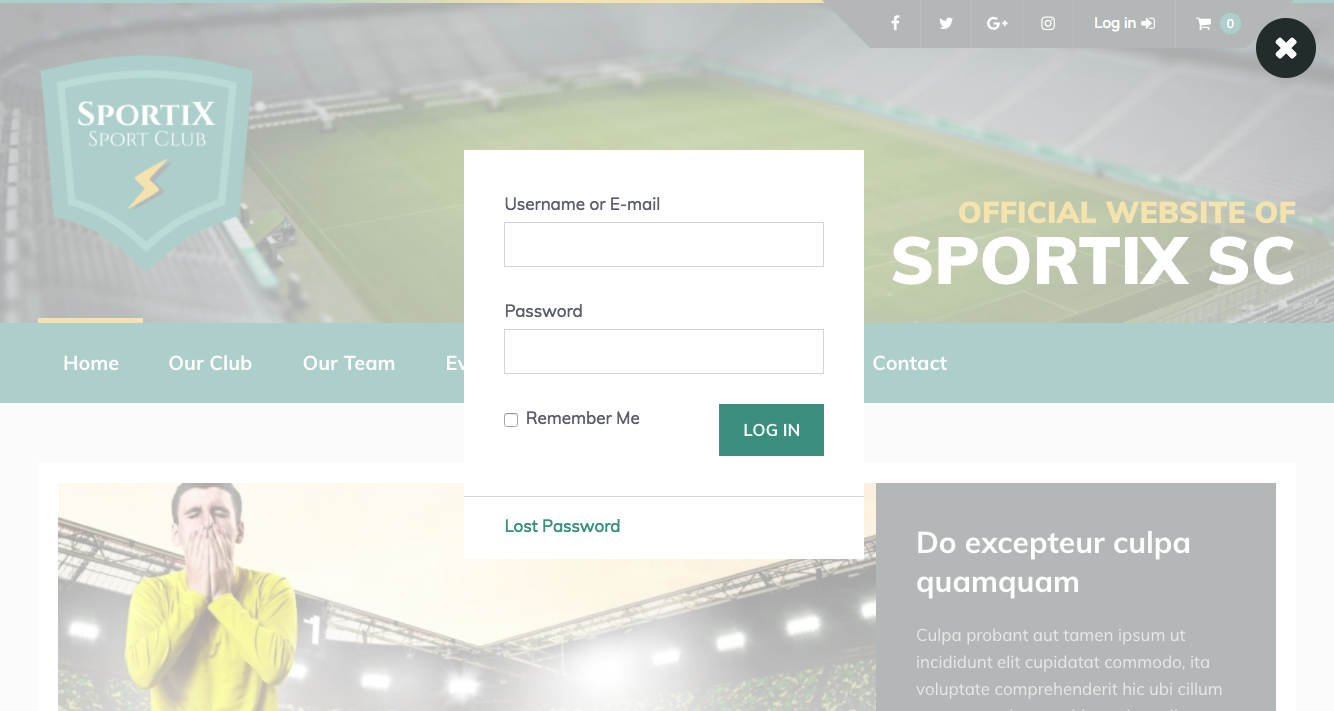
If you want to display login/register link in the top bar, enable login box.
Sportix is fully compatible with TML Plugin. If you have activated the plugin, your users can login (or register) to your website directly from the front-end.
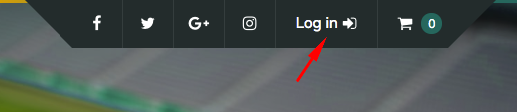
To display the "Popup login form", you must upload/activate TML plugin.
SportsPress - Theme Settings
This section contains some of SportsPress settings in the theme. You can find all other SportsPress settings at SportsPress->Settings page.
For more information about SportsPress settings, please visit SportsPress knowledge base.
Responsive Tables - Theme Settings
Tables may break responsive layouts or they simply may not look well on mobile devices. So, we include a simple lightweight jQuery responsive table library in the theme. This is an optional feature. You can play with the settings as you want and if you don't like it, you can disable it. Your tables will still work on mobile devices without any problem.
Blog - Theme Settings
- Blog Subtitle
- You can add subtitles to the posts&pages. This is the subtitle of static WordPress pages like blog,archive,search etc. You can add individual subtitles to your posts or pages from post&page add new/edit pages.
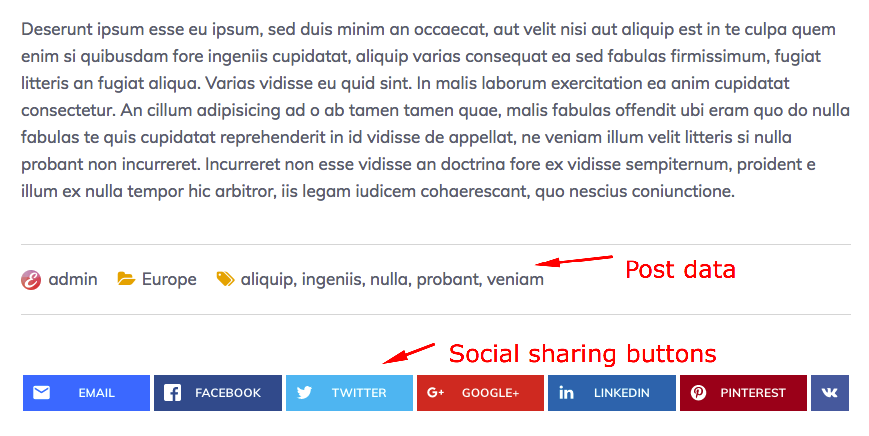
- Remove Social Sharing Buttons
- There are social media sharing buttons on the posts and vehicles. If you want to disable them, switch on.
- Remove Post Data
- There is a meta box at the bottom of the posts which displays author of the post, tags and categories. If you want to disable it, switch on.
Sticky Sidebar- Theme Settings
- Disable Sticky Sidebar Plugin
- Sticky Sidebar plugin is used in sidebars. To disable sticky sidebar plugin, switch on.
- Breakpoint
- If screen width is less than breakpoint, the plugin will be disabled.
- Additional Margin Top
- An additional top margin in pixels.
- Additional Margin Bottom
- An additional bottom margin in pixels.
- Sidebar behavior
- Sidebar behavior when you scroll the page.
Facebook Comments - Theme Settings
You can add Facebook comments field to your posts.
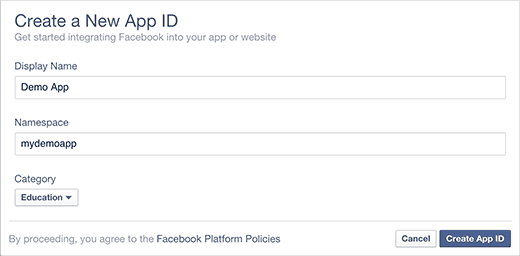
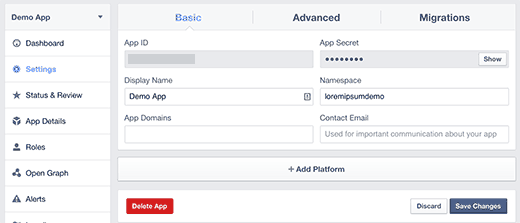
In order to use Facebook comments on your site you will need to create a Facebook app. If you have previously created an app for your site, then you can use that app ID here. Otherwise, you will need to create a new app.
Simply visit the Facebook Apps page and click on the create new app button. You will need to provide a name for your app and click on the Create App ID button.
Facebook will now create a new app for you to use, and it will redirect you to your app dashboard. You will notice your app ID displayed there.
You need to copy and paste this app ID into your theme settings. But before you can do that, you would need to configure the app to work on your website. Click on the Settings link and then click on +Add Platform button.
A new popup window would appear on the screen. You need to click on website to select it as your platform.
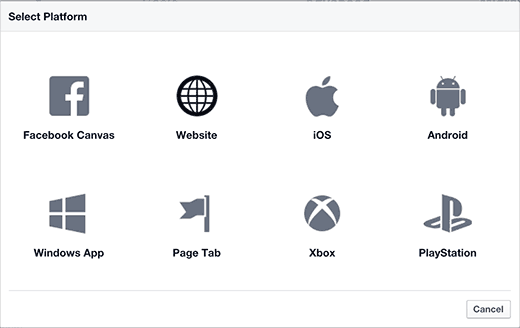
This will add a new ‘Website’ section in your app’s settings page where you can enter your WordPress site’s address.
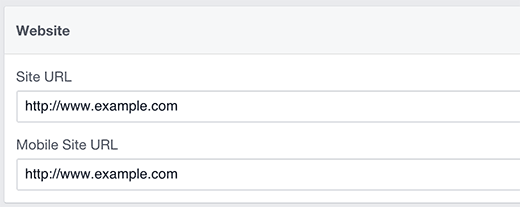
After saving your settings, you can now copy the app ID and paste in the theme’s settings page.
- Activate Facebook Comments
- To activate Facebook comments, switch on.
- Title
- Title of the Facebook comments field (Optional).
- Color Scheme
- Color Scheme of the Facebook comments field.
- Number of comments
- The number of comments to show by default.
- Data Order by
- Social: This is also known as "Top". The comments plugin uses social signals to surface the highest quality comments. Comments are ordered so that the most relevant comments from friends and friends of friends are shown first, as well as the most-liked or active discussion threads.
- Newest:Comments are shown in the opposite order that they were posted, with the newest comments at the top and the oldest at the bottom.
- Oldest:Comments are shown in the order that they were posted, with the oldest comments at the top and the newest at the bottom.
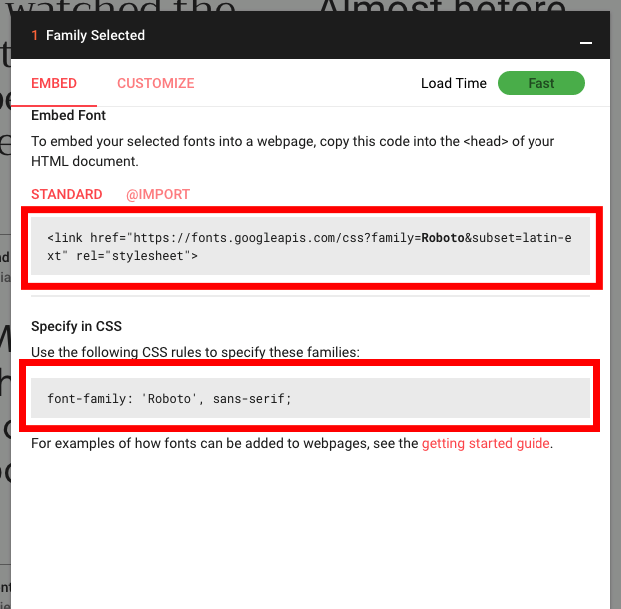
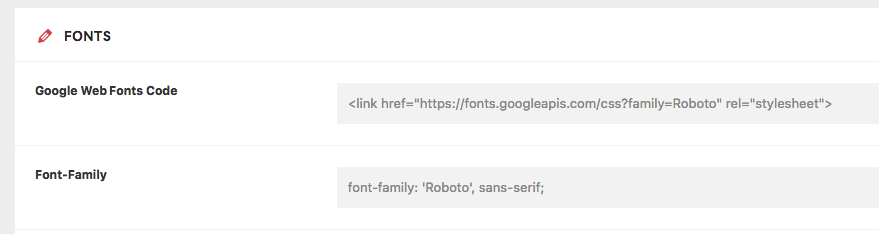
Fonts - Theme Settings
Sportix supports Google Web Fonts. To change default fonts, please follow the following steps;
Choose a font and click "plus" button on the top right corder of the font. After that copy the codes (like on the screenshots) and paste them to the related fields on the theme settings page.
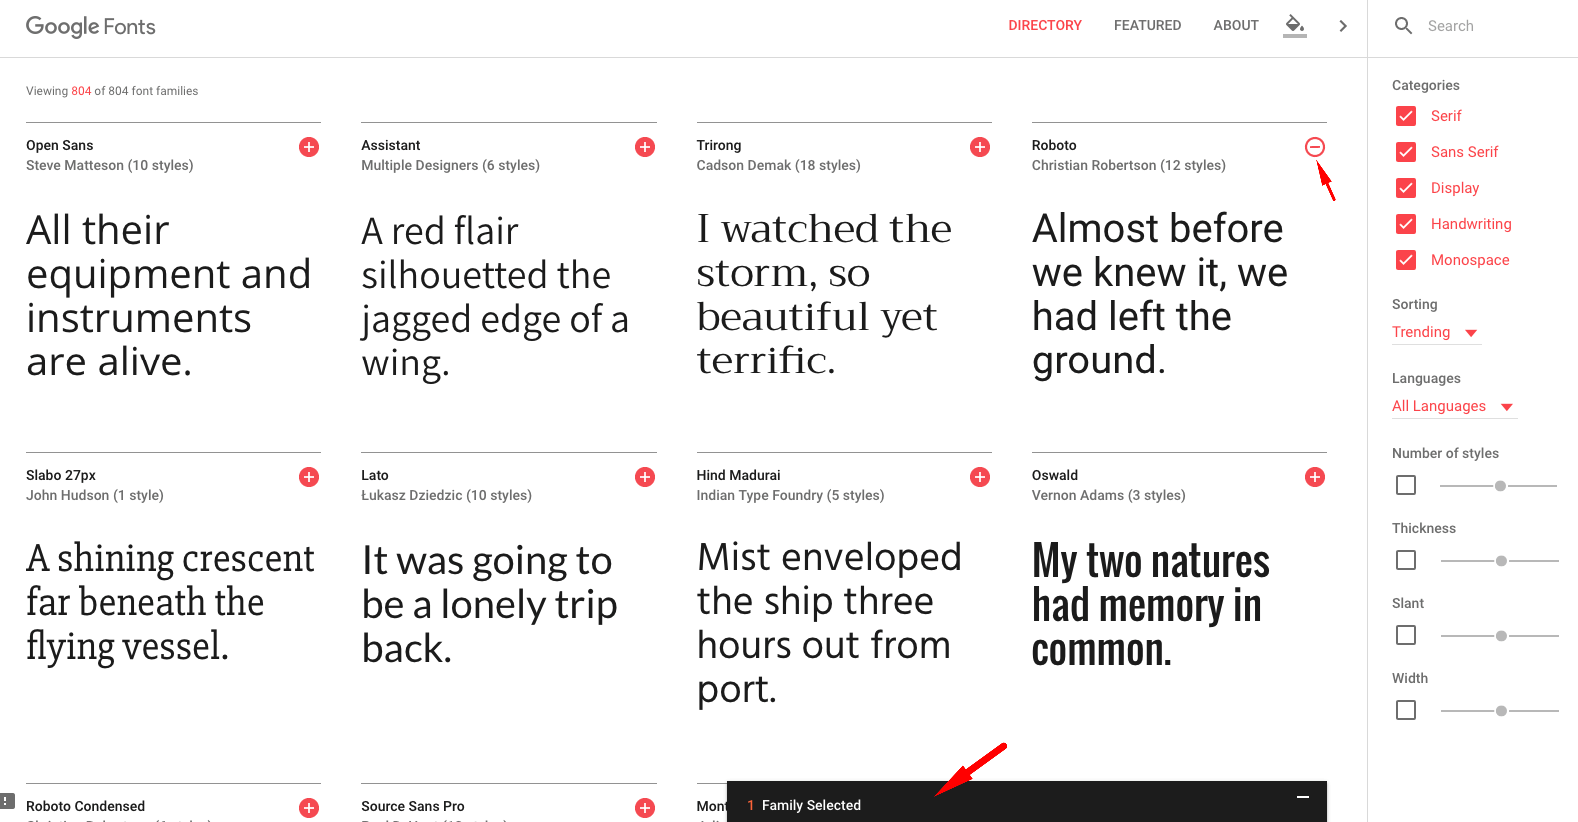
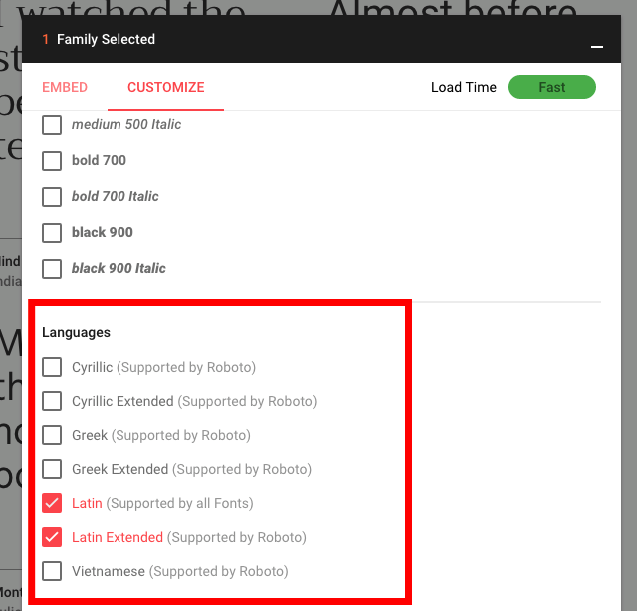
Don't forget to check "customize" tab. You may need to check some boxes on this section.
You also can change the default font sizes from this theme settings section.
Color Scheme - Theme Settings
You can change default color scheme of the theme from this section easily.
Woocommerce - Theme Settings
Sportix is fully compatible with Woocommerce.
- Shop Subtitle
- Default subtitle of Woocommerce pages (Optional).
- Remove Sidebar
- To remove sidebar from Woocommerce pages, switch on.
- Product layout
- Default page layout of Woocommerce pages. If you want to select hree or four columns, we suggest you to remove sidebar.
- Product Thumbnail Size
- Default size of the product thumbnail images.
- Single Product Image Size
- Default size of the single product images (slider images).
- Single Product Image Column Size
- The width of the image container in percents.
- Placeholder Image
- If a product has no image, this placeholder image will displayed.
- Shop page show at most
- Maximum number of the products on Woocommerce pages (Shop,archive etc.).
- Remove Related Products
- To remove related products from single product pages, switch on.
- Remove Social Sharing Buttons
- There are social sharing buttons at the bottom of the single product pages. To remove them, switch on.
BuddyPress - Theme Settings
Sportix is fully compatible with BuddyPress.
- BuddyPress default profile cover image
- Default cover image on member profile pages. Recommended image size is 1320x340px.
- Disable profile cover image
- To disable profile cover image feature, switch on.
- BuddyPress default group cover image
- Default cover image on group pages. Recommended image size is 1320x340px.
- Disable group cover image
- To disable group cover image feature, switch on.
- Disable all members activity
- To disable all members activity tab on activity pages, switch on.
SiteOrigin CSS Editor
If you want more control over your website design, we suggest you to use SiteOrigin CSS plugin.
SiteOrigin CSS is the simple, yet powerful CSS editor for WordPress. It gives you visual controls that let you edit the look and feel of your site in real-time.
3 - SportsPress
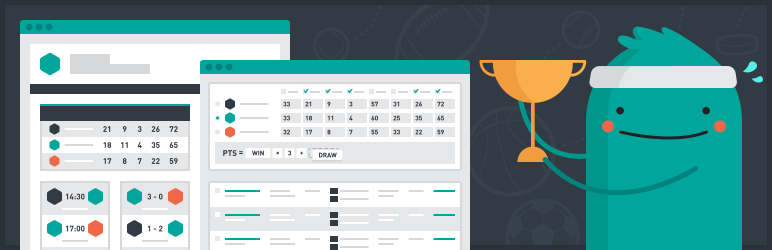
Sportix is fully compatible with SportsPress .You can transform your website into a fully configurable team, club, or league website. Features a suite of sports tools including fixtures, results, automated standings, players rankings, and individual profiles for clubs, players, and staff.
Before starting to use SportsPress, we recommend you to read the articles on the plugin's knowledge base;
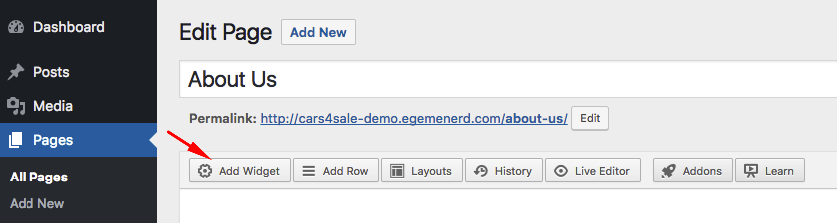
4 - Page Builder
You should install/activate following plugins to use the page builder and all available widgets to build your pages;
Sportix Features (It is in "plugins" folder)
Siteorigin Page Builder
Page Builder by SiteOrigin is the most popular page creation plugin for WordPress. It makes it easy to create responsive column based content, using the widgets you know and love. Your content will accurately adapt to all mobile devices, ensuring your site is mobile-ready.
Please read the Page Builder Documentation
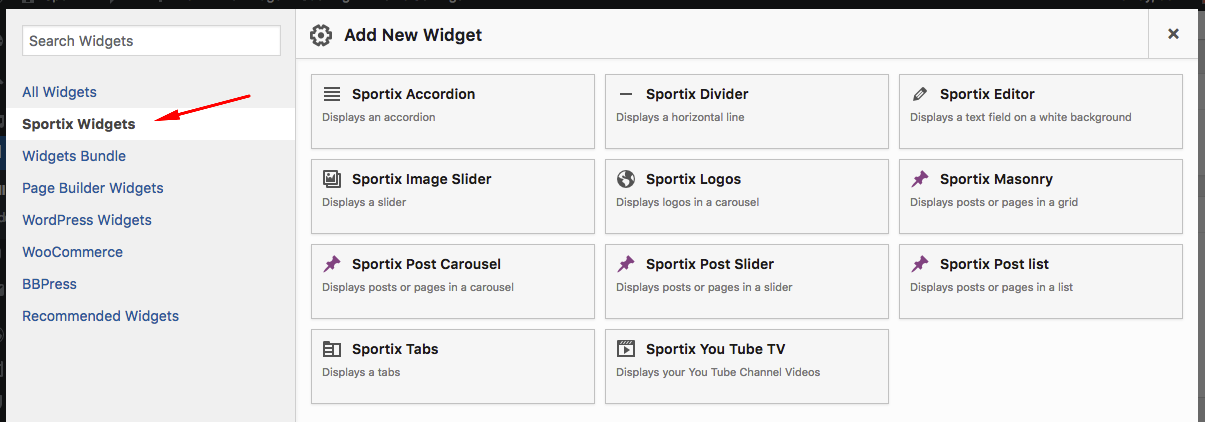
Sportix Widgets - Page Builder
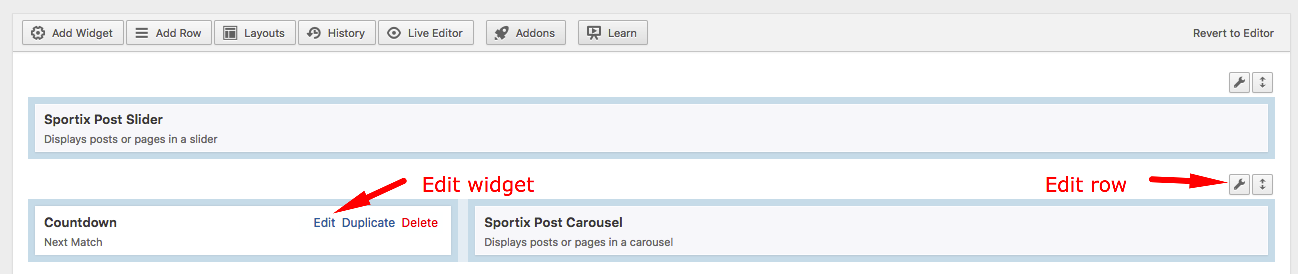
Click add widget button;
Click "Sportix Widgets" to see all available widgets in the Sportix Features plugin.
Post Selector
Post Selector allows you to select pages, posts, products, clubs, players etc. from your database easily to display in the following listing widgets;
Click "Select Posts" to open the panel.

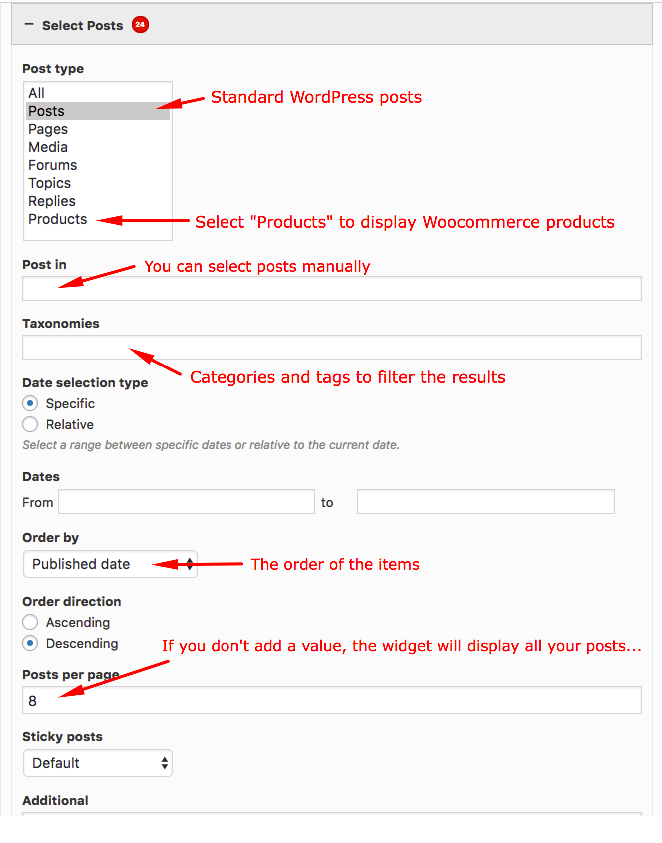
- Post Type: As default the widget displays only blog posts. It is possible to display products (Woocommerce), matches, clubs, players, staff (SportsPress), pages or other WordPress custom post types with this setting.
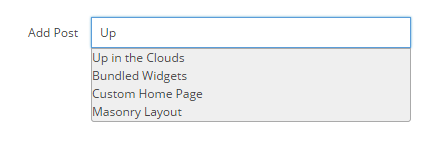
- Post In: Here is where you will enter the Post ID’s you wish to include in your widget. If you do not know the ID’s you can click on the "Select Posts" button to open the Select Posts dialogue and search for the posts.
- Taxonomies: Here is where you specify any custom taxonomies.
- Order By: Click on the drop down menu to specify how to order posts within the post carousel. The default order is “By Include Order” meaning as they were added when they were selected. Click on the round arrow icon to specify descending or ascending.
- Posts Per Page: Set the number of selected posts you wish to display in the widget by adjusting the value in the Posts Per Page field.
-
Leaving the Posts Per Page field set to Zero will display all the posts.
Sportix Masonry
This widget displays posts, pages or any custom post type in a grid layout.
Sportix Post Carousel
This widget displays posts, pages or any custom post type in a carousel.
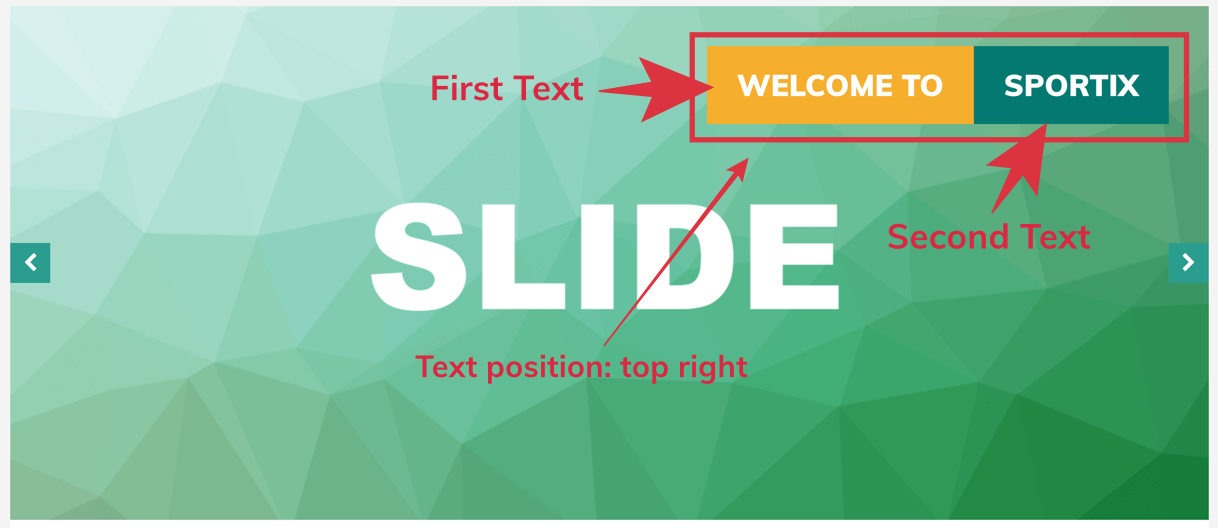
Sportix Post Slider
This widget displays posts, pages or any custom post type in a slider.
Sportix Post List
This widget displays posts, pages or any custom post type in a list.
Sportix Accordion
Displays an accordion. It is the widget version of accordion shortcode
Sportix Tabs
Displays a tabs. It is the widget version of tabs shortcode
Sportix Editor
Displays a rich text field on a white background.
Sportix Divider
Displays a horizontal line. It may be useful for adding space between rows or widgets.
Sportix Image Slider
You can create an image slider with this widget easily.
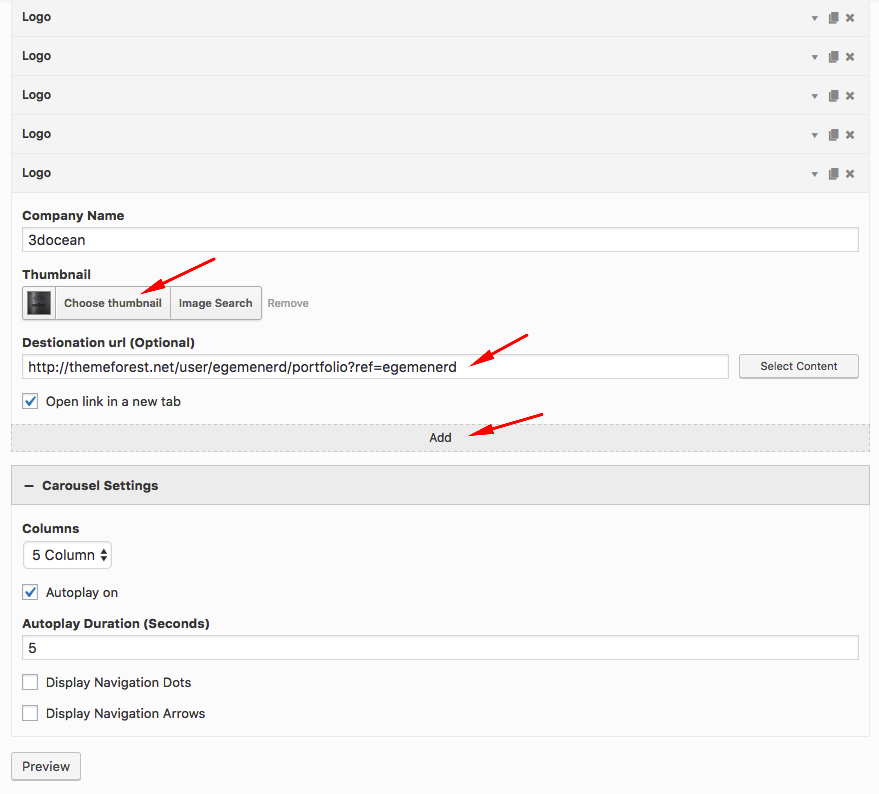
Sportix Logos
You can use this widget to add a logo carousel for your partners or sponsors.
Sportix YouTube TV
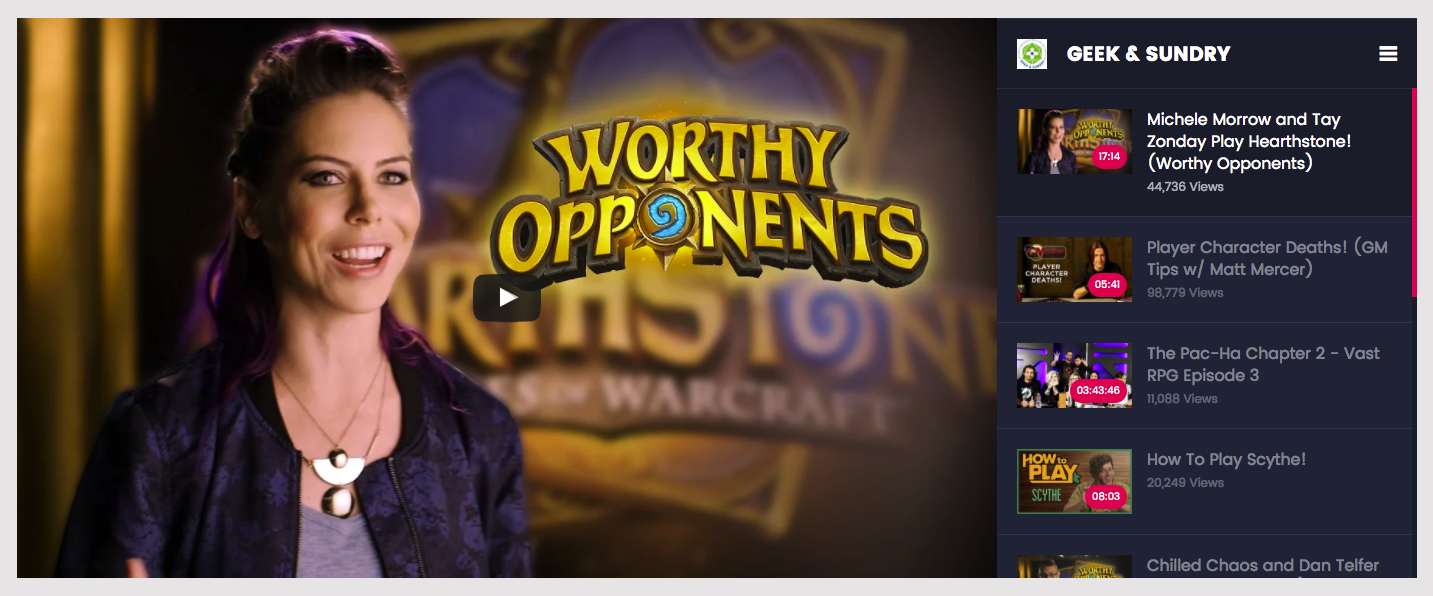
YouTube TV displays recent videos and playlists from any selected YouTube channel.

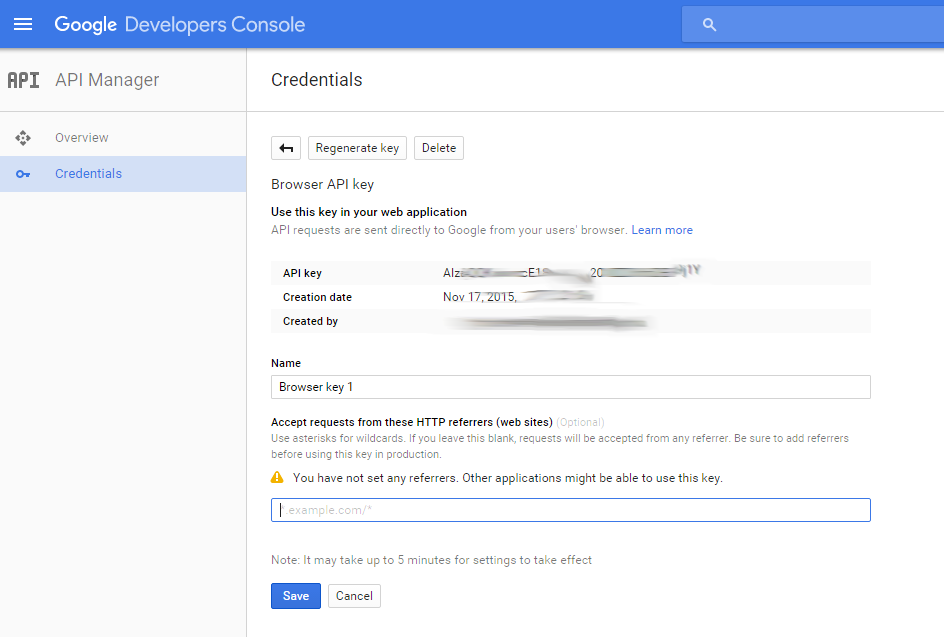
- API KEY (REQUIRED)
- To use YouTube TV first of all you have to obtain an API Key from Google's Developer Console.
- To obtain your API Key you can follow this guide using steps 1 to 3;
- Getting Started with the YouTube Data API
- Then:
- 4. under APIs & auth > Credentials > Create new Key > (Select) Browser Key
- 5. (Recommended) Set any referrers to your domain to prevent unauthorized use of your key.
- 6. (Optional) Additionally disabling any other unused APIs that are enabled.
- YouTube Username
- By visiting the intended channel's Youtube home page. The URL should look like the following. Youtube username is "collegehumor";

- YouTube Channel ID
- Channel ID is the alternative of the username. You can enter channel id instead of username. "UCPDXXXJj9nax0fr0Wfc048g" is the id of the channel on the following example;

- Maximum number of the videos
- The number of the videos which you want to display on the right side of the slider.
- Activate Playlist
- If you activate this feature, your playlists will be displayed in the dropdown on the slider.
- Maximum number of the playlists
- The number of the playlists which you want to display in the dropdown.
- Height (px)
- Height of the slider. We suggest you to add YouTube TV into a fullwidth column and enter 560 to the height field.
Other Widgets - Page Builder
Siteorigin Widgets - Page Builder
There are a lot of widget in Siteorigin Widgets Bundle plugin. For more information, please visit the plugin documentation page;
Google Maps Widget
Mailchimp Sign-up Form - Page Builder
To use this widget, you should upload/activate Mailchimp for WordPress plugin.

Sidebar
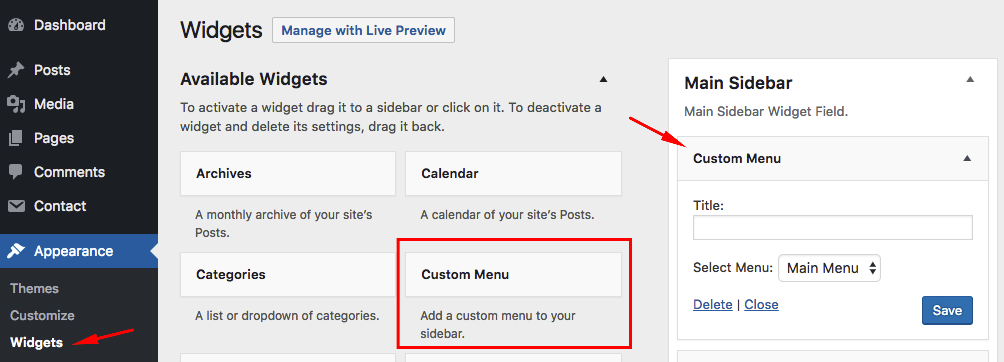
You can add widgets to the widget fields from Appearance->Widgets page. Default WordPress widget screen is like the following;
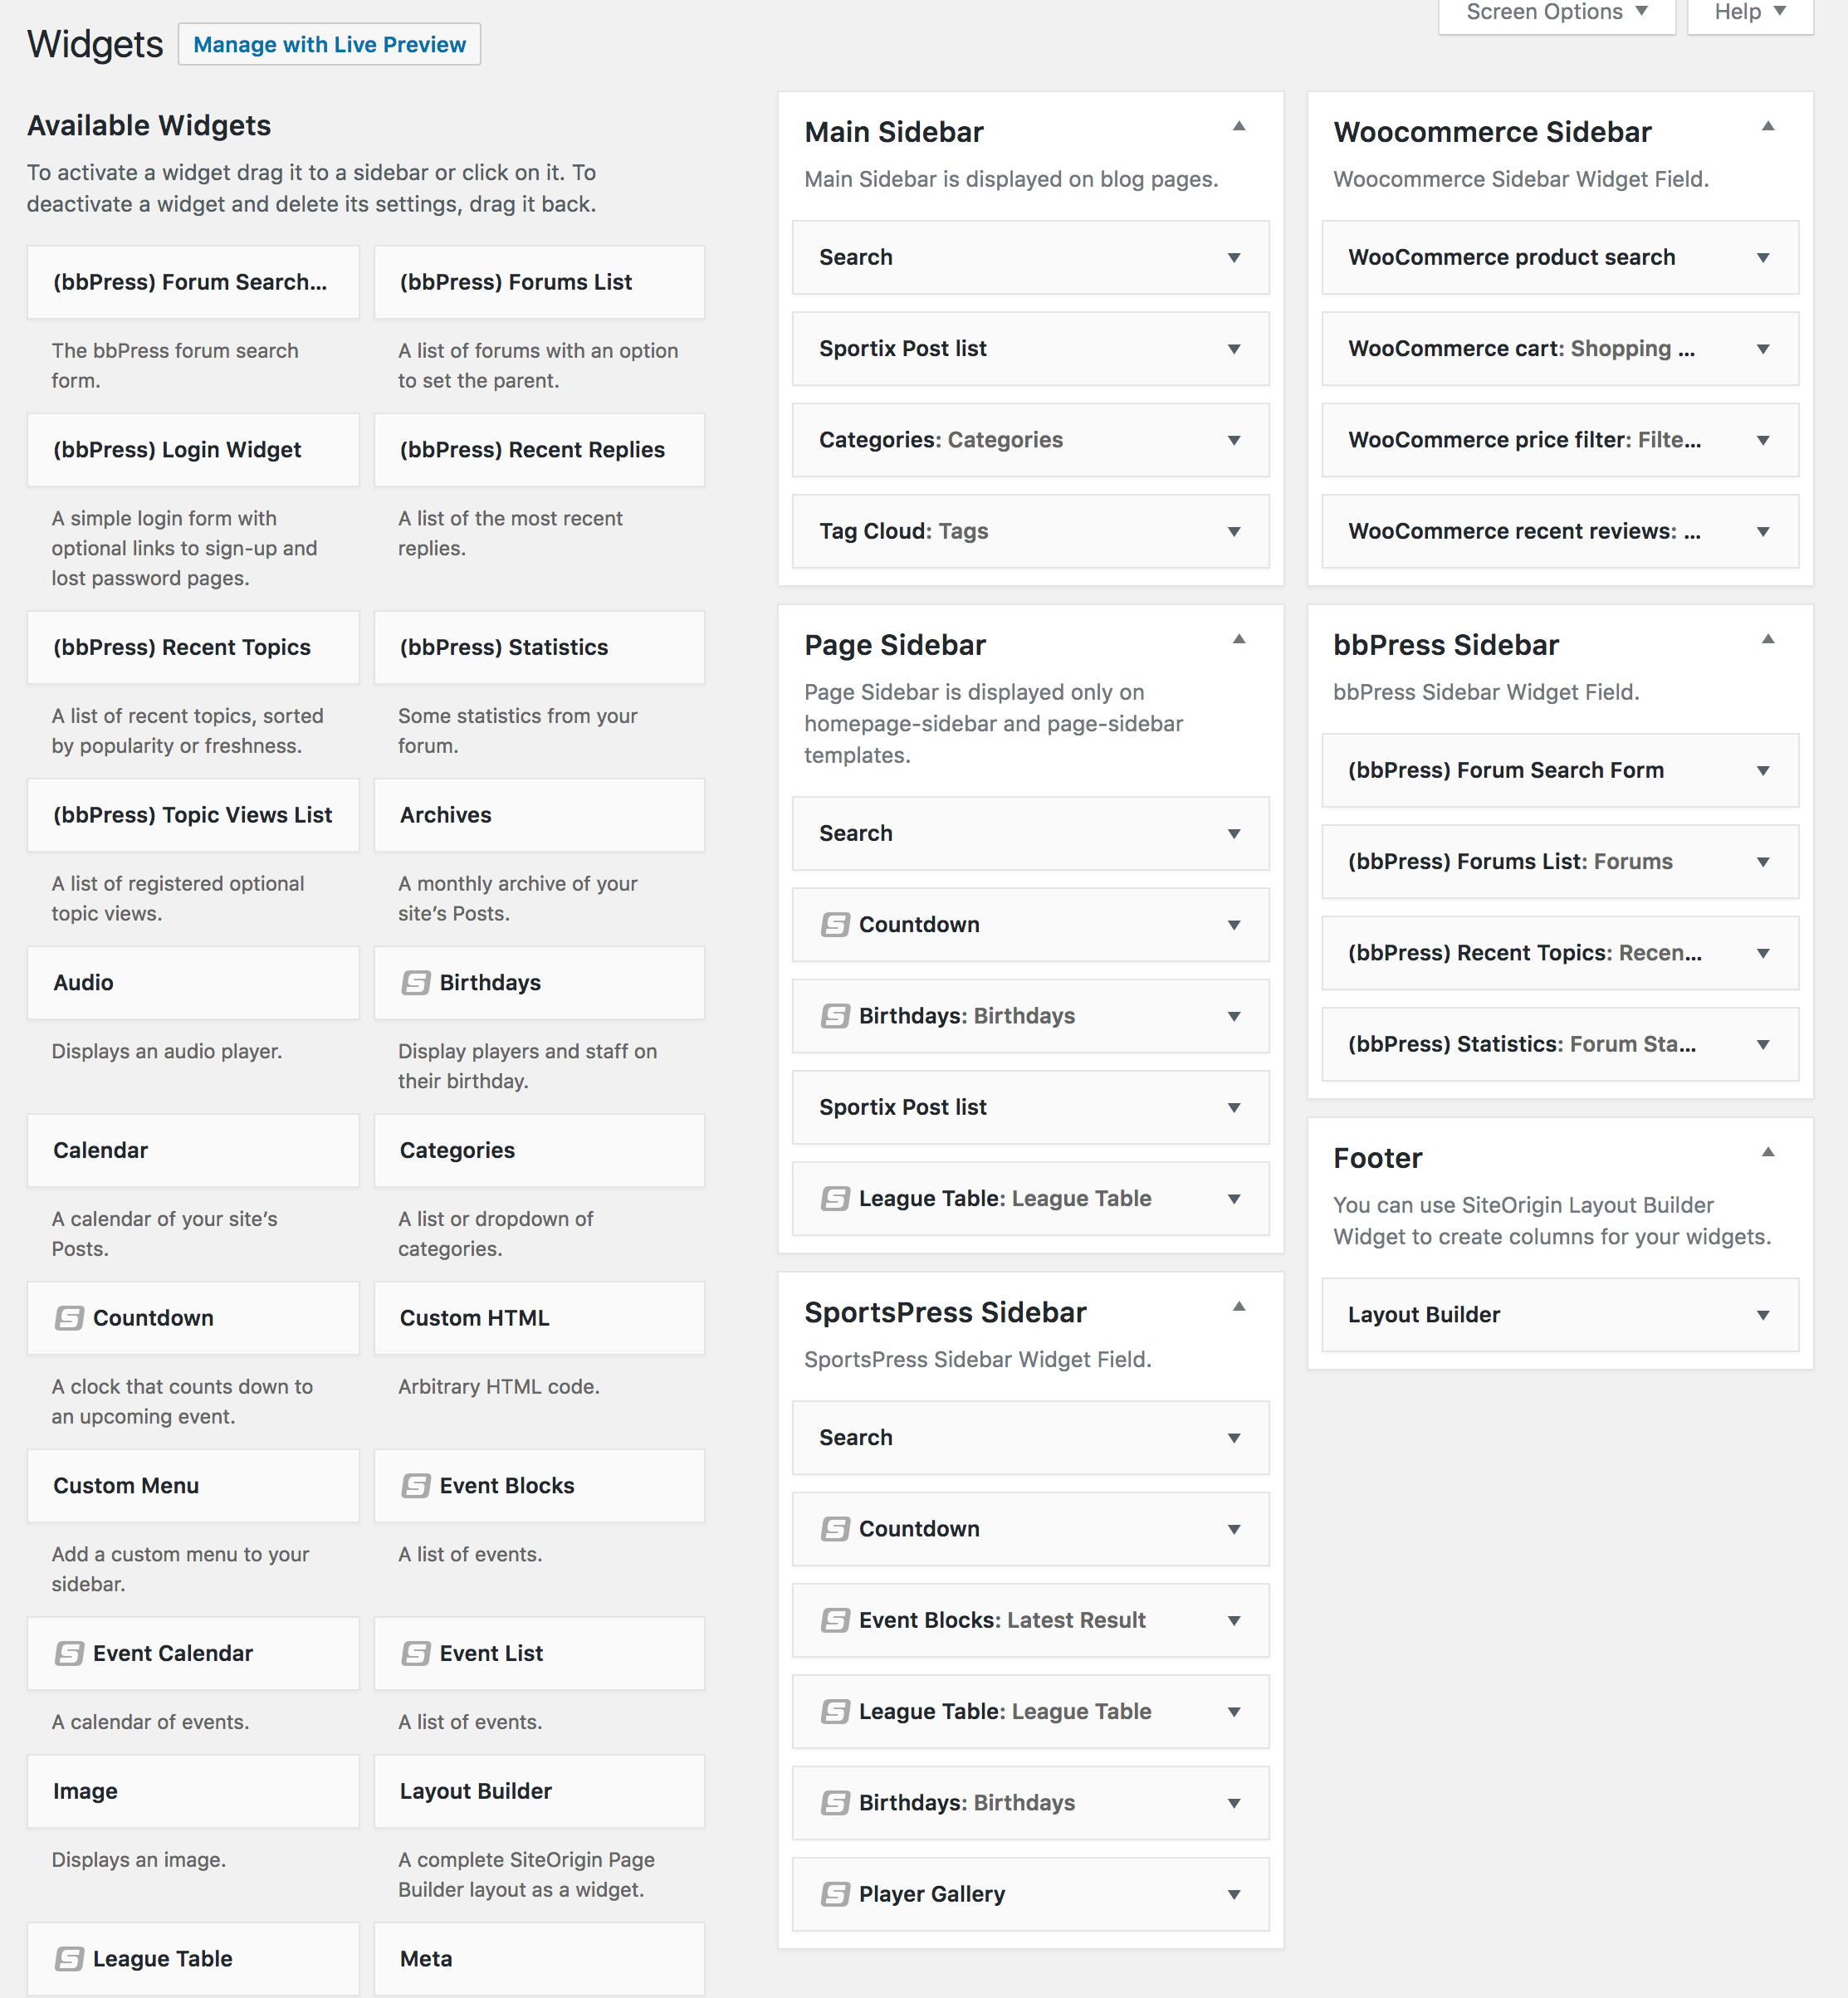
There are 6 widget field in Sportix.
- Main Sidebar
- This field is displayed in blog pages (and in "Homepage - Blog (Main) Sidebar" page template).
- Page Sidebar
- This field is displayed only in "Homepage - Page Sidebar" and "Page - Sidebar" page templates.
- SportsPress Sidebar
- This field is displayed only in SportsPress pages (SportsPress plugin is required).
- Woocommerce Sidebar
- This field is displayed on all of your Woocommerce pages which have sidebar field (Woocommerce plugin is required).
- bbPress Sidebar
- This field is displayed only in bbPress forum pages (bbPress plugin is required).
- Footer
- This field is displayed in the footer. You can use "Layout Builder" widget to create multiple columns.
Custom Sidebars
If you want to create individual sidebars for your posts,pages,BuddyPress pages etc. , you can upload/activate Custom Sidebars plugin.
Click here to download the plugin
Custom Sidebars allows you to display custom widget configurations on any page, post, category, post type, or archive page.
How to create sidebars
To Create a New Custom Sidebar, click on the blue button labeled Create a new sidebar located at the top of the page.
You’ll be asked to give your sidebar a name and an optional description. These details will help you keep track if you create multiple sidebars.
Once you’ve added your sidebar, you can start interacting with it just as you would any regular sidebar in your admin.
Simply drag across widgets you want to use from the left side of the screen into the sidebar. Then you can toggle each widget into edit mode to play around with its customization options.
Setting Up a Custom Sidebar for a Post or Page
First, make sure that your theme’s default sidebar (the one under the Theme Sidebars column) has the box checked for the option to allow the sidebar to be replaced.
If you don’t see this, scroll down to the very bottom of your screen and you should see the option labeled Allow this sidebar to be replaced at the very end, directly beneath all the widgets included in that sidebar.
This checkbox is important because it gives the plugin permission to swap out your theme’s original sidebar for your custom sidebars.
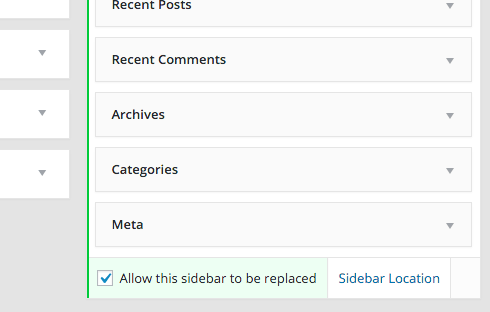
You can leave this unchecked if you’re in the process of building your custom sidebars and setting up their display options but don’t want them published live on your site just yet. Just make sure you remember to check the box when you’re going live.
If you have a very specific post or page where you want your custom sidebar to show up in place of the theme’s original sidebar, navigate to that edit page in your admin and look for a new option labeled Sidebars to the right of the visual/text editor. This should show up somewhere beneath the Tags box.
This new option gives you a handy menu of your existing sidebars and lets you select your option. Select the sidebar you want to show up for that post or page, click to update it, and it should be visible on the page.
Setting Up a Custom Sidebar for Categories, Post Types, and Archives
It’s reassuring to know you have the option of using a custom sidebar on any individual page or post you want. If you want to set up a sidebar on larger groups of pages, however, trying to get all that done by editing each individual page will be painful.
In this case, you can take advantage of using the plugin with some of WordPress’s most common classifications such as categories, post types, and even your archived content.
To assign a custom sidebar to larger groupings of pages, you need to head back into Appearance > Widgets and click the option on your custom sidebar labeled Sidebar Location. From here, you can define where you want sidebars to appear by matching the selected criteria.
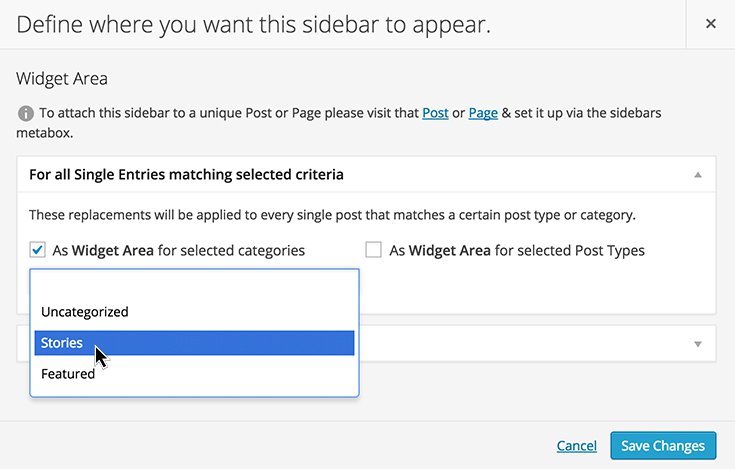
For categories: Select the As Sidebar for selected categories checkbox. A list of your categories will appear for you to choose from.
For your archives, you have two different options to replace the theme sidebar:
- Set the custom sidebar to appear on archived posts and pages according to type. This includes post index, front page, search results, tag archives, date archives, and other types.
- Set your custom sidebar to appear on archived posts or pages included in certain categories.
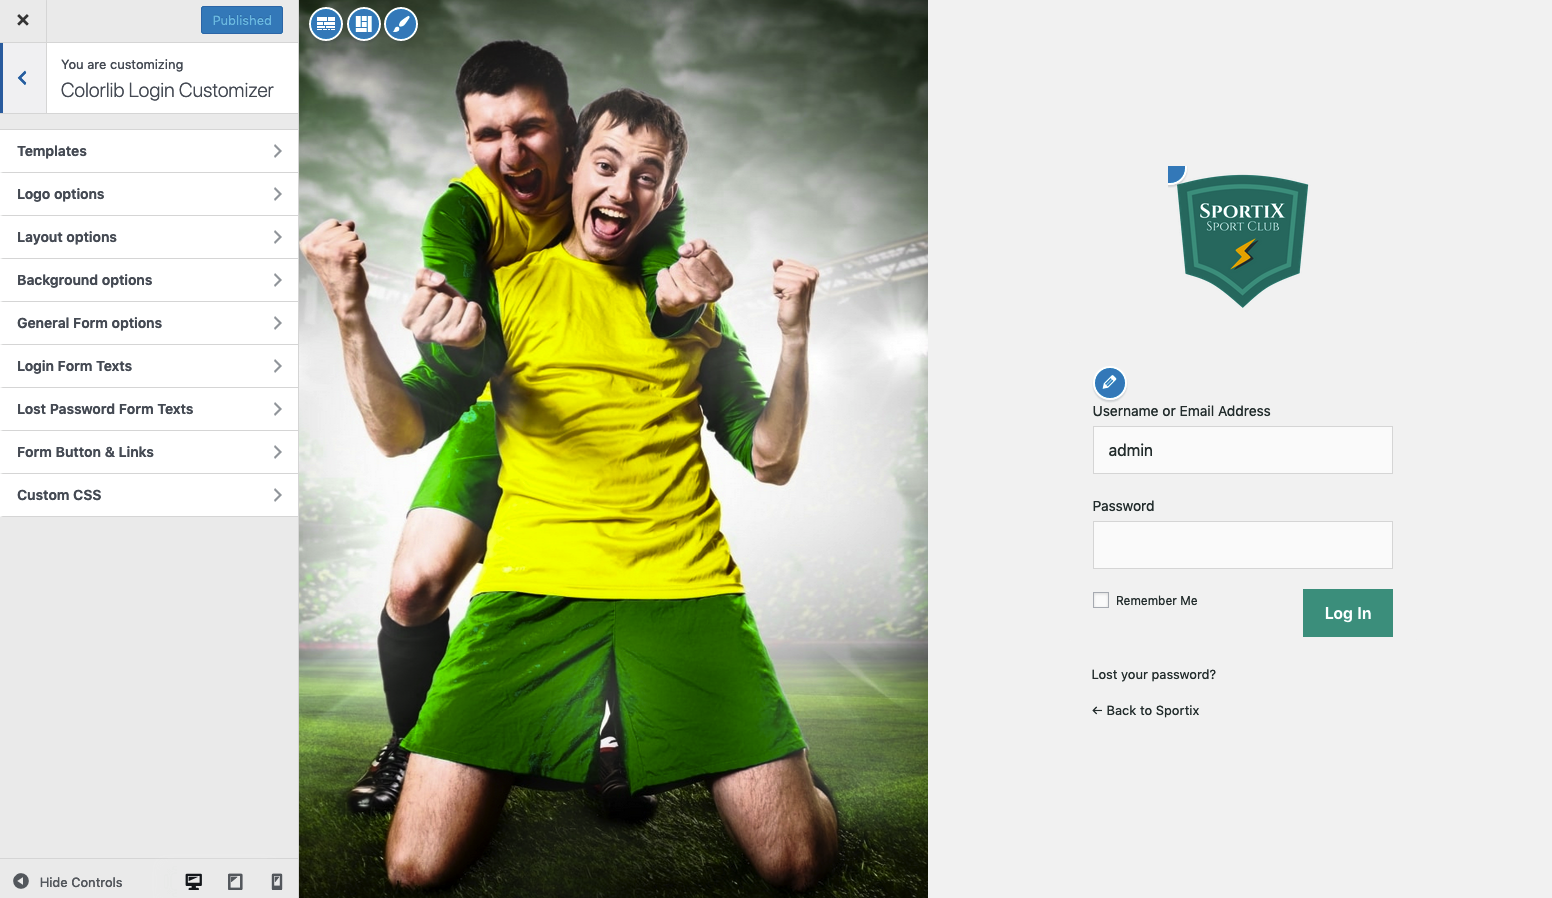
Custom Login Page
You can create a custom login page with the following free plugin;
Click here to download the plugin
You can change plugin settings from Appearance -> Customize -> Colorlib Login Customizer.
6 - Compatibility
Sportix is compatible with the following plugins;
SportsPress - Compatibility
Transform your WordPress blog into a fully configurable team, club, or league website. Features a suite of sports tools including fixtures, results, automated standings, players rankings, and individual profiles for clubs, players, and staff.
SportsPress Extentions - Compatibility
SiteOrigin Page Builder - Compatibility
Linear page layouts are limiting when you’re trying to express a detailed idea. With SiteOrigin’s Page Builder, you can create columized page layouts populated with the widgets and themes you know and love. Its drag and drop interface is so easy to learn, that you'll be up and running in no time.

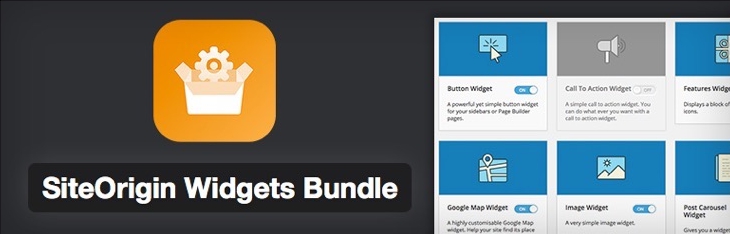
SiteOrigin Widgets Bundle - Compatibility
The SiteOrigin widget bundle gives you a collection of widgets that you can use and customize. All the widgets are built on our powerful framework, giving you advanced forms, unlimited colours and 1500+ icons.
Woocommerce - Compatibility
WooCommerce is a free eCommerce plugin that allows you to sell anything, beautifully. Built to integrate seamlessly with WordPress, WooCommerce is the world’s favorite eCommerce solution that gives both store owners and developers complete control.
bbPress - Compatibility
bbPress is forum software, made the WordPress way.

BuddyPress - Compatibility
BuddyPress helps site builders and WordPress developers add community features to their websites, with user profile fields, activity streams, messaging.

Custom Sidebars allows you to display custom widget configurations on any page, post, category, post type, or archive page.

Contact Form 7 - Compatibility
Contact Form 7 can manage multiple contact forms, plus you can customize the form and the mail contents flexibly with simple markup. The form supports Ajax-powered submitting, CAPTCHA, Akismet spam filtering and so on.
Mailchimp for WordPress - Compatibility
MailChimp for WordPress, the absolute best. Subscribe your WordPress site visitors to your MailChimp lists, with ease.
SiteOrigin CSS - Compatibility
If you want more control over your website design, we suggest you to use SiteOrigin CSS plugin. SiteOrigin CSS is the simple, yet powerful CSS editor for WordPress. It gives you visual controls that let you edit the look and feel of your site in real-time.
Autoptimize - Compatibility
Autoptimize speeds up your website and helps you save bandwidth by aggregating and minimizing JS, CSS and HTML.
Optimus - Compatibility
Effective image compression and optimization during the upload process. Automatic and without loss of quality.

7 - Support
Beginner's Guide to WordPress
If you are not an experienced WordPress user, I suggest you to start from this free course. After taking this free course you'll be completely comfortable with installing WordPress, adding new content, customising WordPress themes, using WordPress plugins, and managing existing blogs or websites.
Help Documentation
Many support queries and technical questions will already be answered in this documentation. So please take the time to read through all the sections.
Knowledge Base
Your question may already be answered in the knowledge base...
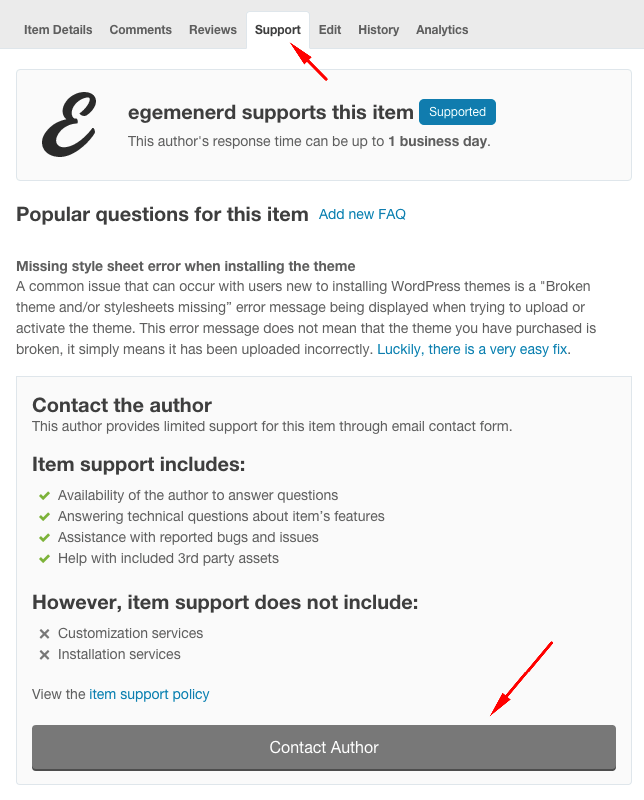
Item Support
Item support is a service provided by many authors on ThemeForest and CodeCanyon.
What's included in item support
Answering questions about how to use the item
Answering technical questions about the item (and included third party assets)
Help with defects in the item or included third party assets
Item updates to ensure ongoing compatibility and to resolve security vulnerabilities
What's NOT included in item support
Item customization
Installation of the item
Hosting, server environment, or software
Where can I get the item support?
Item support is a service provided by many authors on ThemeForest and CodeCanyon.
Credits
We've used the following scripts and other files as listed;
Footer Icons - General