Help Documentation
Sporty Wordpress Theme
Thank you for purchasing our theme ! Please take the time to read through the following sections before asking for support. As many support related questions can be answered simply by re-reading the documentation.
 Envato
 Facebook
 Behance
First Steps
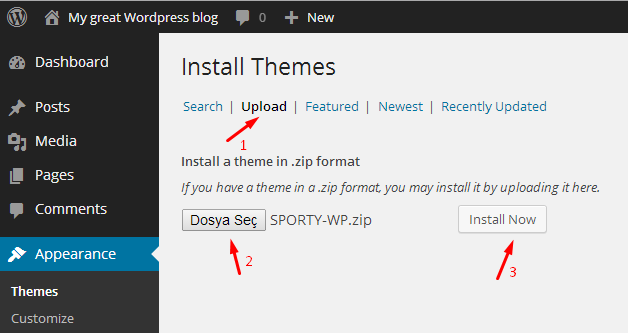
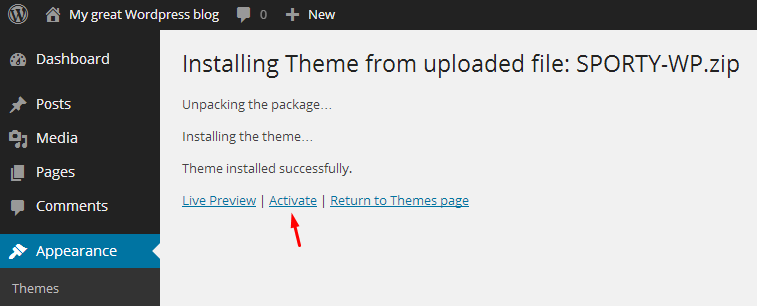
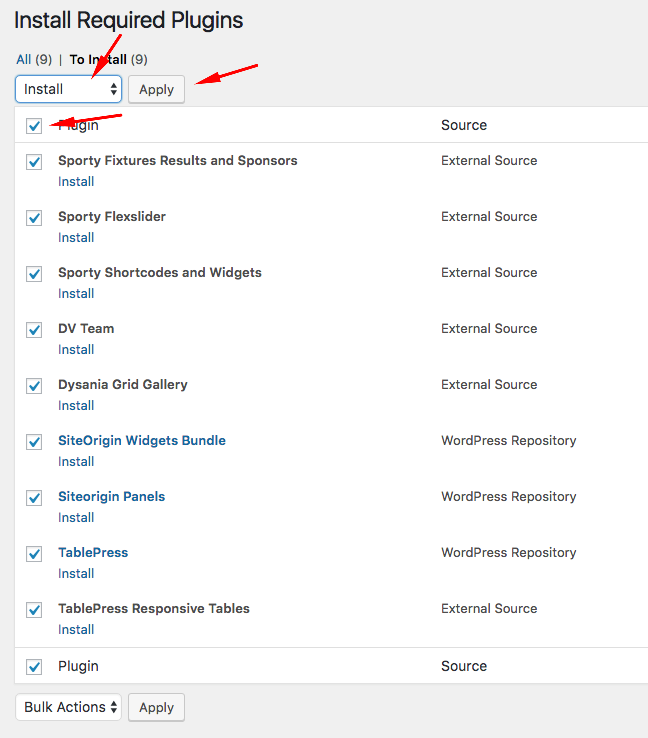
Installation
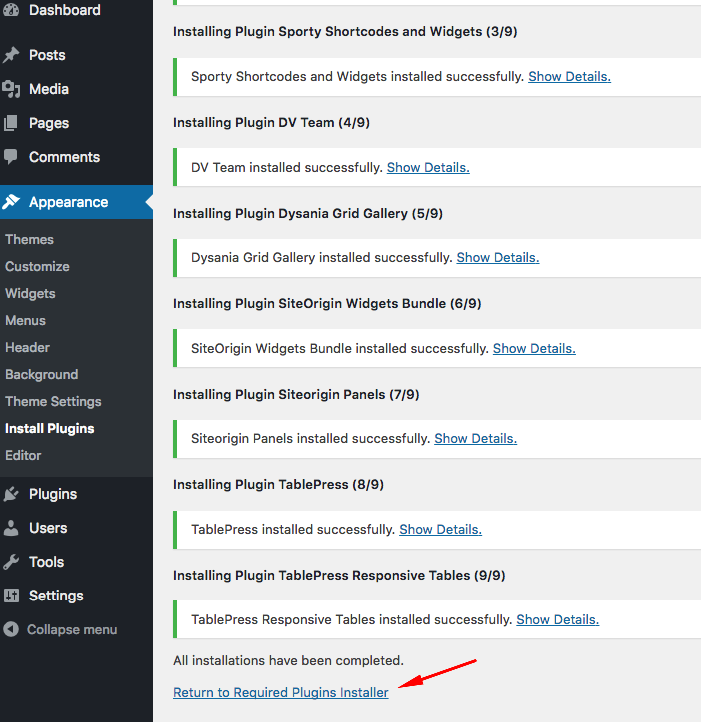
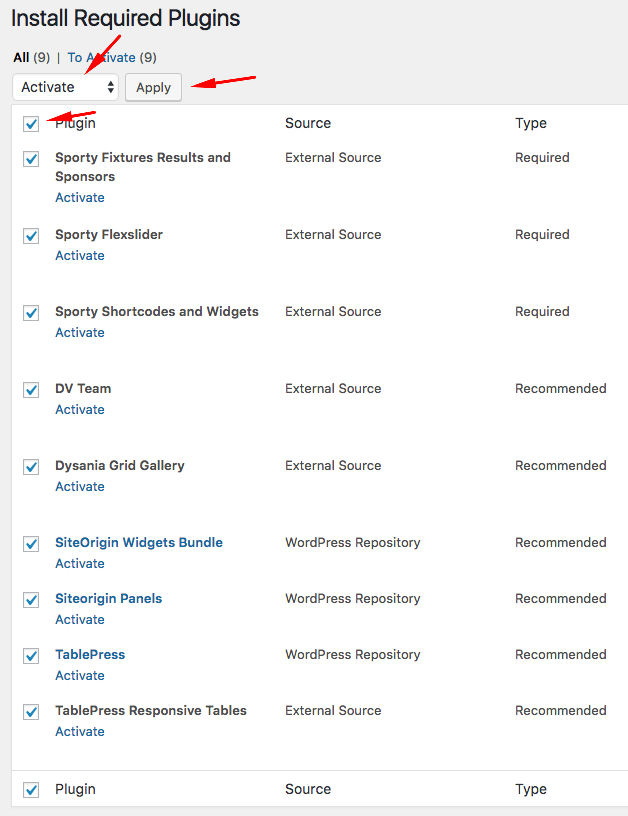
If you want to use all features of SPORTY (Custom post types,shortcodes,widgets...etc), you should upload and activate the required plugins. After the installation of the theme, you will see a message about required plugins. Click "Begin Installing Plugins", install the plugins and activate them.
Note: You can also find these plugins in your theme folder in "plugins" folder.

Loading Demo Content - First Steps
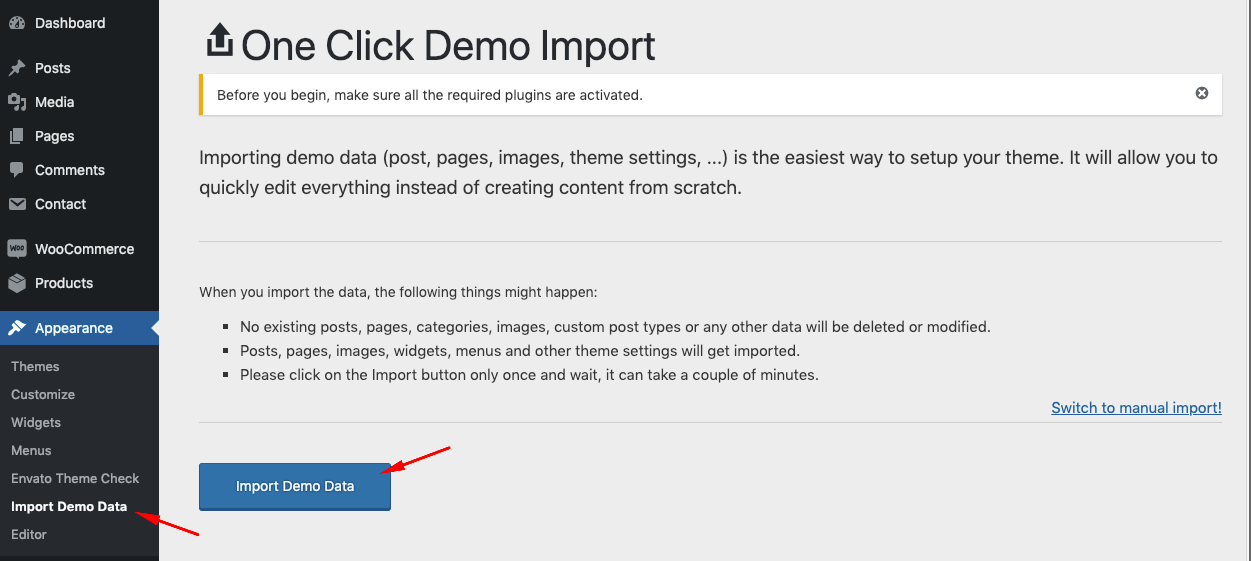
Go to Appearance->Import Demo Data and click on the Import button only once and wait, it can take a couple of minutes.
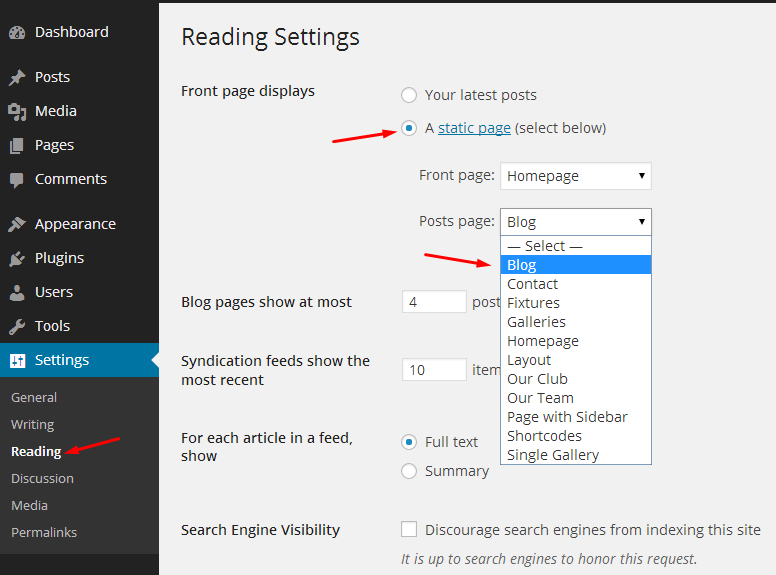
Selecting Front Page
First of all you should create a static page (select a homepage template).
After that go to Settings->Reading and select in the drop-down box a this page for the front page display.
For more information about page templates, click here...


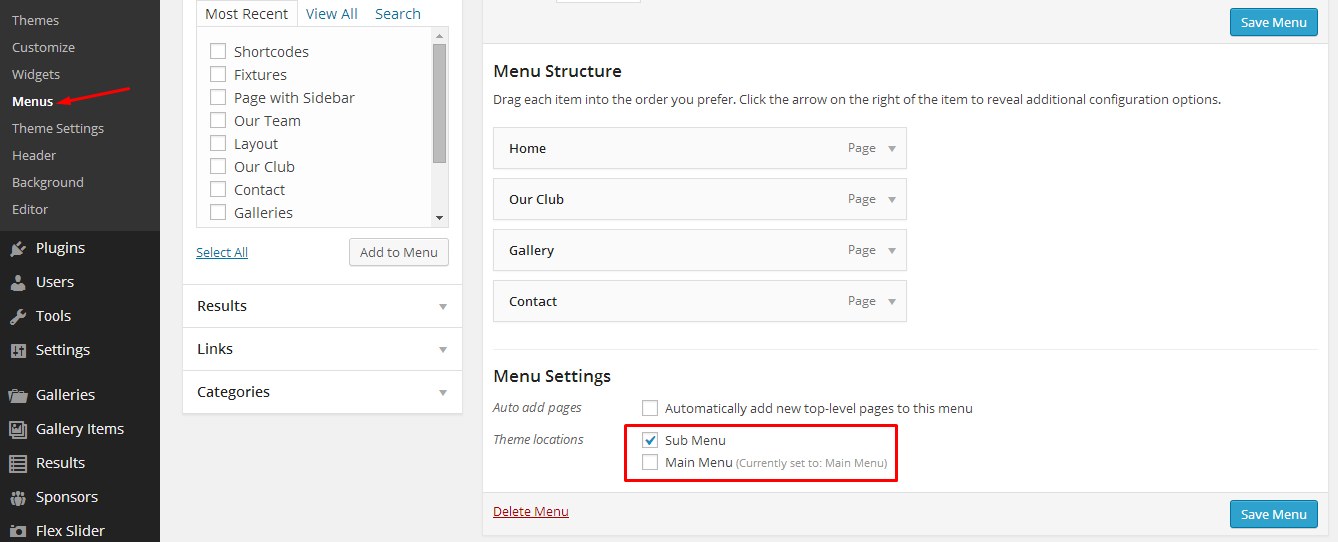
Menus
Sporty-WP supports 2 Wordpress custom menu.You can create your menu from Appearance->Menus page.
After creating your menus, you should manage your menu locations.
For more information about Wordpress menus click here
Note: Sub Menu doesn't supports 2,3 etc. level menus. If you don't want to use Sub menu, you can disable it at Appearance->Theme Settings->General.

Logo, Site Title and Tagline
Sporty-WP supports Wordpress custom header feature. You can add your logo from Appearance->Header.
Default logo size is 143x143 px.
You can change the site title and the tagline from Settings->General
If you don't want to use site title field, you can hide it from Appearance->Theme Settings->General->Hide Header Text.
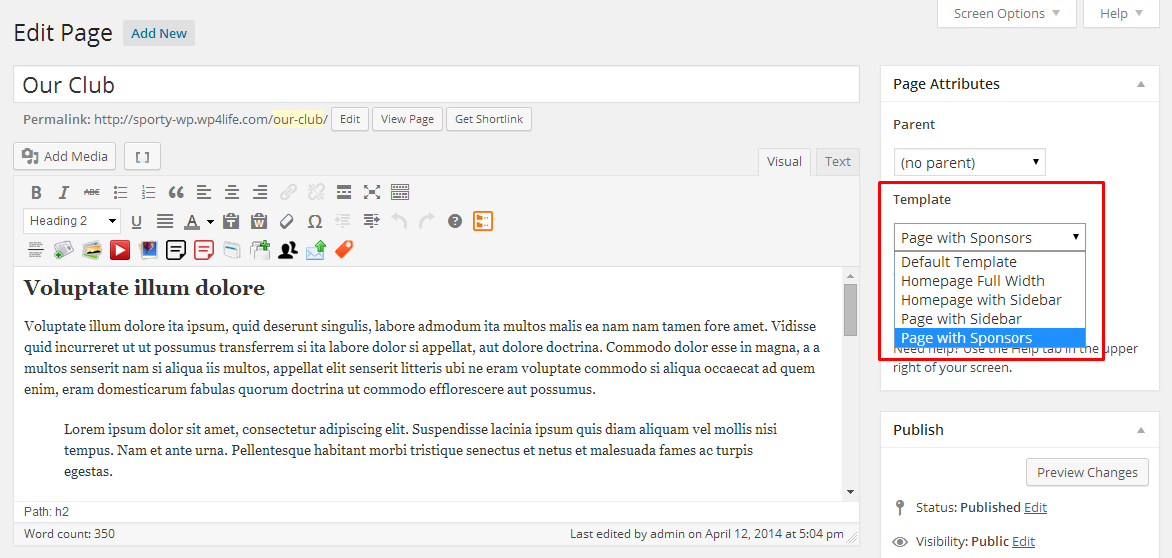
Page Templates
Homepage Templates
Homepage templates contains sliders, latest results box and sponsors box.
You can use YouTube templates to display your YouTube videos as a slider.
Other Templates
Default Template: Default page template is a full width page template.
Page with Sidebar: There is a sidebar field on this page template. You can add widgets to that field at Appearance->Widgets->Page Sidebar.
Page with Sponsors: There is a sponsors carousel in this page template.
Page with Sponsors - Sidebar: There is a sponsor carousel and a sidebar in this page template.
Played Matches: Displays all played matches like a blog page.
Upcoming Matches: Displays all upcoming matches like a blog page.
Blog Grid: Displays all your blog posts in a grid.
You can add featured images to all these page templates. How to add featured image?
How to create a blog page?
To create a blog page, create a blank page. After that go to Settings->Reading and select in the drop-down box the name of the Page that will now contain your Posts. If you do not select a Page here, your Posts will only be accessible via other navigation features such as category, calendar, or archive links.
Theme Settings
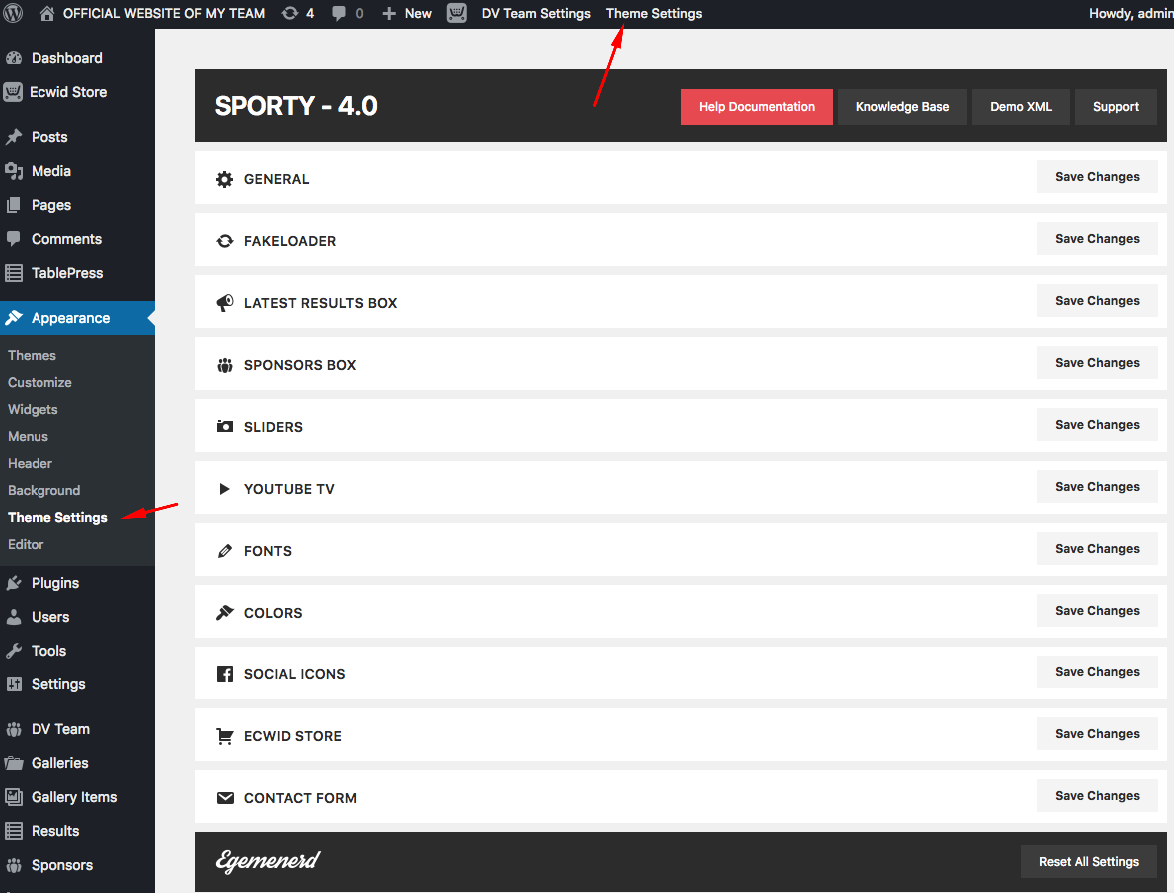
General
Custom Header Script: You can use this field to add custom scripts or styles like Google Analystics Tracking code. (Don't use this field to add texts...)
Logo Height: Default height of your logo.
Logo Position: There are 4 option; left, center, right, fullwidth. If you select Center, site title will be invisible. If you select Full Width, logo width will be 100% and height will be auto. This mode is suitable for large horizontal banners (For example 1024x200px).
Your Team Name: Add your team name to this field. Your team name will be used on fixtures,match results etc.
Background Image: Background Image of your website.
404 Page Image: Featured image of the 404 page.
Dropdown Menu Width: If you need more width on your main menu dropdown menus, you can change the width here.
Disable Menu Animation: There is a unique onhover animation on main menu. If you want to use a classic fade effect on main menu items instead of this animation, check this field.
Disable Sub Menu: If you don't need a sub menu, you can hide it.
Disable Tooltip: To disable date-time tooltip on fixture tables, check this box.
Hide Header Text: You can hide site title in the header.
Hide Featured Image: If you don't want to display featured images on single post pages, check this box.
Remove Meta Data: If you want to remove meta data (Author name, categories, tags) from single post pages, check this box.
Hide Footer Widget Area: There are 3 footer widget area on the Footer. If you don't want to use these fields, check this box.
Footer Text: You can add a copyright message to the bottom of your website.
Fakeloader
Disable Fakeloader: If you want to disable page loading animation, switch it off.
Time to hide: Time in milliseconds for fakeLoader disappear .
Spinner Style : CSS3 animation style
Background Color: The background color of the loading screen.
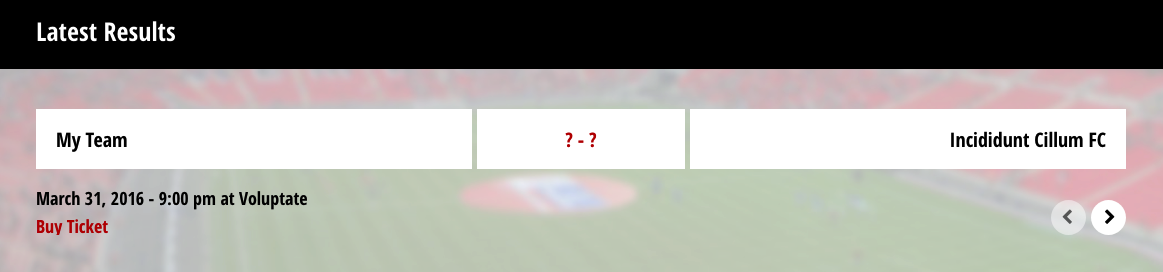
Latest Results Box
Latest Results box displays latest results.
Activate Latest Results Box: To activate latest results box box, check this box. To use this feature, you should also activate Sporty fixtures results and sponsors plugin and add at least one result.
Latest Results Box Title: If you dont want to add a title to latest results box, leave this field blank
Maximum Results: Maximum number of result to display.
Hide played matches: Don't display played matches.
Hide upcoming matches: Don't display upcoming (not played) matches.
Change date order: If you check this box, older matches will be displayed first. It may be useful if you want to display only upcoming matches.
Sponsors Box
Sponsor box displays your sponsor's logos.
Activate Sponsors Box: To activate sponsors box, check this box. To use this feature, you should also activate Sporty fixtures results and sponsors plugin and add at least one sponsor.
Sponsors Box Title: If you dont want to add a title to sponsors box, leave this field blank
Slide Width: You can change slide widths (px).
Min Slides: Minimum number of logo to display
Max Slides: Maximum number of logo to display
Slide Margin: Blank space between slides.
Infinite loop: To activate infinite loop, check this box.
Sliders
Disable Autoplay: As a default autoplay is active for homepage sliders. If you want te disable it,check this box.
Slider Autoplay Speed: You can change slide duration on autoplay mode here. Default value is 5 seconds.
Title Box: If you don't want to use title box, check this box.
Flexslider animation: There are two available slide animation. Slide and fade. Default Flexslider animation is slide. If you want to use fade animation, check this box.
ZeusSlider height: It is the height value of the Zeus Slider. You can use only numbers between 1 with 5. Default value is 2.5.
YouTube TV
Api Key (Required): To use YouTube TV first of all you have to obtain an API Key from Google's Developer Console.
To obtain your API Key you can follow this guide using steps 1 to 3;
Getting Started with the YouTube Data API
Then:
4. under APIs & auth > Credentials > Create new Key > (Select) Browser Key
5. (Recommended) Set any referrers to your domain to prevent unauthorized use of your key.
6. (Optional) Additionally disabling any other unused APIs that are enabled.
All available settings are at the Theme Settings page.
Username: YouTube Username
By visiting the intended channel's Youtube home page. The URL should look like one of the following.
Youtube username is "collegehumor" on the following example;

Channel ID: YouTube Channel ID
Channel ID is "UCPDXXXJj9nax0fr0Wfc048g" on the following example;

Max. Video Maximum number of the videos
Activate Playlist: To activate playlist dropdown, check this box
Max. Playlist: Maximum number of the playlists
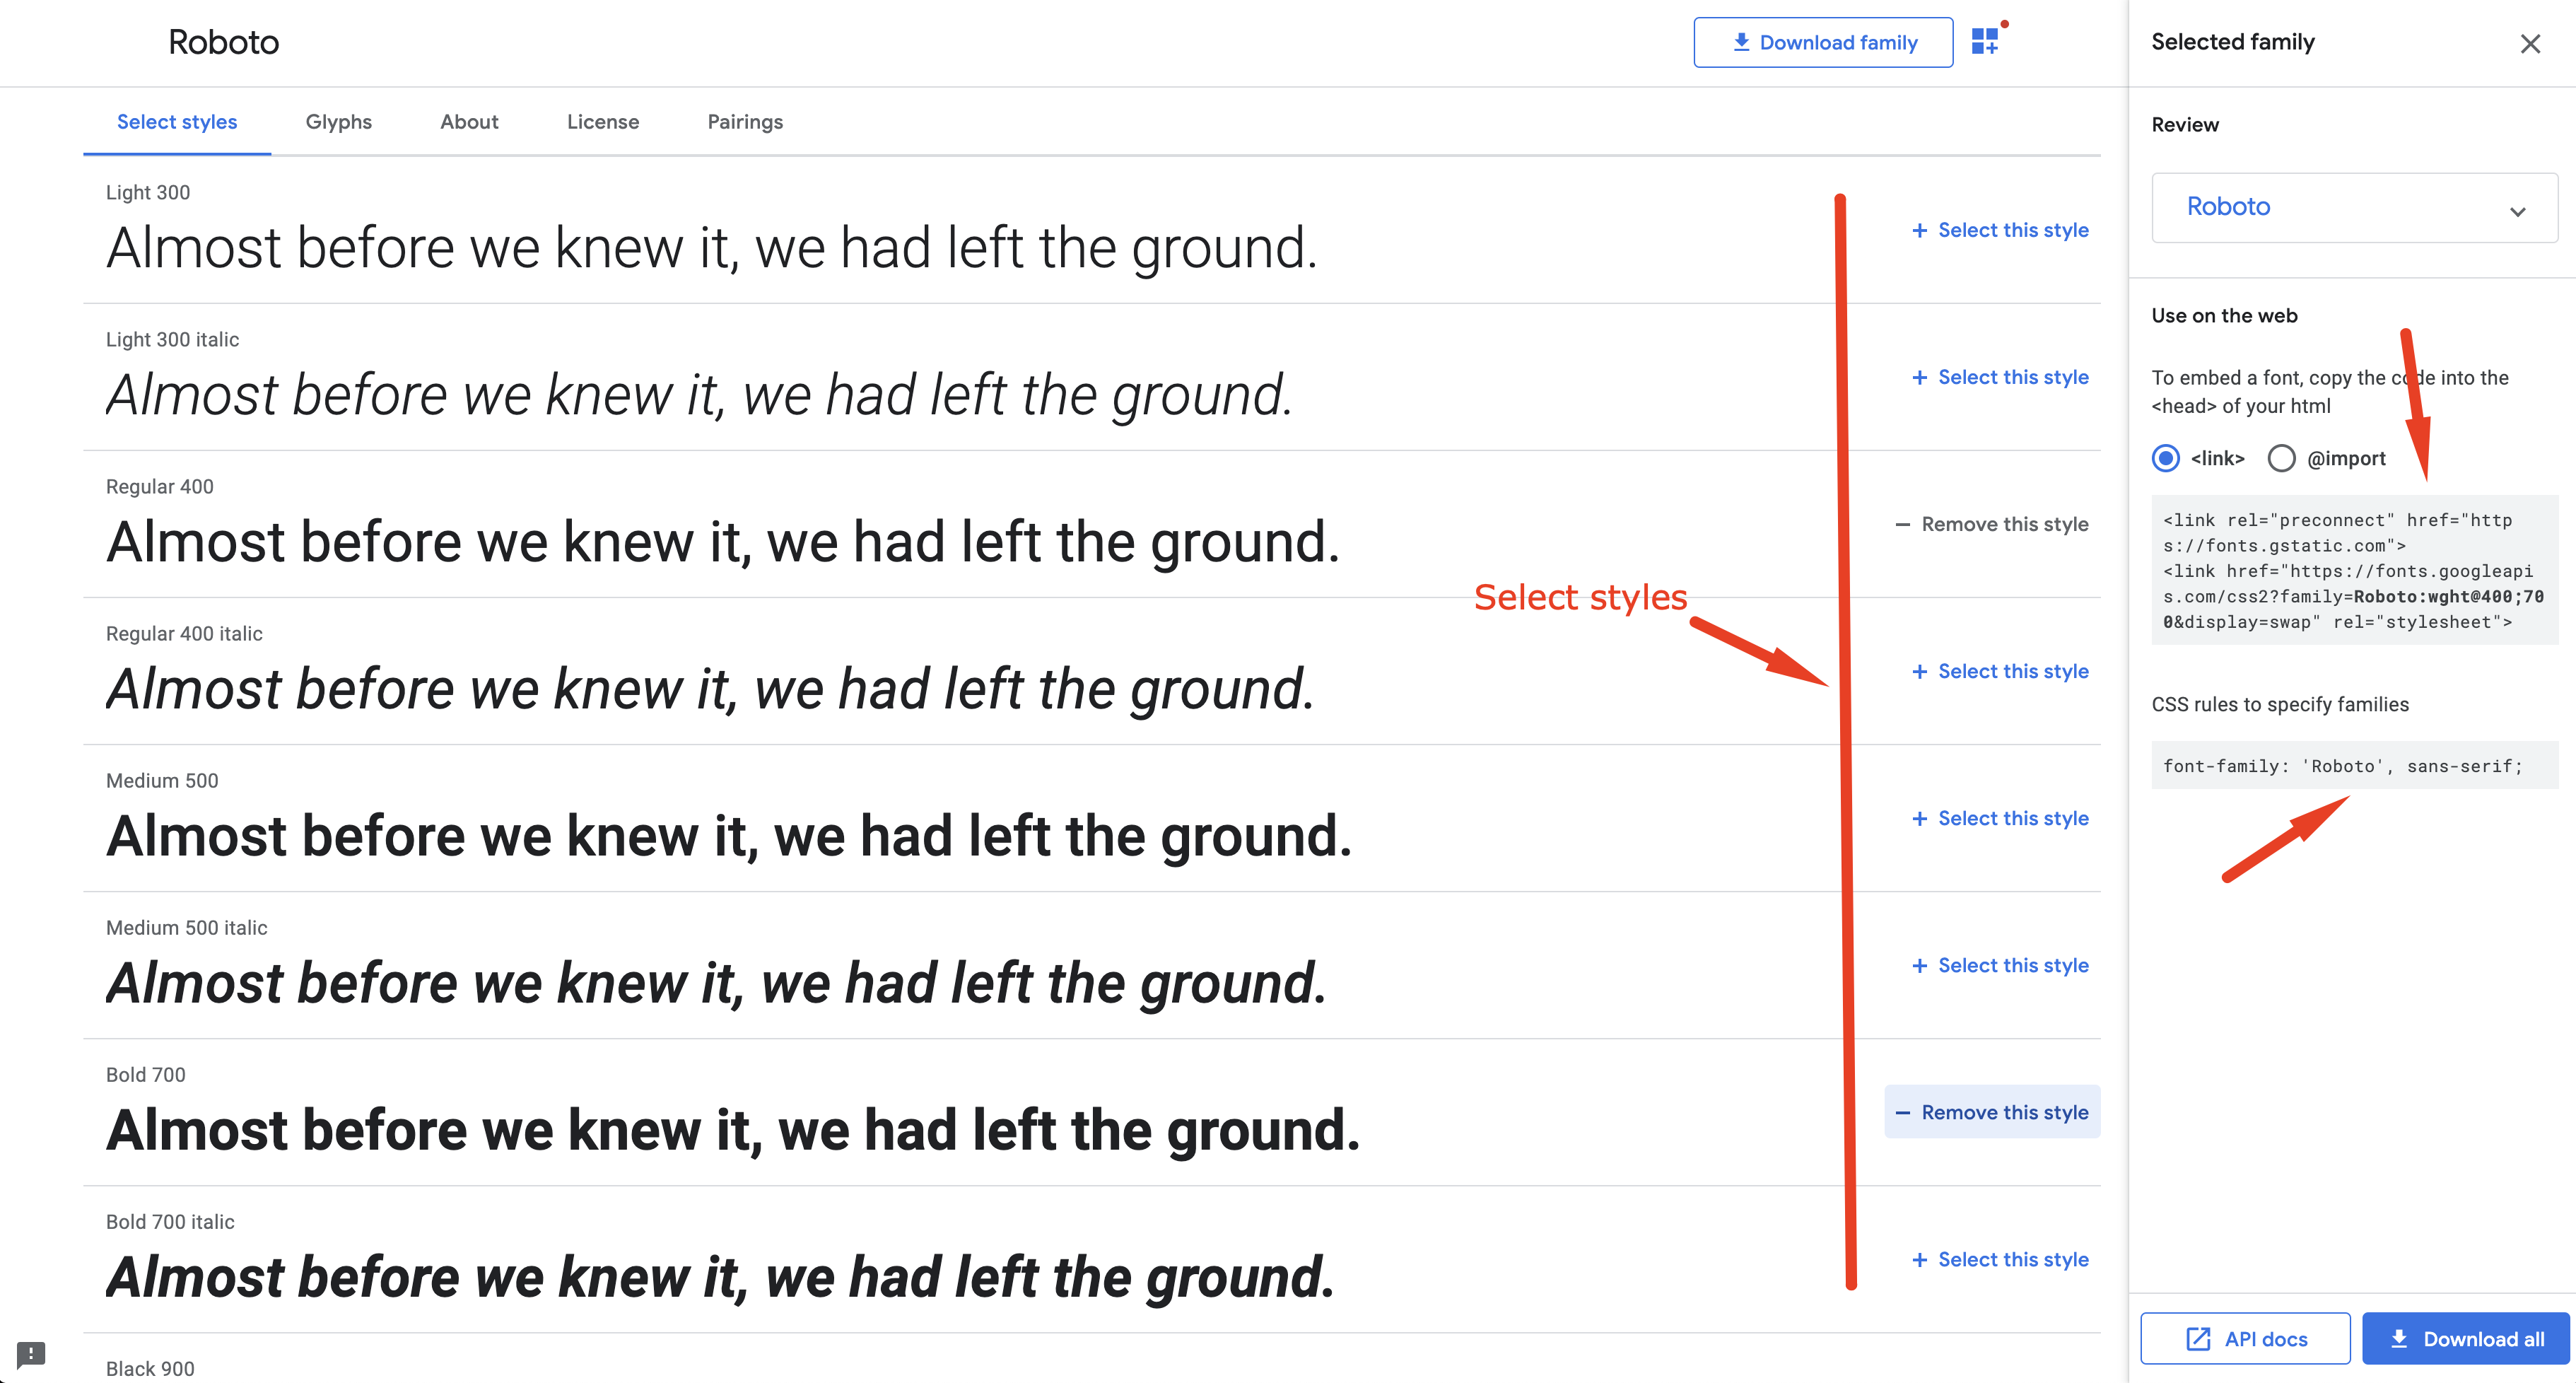
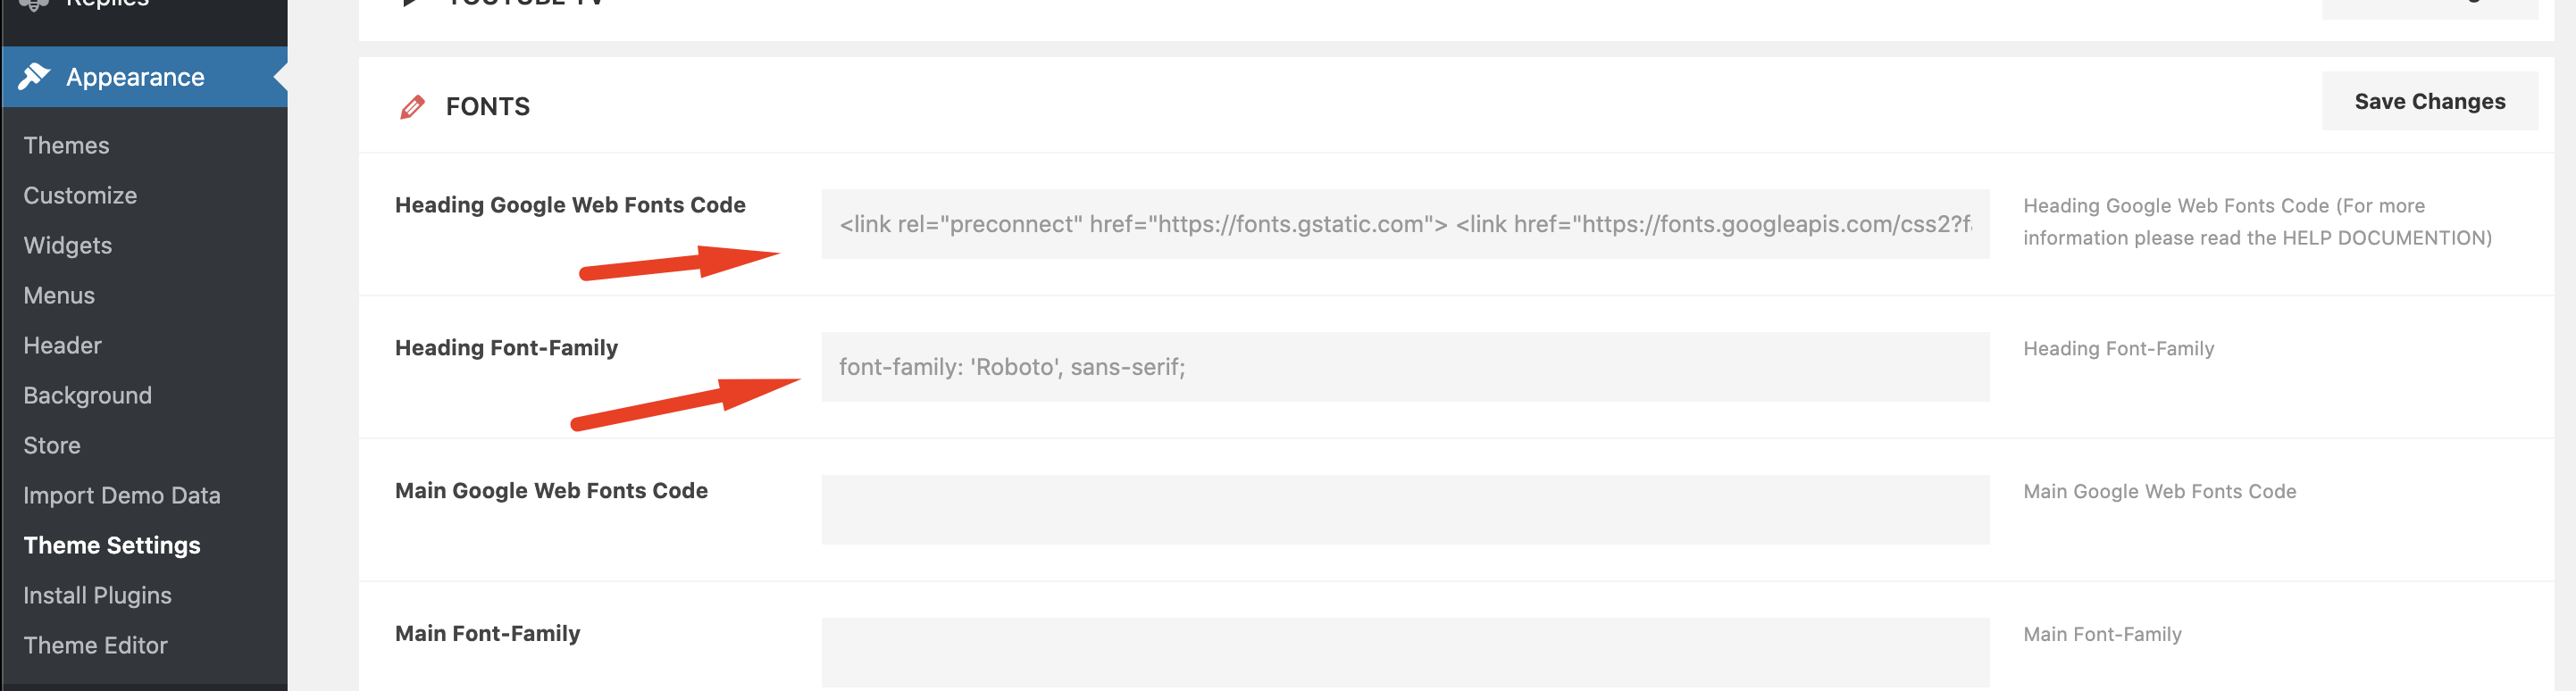
Fonts
Sporty supports Google Web Fonts. To change default fonts, please follow the following steps;
Choose a font and click on it.
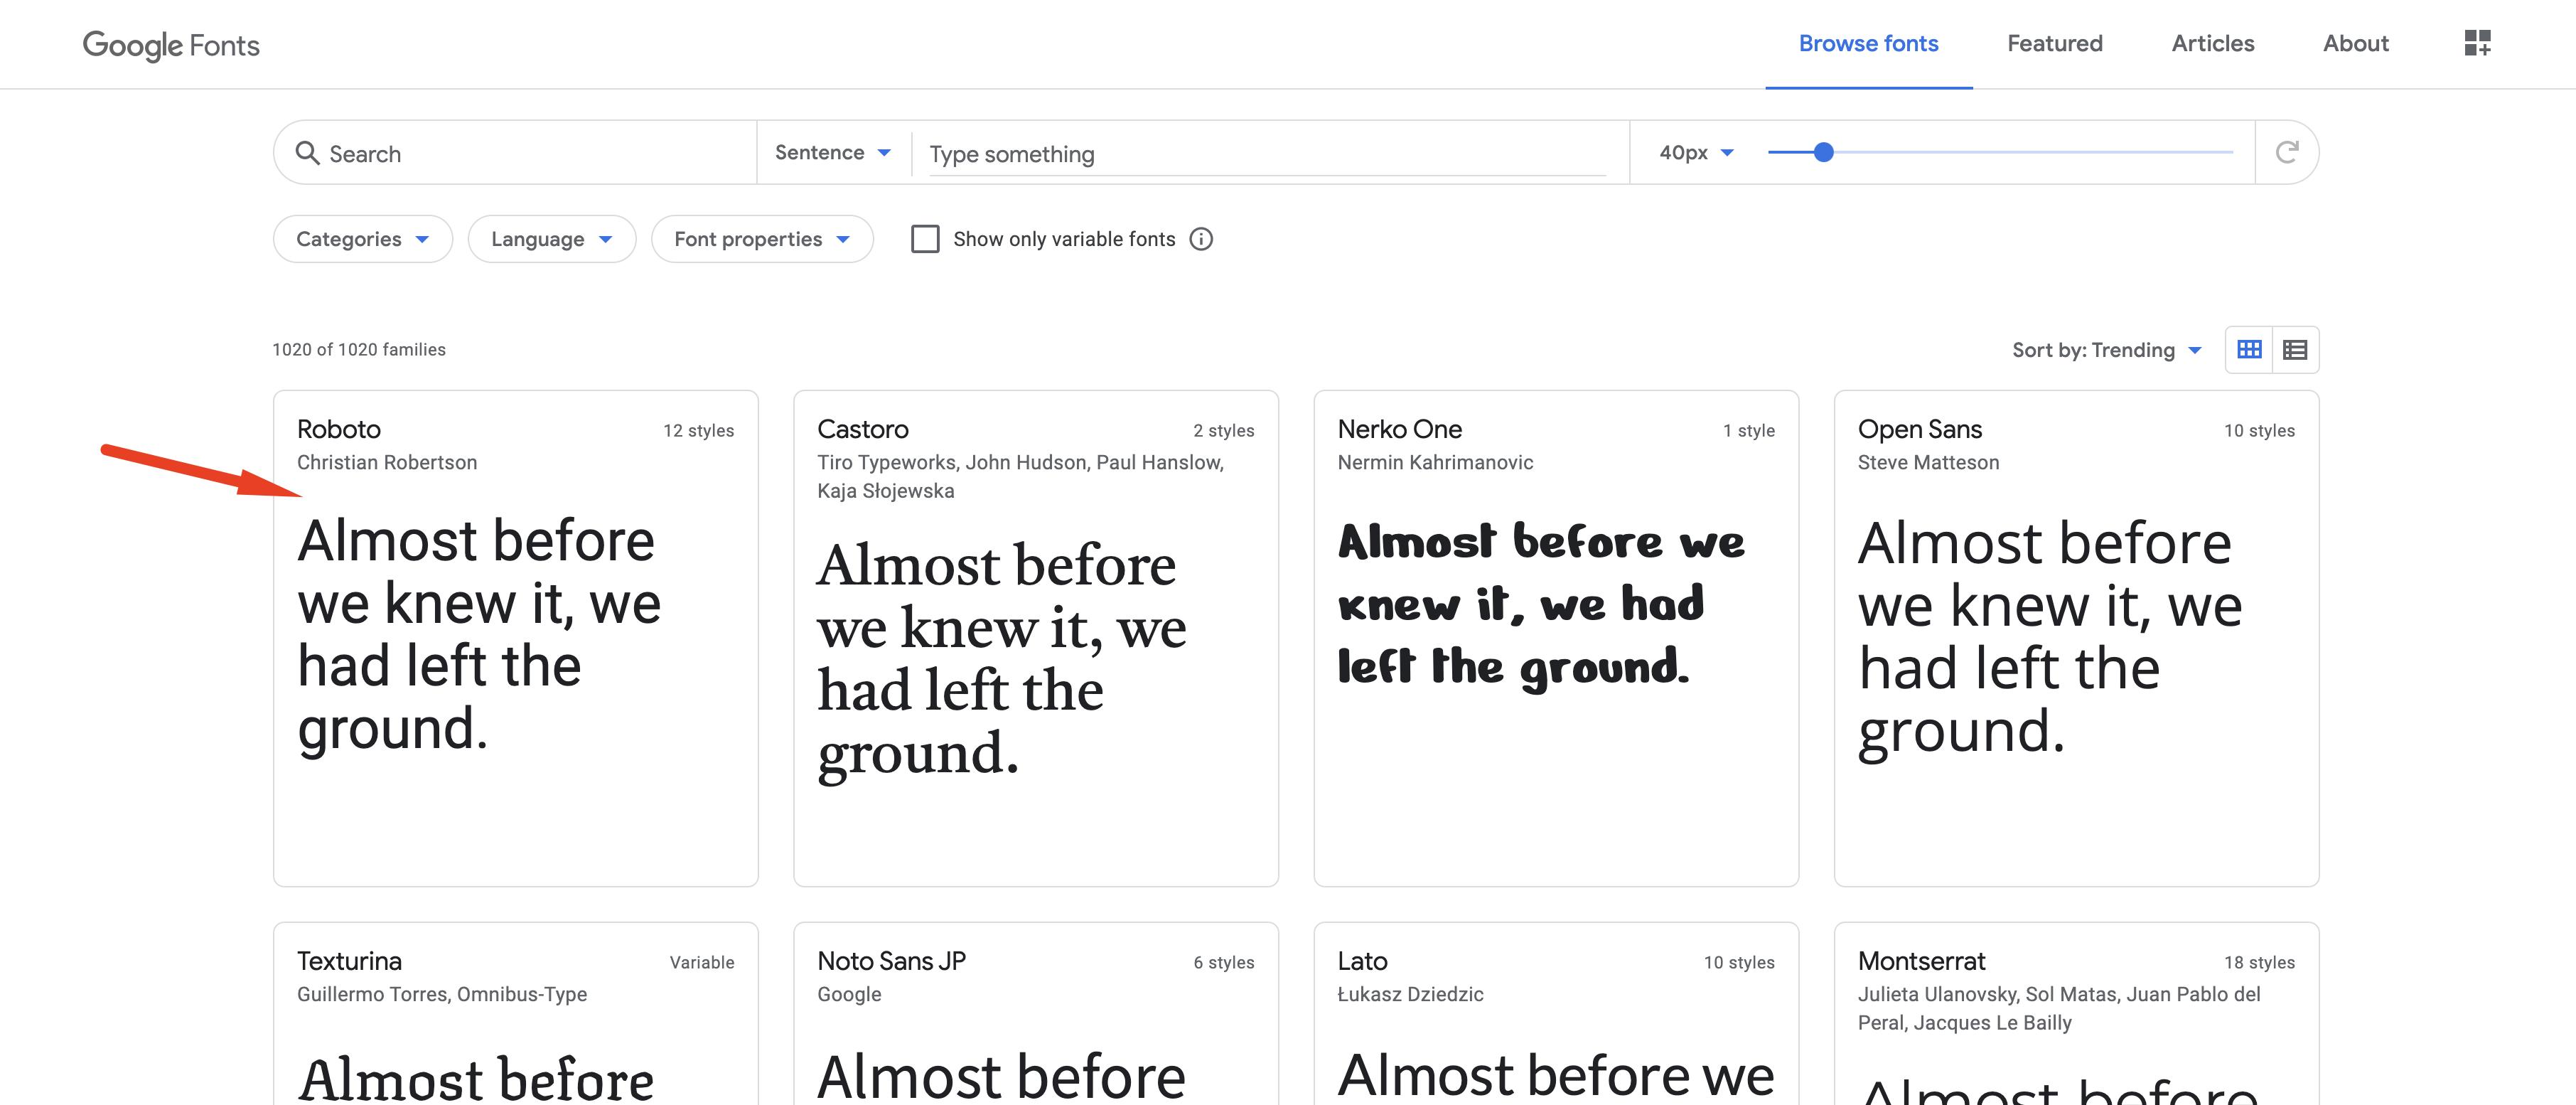
Select the styles you want to use. Copy&paste the codes to the theme settings.
Colors
There are 7 colors in the theme's color scheme. You can change them with any color.
Social Icons
There are social media icon fields at the top bar and at the footer.
Ecwid Store
To use Sporty custom Ecwid css theme, you should activate it from this section. If you want to use a standard Ecwid css theme or if you want to make your own css theme, don't activate it.
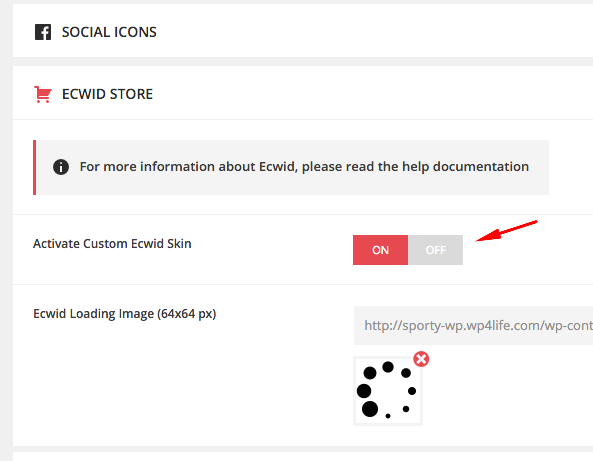
For more information about Ecwid, click here
Contact Form
To use contact form shortcode, you should fill the following fields.
Recipient Name: Recipient Name of the contact form e-mail.
E-Mail Subject: Subject of the contact form e-mail.
Contact Form E-Mail: Contact form content will be send to this email address.
Name Field Text: Name Field Text.
E-Mail Field Text: E-Mail Field Text.
Message Field Text: Message Field Text.
Send Button Text Send Button Text.
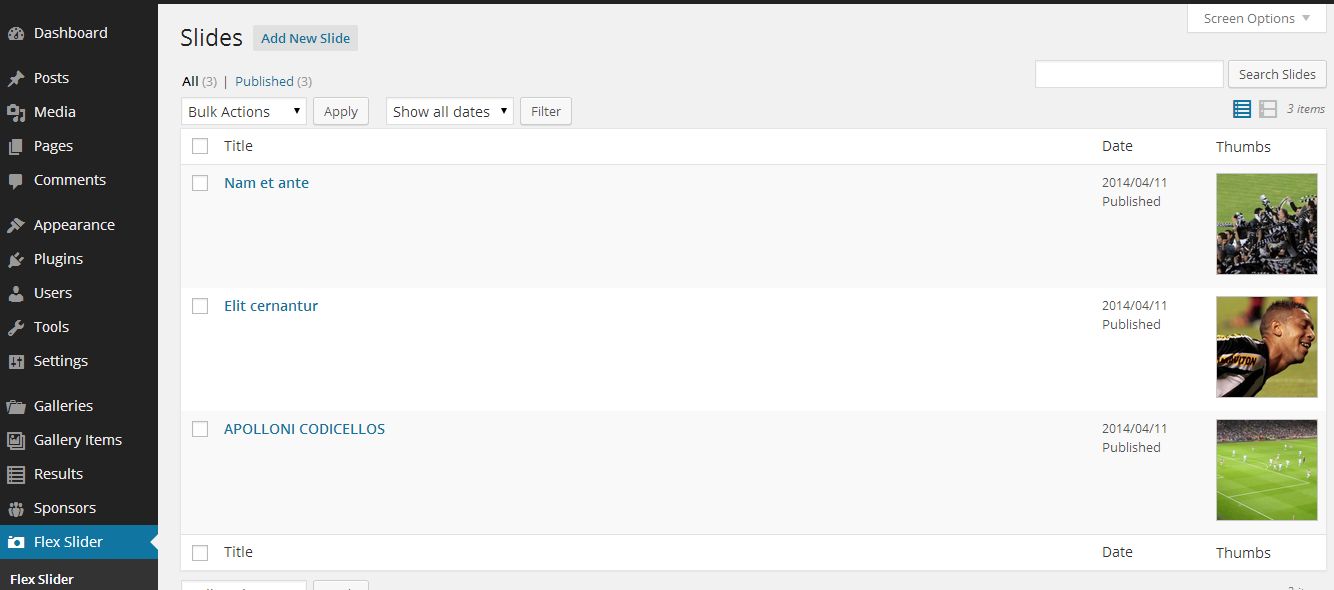
Sliders
Flex Slider
Sporty Flexslider plugin is required.
Flexslider is only visible on homepage-full and homepage-sidebar templates. For more information about page templates, click here...
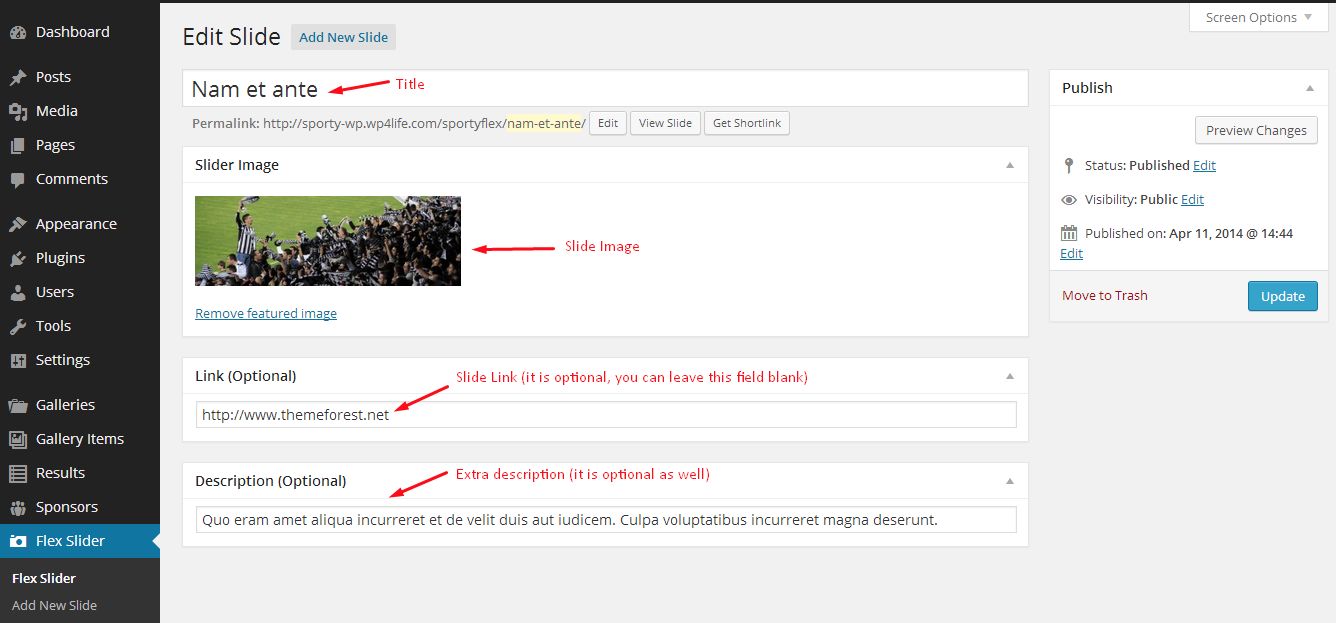
You can add as many image as you want. You should add each slide individually.
Page Title: Title of the slide image.
Slider Image: You can upload the slide image here. Suggested minimum slider image width is 1024px and minimum height is 350px.
Link: If you want to add a link to the slide, use this field. Correct link format is; http://www.yoursite.com
Description: If you want to add a extra description to the slide, use this field.
Zeus Slider
Zeus Slider is only active on zeus-full and zeus-sidebar templates. For more information about page templates, click here...
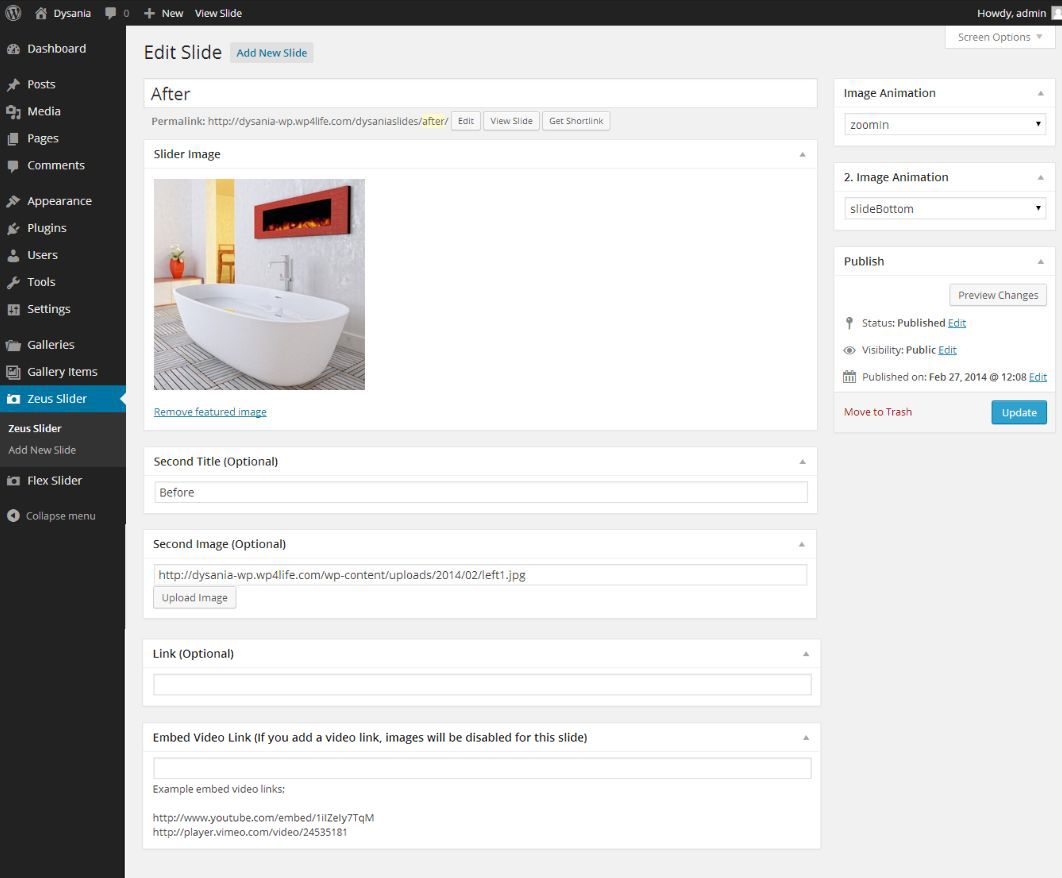
Page Title: If you add 2 image, It will be used as a title of your first slider image.
Slider Image: It is the main image of the slide.
Second Image: If you want to use 2 image in a single slide, you can upload a second image here. If you want to use a single image in a slide, leave this field blank.
Second Title: If you add 2 image, this will be used as a title of your second image. If you add 1 image this will be used as a title of your single image.
Image Animation: It is the css3 animation of the first slide image.
2. Image Animation: It is the css3 animation of the second slide image.
Link: If you want to add a link to the slide, use this field. Correct link format is; http://www.yoursite.com
Embed Video Link: If you want to add an embed video from YouTube,Vimeo etc. use this field. If you add a video link, images,animations and titles will be disabled for this slide.

YouTube TV
Flexslider is only active on "homepage youtube sidebar" and "homepage youtube full" templates. For more information about page templates, click here...
To use YouTube TV first of all you have to obtain an API Key from Google's Developer Console.
To obtain your API Key you can follow this guide using steps 1 to 3;
Getting Started with the YouTube Data API
Then:
4. under APIs & auth > Credentials > Create new Key > (Select) Browser Key
5. (Recommended) Set any referrers to your domain to prevent unauthorized use of your key.
6. (Optional) Additionally disabling any other unused APIs that are enabled.
All available settings are at the Theme Settings page.
Dysania Grid Gallery plugin
Create a gallery
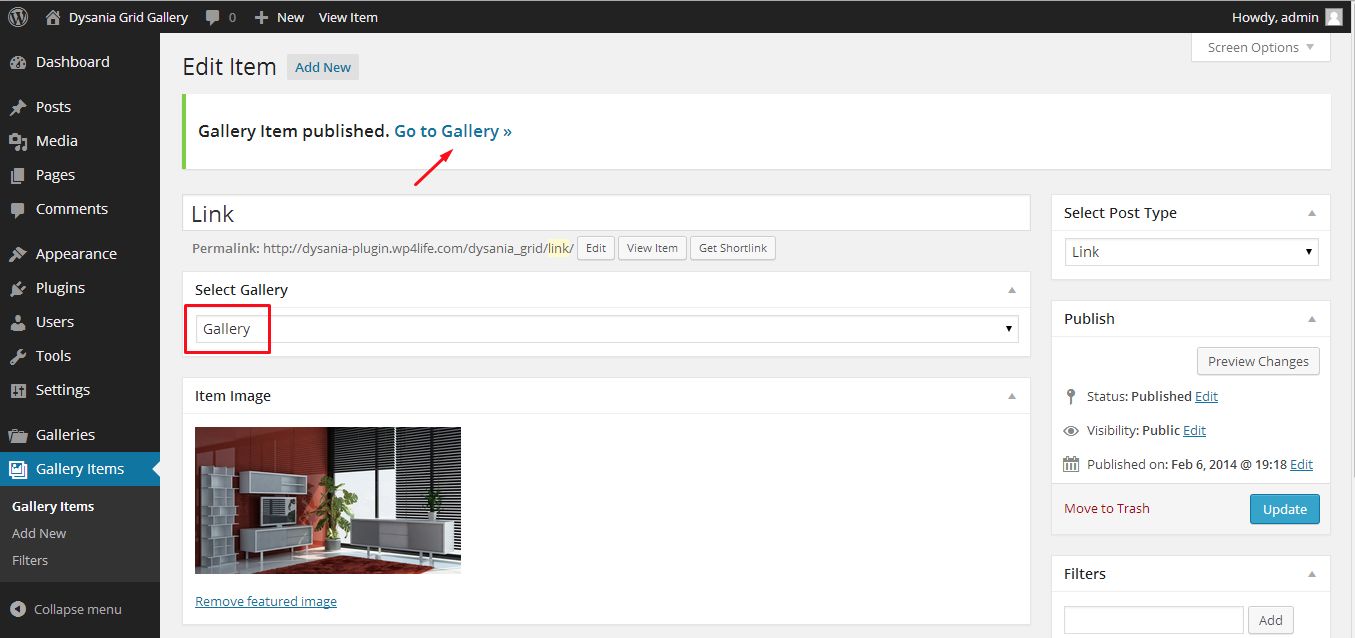
First of all you should creat a gallery. Click "Add new gallery" link, add a gallery name and click publish button.
Important: To use gallery shortcode, first of all you should publish the gallery.

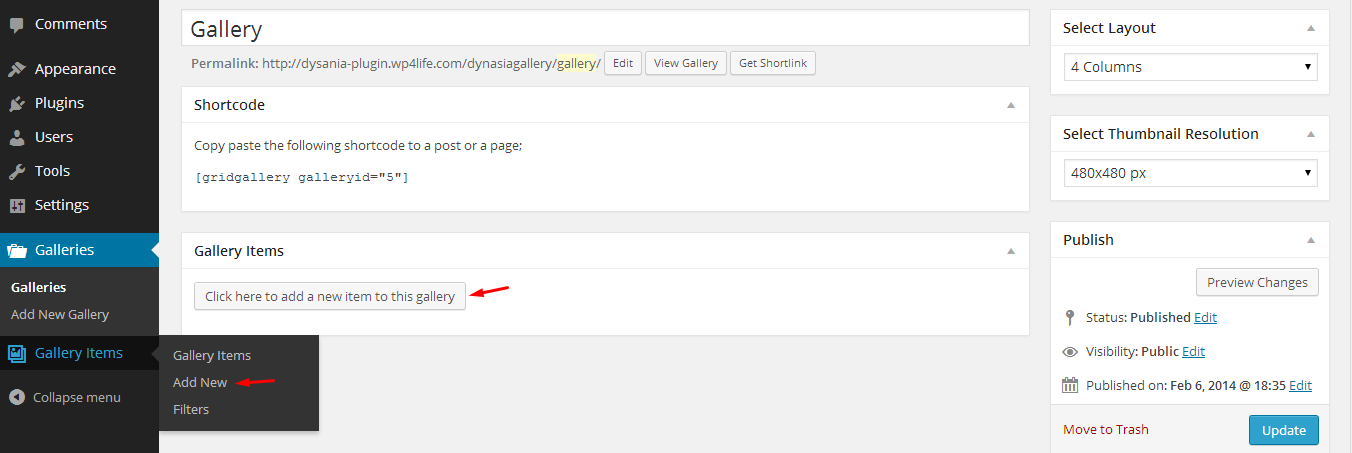
Add Gallery Items
After creating a gallery, click add new gallery item link and start to add your gallery items;
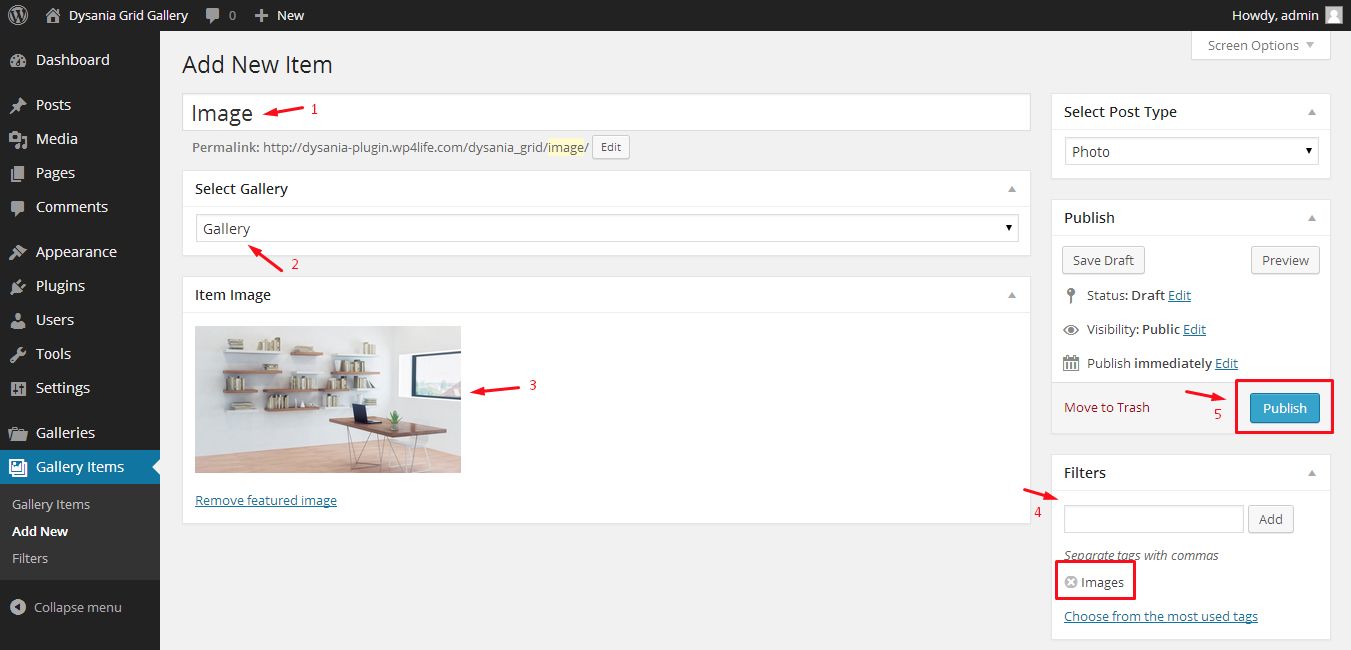
How to add a Photo
1) Add a title to your gallery item
2) Select gallery from dropdown
3) Upload an item image
4) Add filters (optional)
5) Publish it
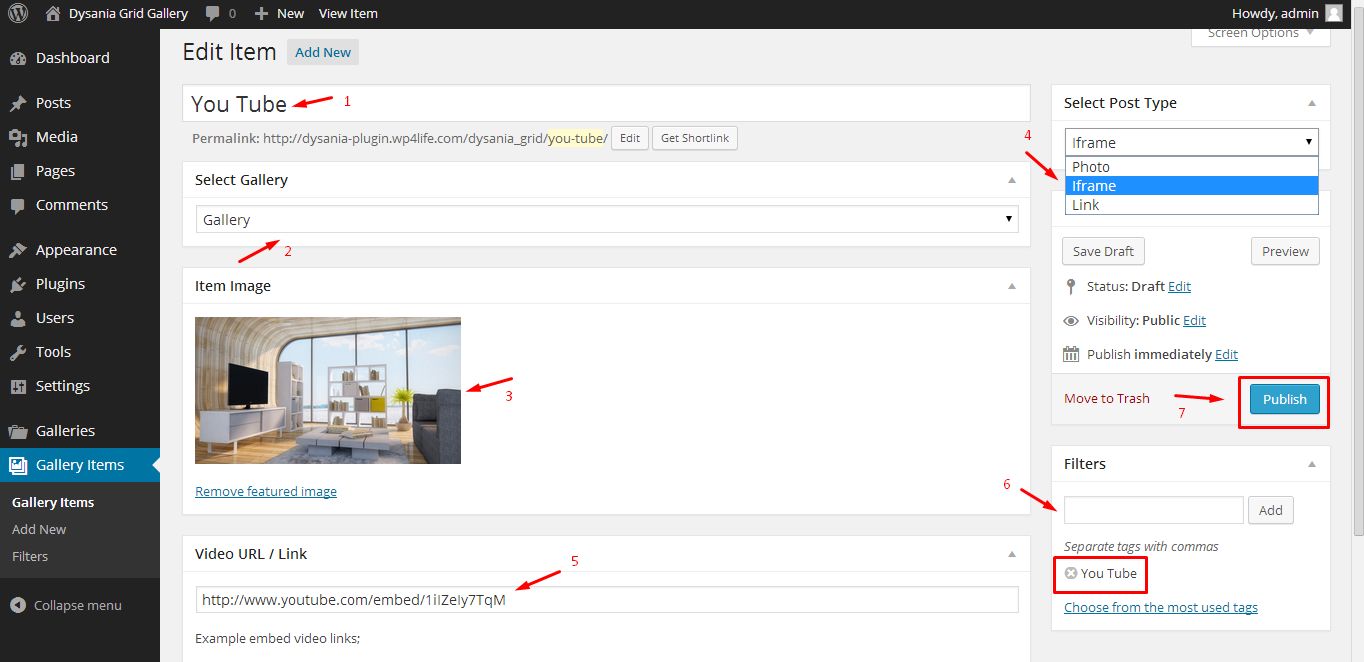
How to add an iframe (video)
1) Add a title to your gallery item
2) Select gallery from dropdown
3) Upload an item image
4) Select iframe
5) Add your video embed link. (You can also add any website link instead of a video embed link. That website will be displayed as a lightbox when user clicks on that item.)
6) Add filters (optional)
7) Publish it
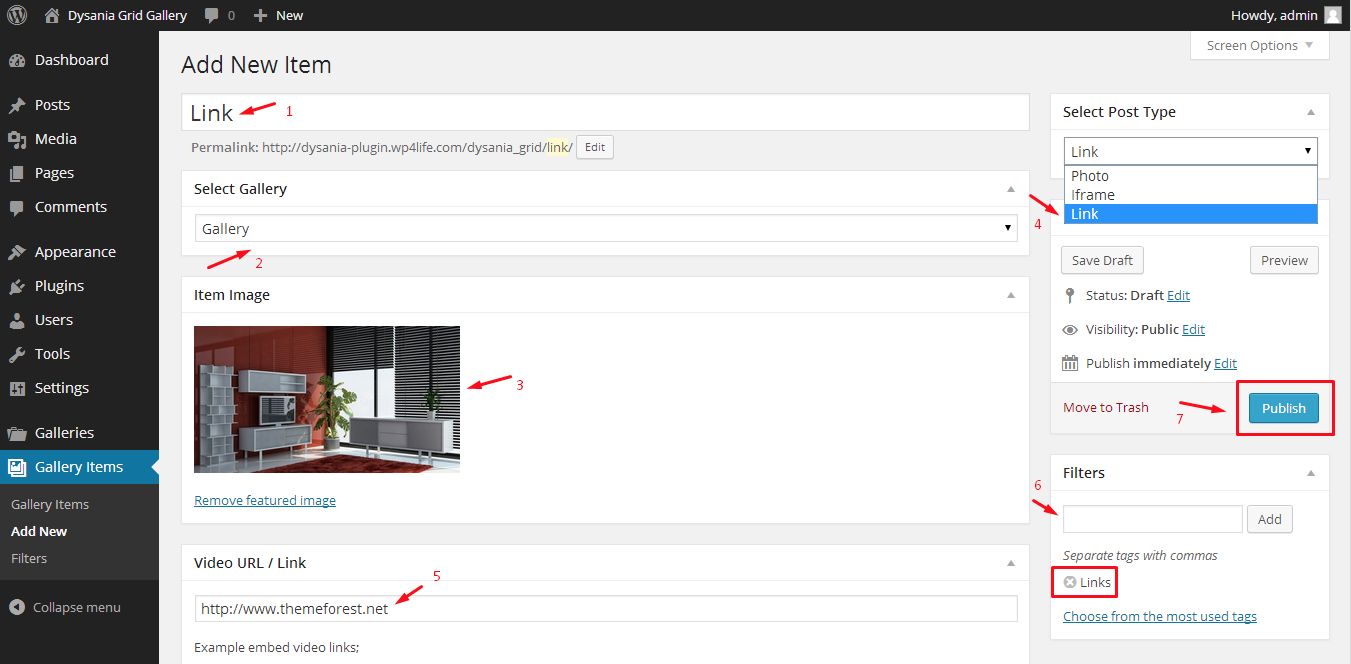
How to add a direct link
1) Add a title to your gallery item
2) Select gallery from dropdown
3) Upload an item image
4) Select link
5) Add an external or an internal link
6) Add filters (optional)
7) Publish it
New Feature! (1.4)
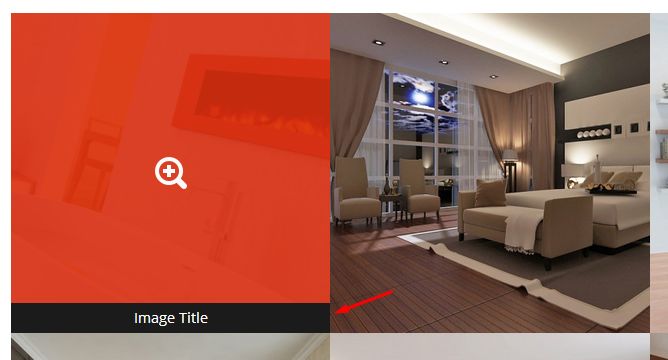
You can add titles to the thumbnails. If you don't want to add a title to the thumbnail, leave this field blank...
If you are using a gallery in a small area (widgets), titles may not appear...

Go to the Gallery Page
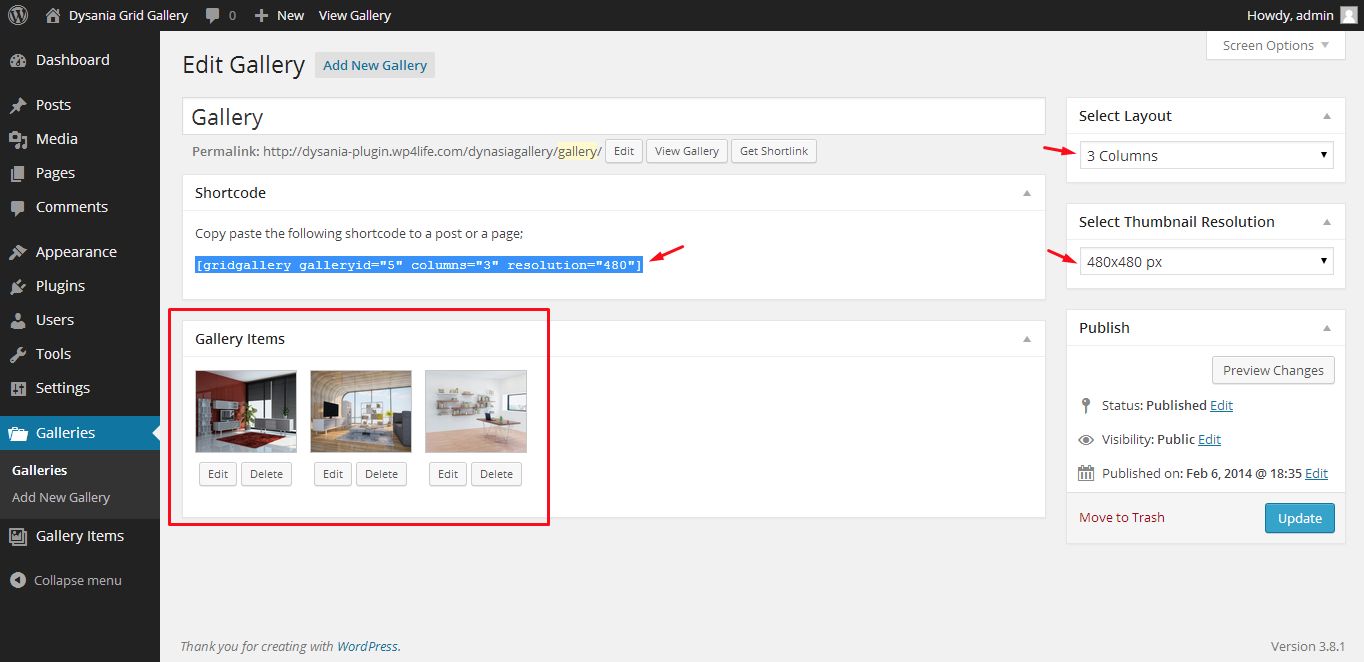
After adding your gallery items, you can go to the related gallery page with clicking "Go to gallery" link or you can click on "Galleries" menu to see all available galleries.
Use the Shortcode
Now you can add this gallery to any page or post with the gallery shortcode which is on the gallery's page. You can change column number of the grid and resolutions of the thumbnails. Default column number is 4 and default thumbnail resolution is 300x300 px.
Hint: You can select thumbnail resolution according to column number. For bigger column numbers, use smaller images for better performance.
For example if you select 2 columns, you should select 600x600 px resolution for better display. If you select 5 columns, you should select smaller image resolution for better page loading performance.
You can also view, edit or delete gallery items directly from edit gallery page.
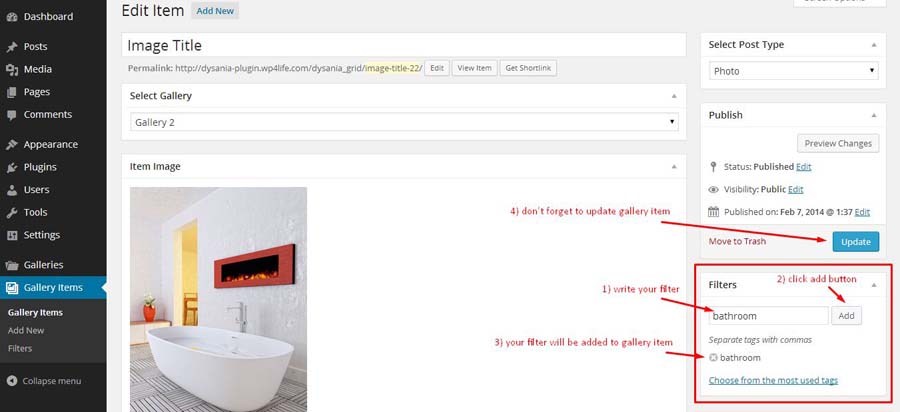
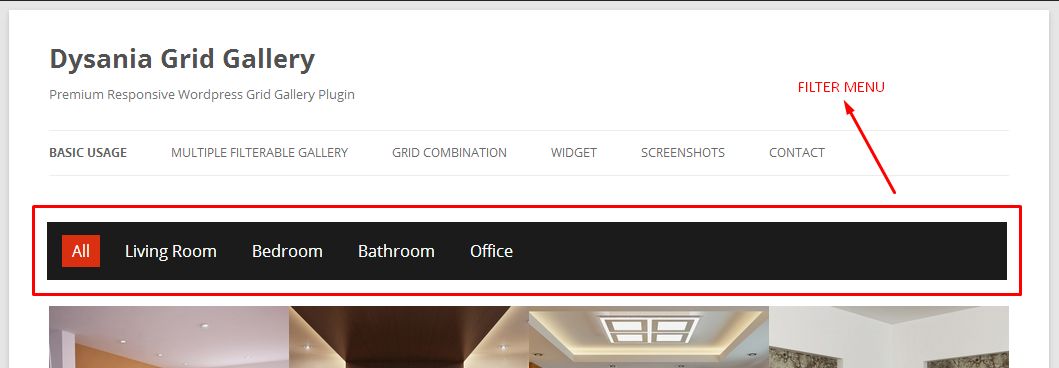
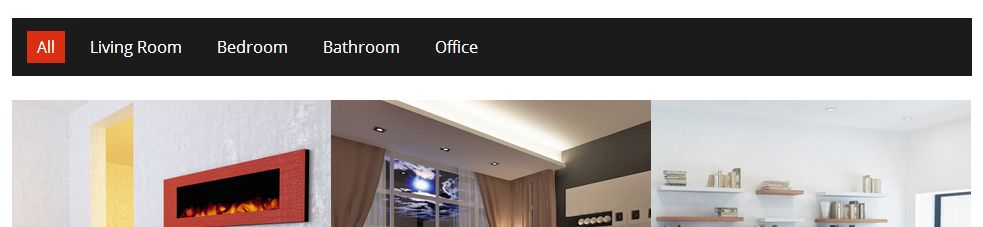
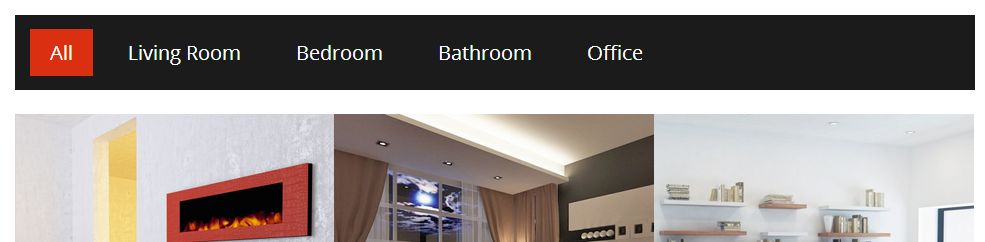
Filter Menu
You can create filterable galleries with filter menu feature. To use this feature, you should add filters during adding or editing an item.
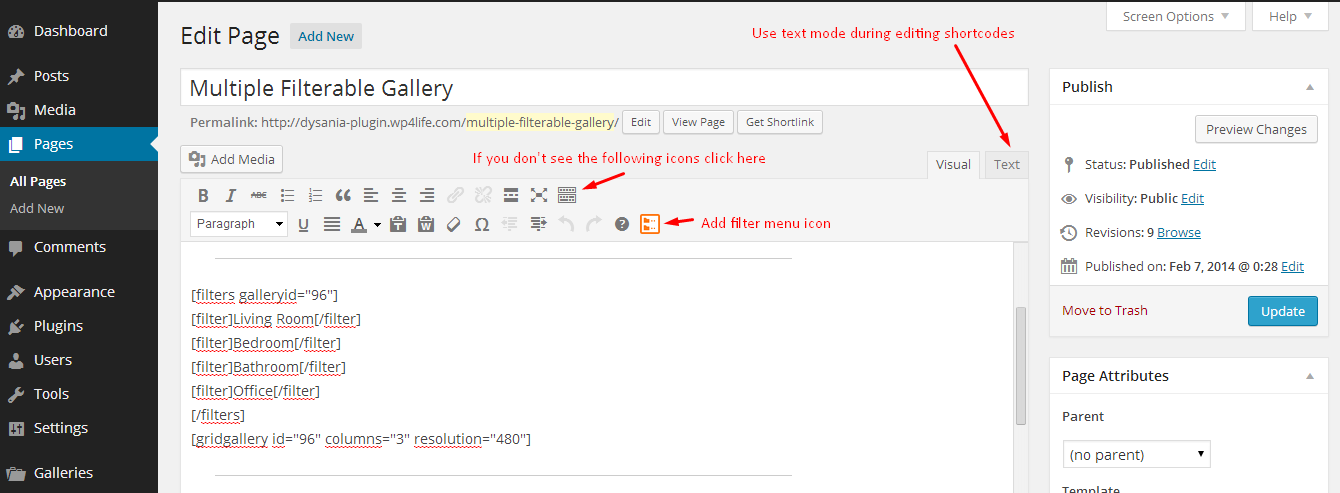
Adding a filter menu
If you want to add a filter menu to your gallery, you can use "Filters" shortcode. There is a "add a filter menu" icon on your text editor. Click on it. Sample filter menu code will be added your page.
If you want to add shortcodes manually, I recommend you to use "Text mode" of the text editor.
You should add your filters like the following structure;
Using multiple filters
To add multiple filters to a page, change the "galleryid" value of the "filters" with the related grid gallery id.
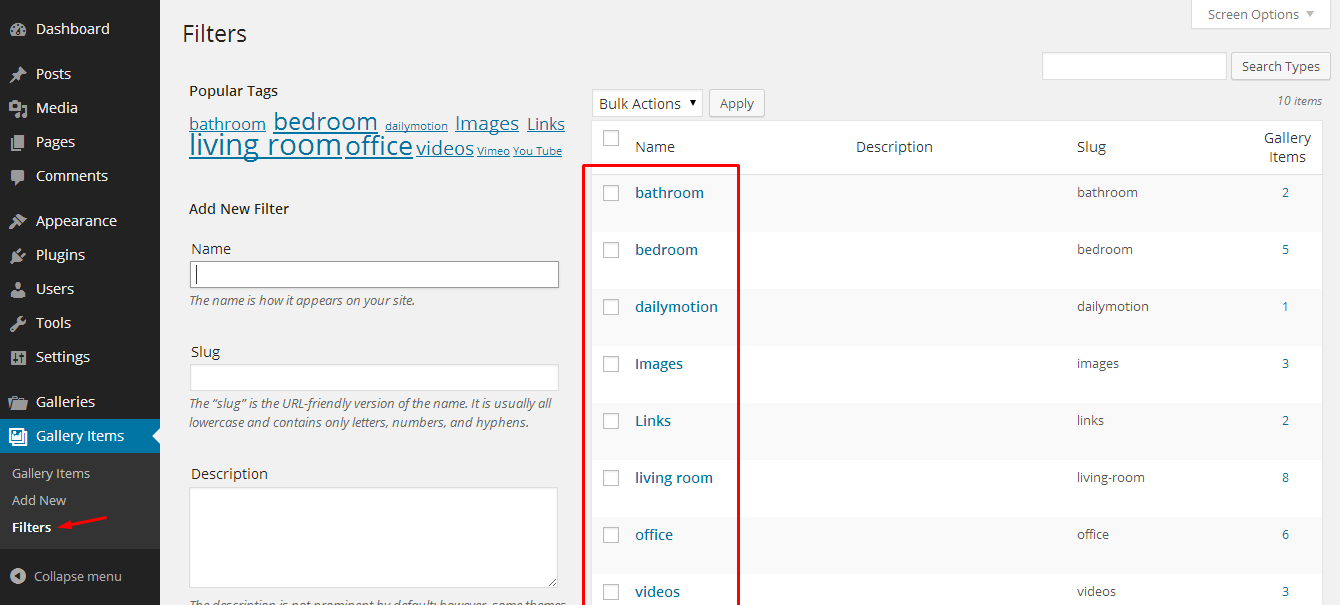
Displaying all filters
Add only 1 filter into each [filter] shortcode and be careful when adding words. They must be the same as your filters. You can view,edit or delete filters at Filters page.
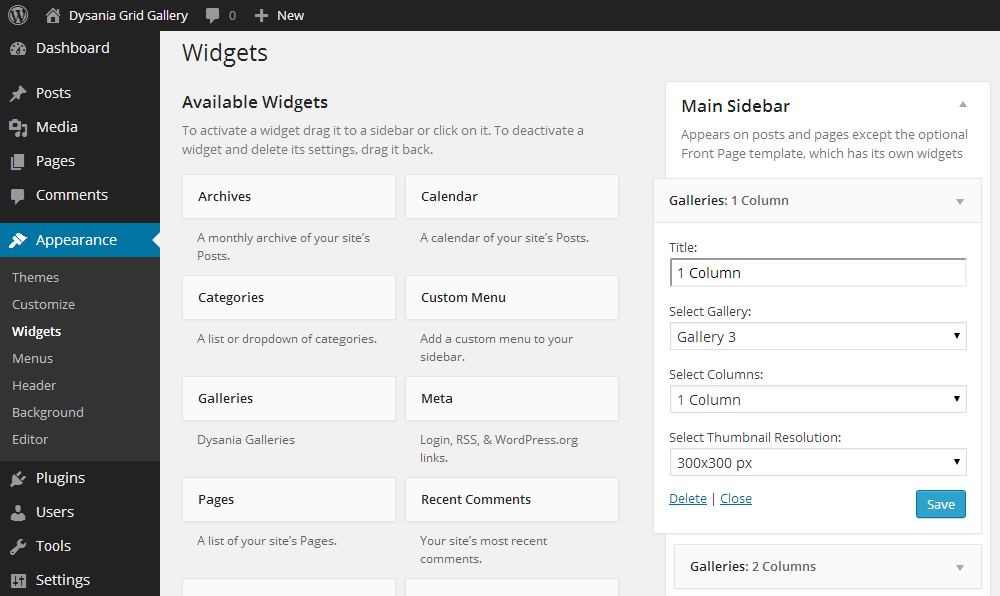
How to use the widget
Using Dysania grid gallery widget is very easy. Just drag-drop the widget to your sidebar, make your column and resolution choices and click save button. It is totally responsive and fits all widget fields.
Gallery Settings
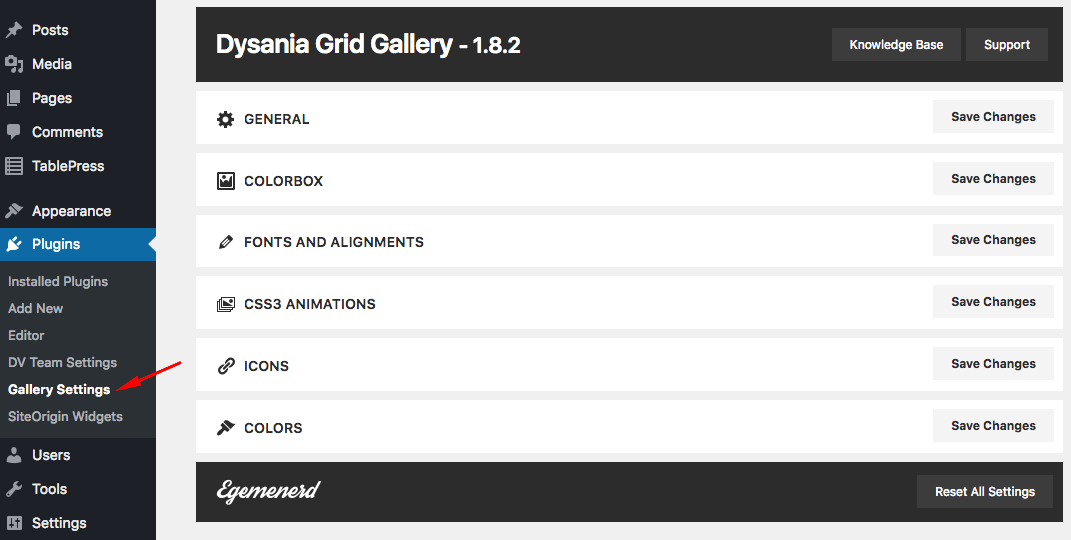
General
Default Image: If you publish a gallery item without an image, this image will be displayed on your gallery.
Disabled Image Opacity: When a user click on any filter, some items are disabled. You can change opacity values of these images.
Colorbox
Colorbox Styles: There are 6 different colorbox style in the plugin. You can select any of them.
Colorbox Styles: There are 6 different colorbox style in the plugin. You can select any of them.
Image Max. Width: Maximum width of the colorbox image (percent max=100)
Image Max. Height: Maximum width of the colorbox image (percent max=100)
Iframe Width: Width of the colorbox iframe (percent max=100)
Iframe Height: Width of the colorbox iframe (percent max=100)
Activate Slideshow: To activate colorbox image slideshow feature, check this box.
Disable Slideshow Autostart: If checked, the slideshow will not automatically start to play.
Slideshow Speed: Speed of the slideshow (second)
Fonts and Alignments
You can change font size, margins and paddings of the filter menu here. In this way, it looks good on all themes.
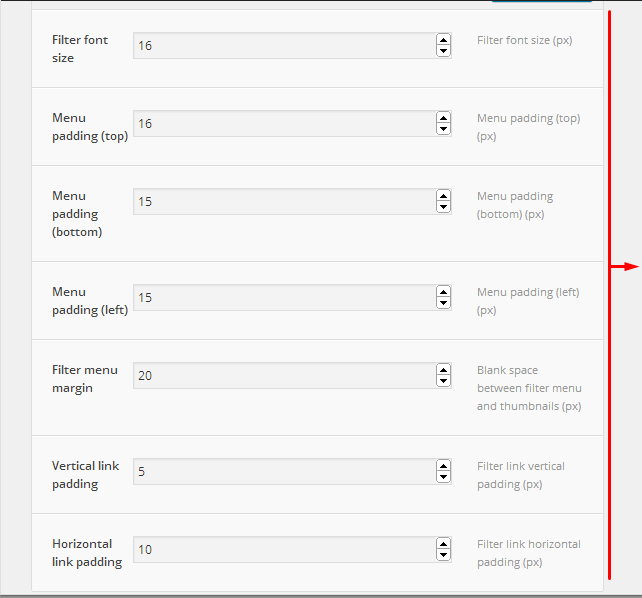
Result
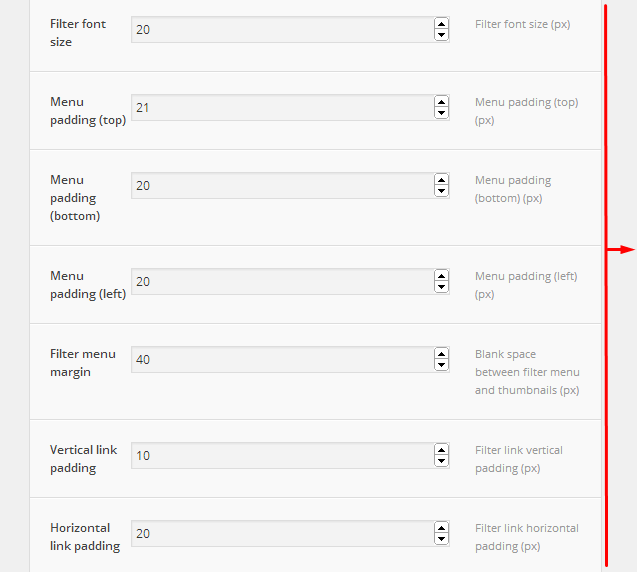
Result
CSS3 Animations
You can change image hover effect and create your own animations. Just play with them and see the results :)
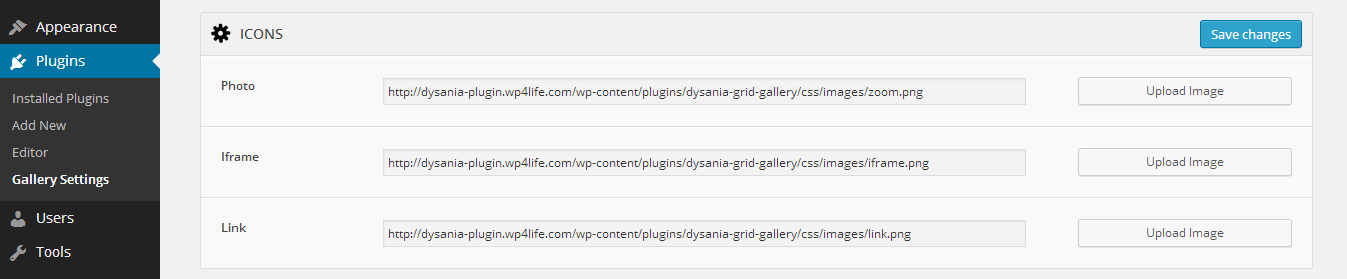
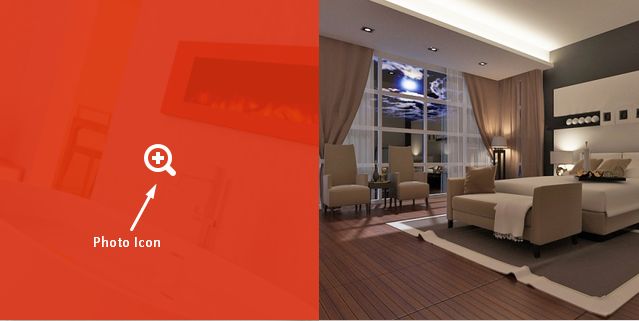
Icons
You can upload your own mouse over icons. There isn't any size limitation.
Colors
I used 4 different color on filter menu and gallery and you can change each color here.
Fixtures
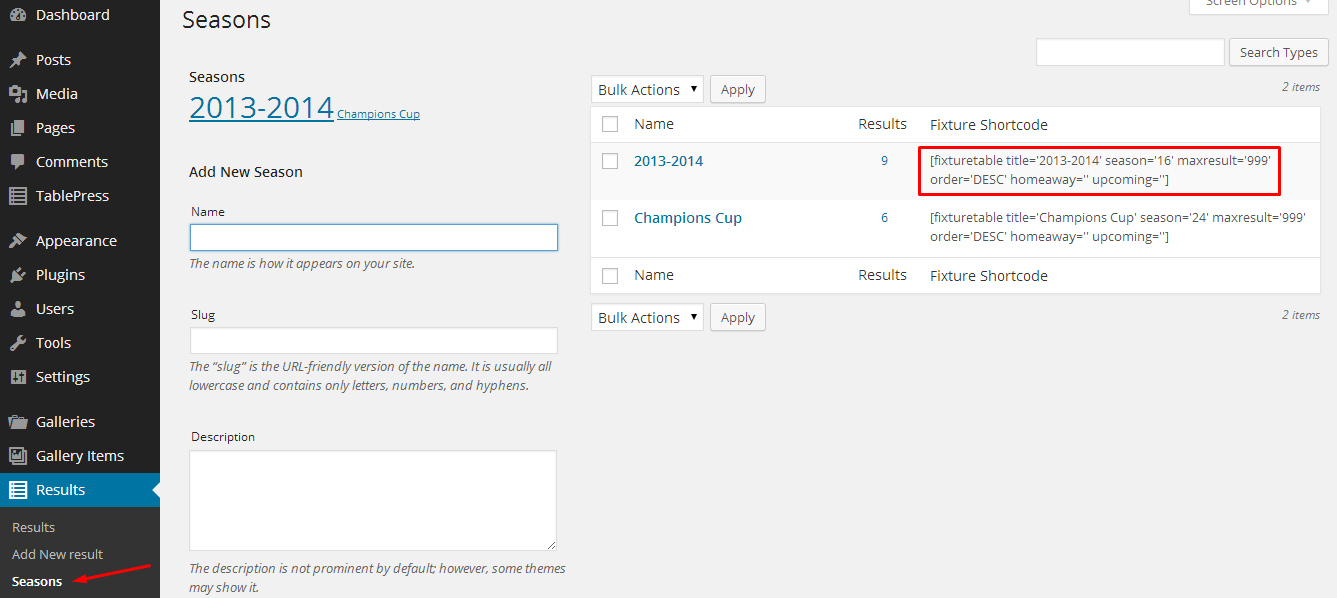
Adding Seasons
First of all you should create at least one season.
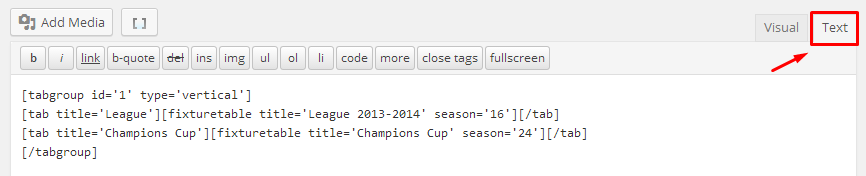
After creating a season, you can see the fixture shortcode on the seasons page. When you add this shortcode to any post or page, all matches in that season will be displayed in a table. You can change the shortcode settings manually.
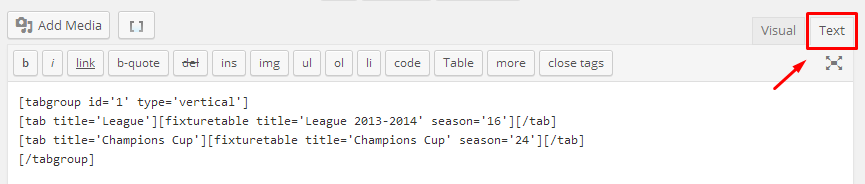
When you are editing the shortcode, use text mode of the page editor;
You can also add these tables to the sidebars with fixture widget.
Fixture Shortcode Options
title (Optional): Title of the table.
season (Required): ID of the season
maxresult (Optional): Maximum number of results
order (Optional): There are two valid value; ASC and DESC (Ascending-Descending).
homeaway (Optional): You can display only home or only away matches. There are two valid value; home and away. If you leave it blank, it will display both home and away matches.
upcoming (Optional): There are two valid value; yes and no. If you want to display only upcoming matches use "yes". If you want to display only played matches use "no".
Sample Shorcode;
Adding Results
After adding season, you can start to add results.
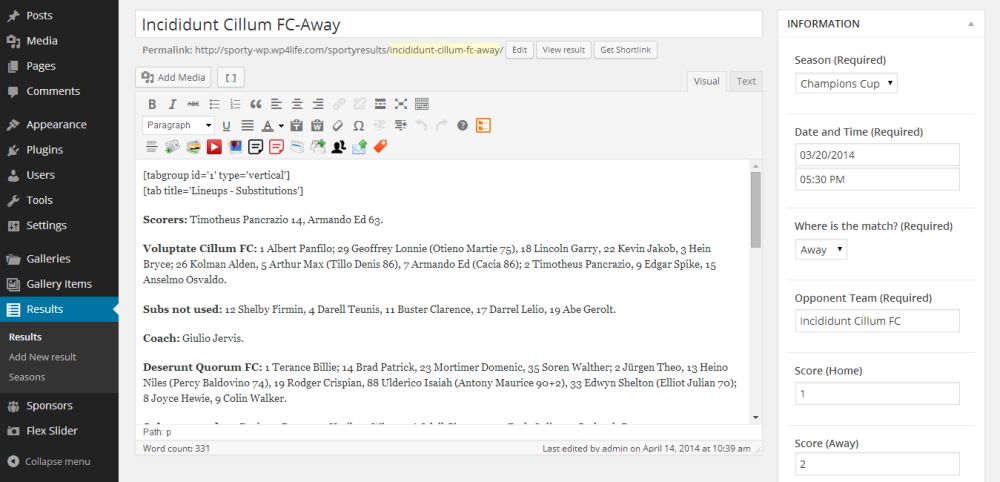
Fields
Page Title: Page title only used as a meta title tag.
Content Field: You can add result page content here. Using is the same as pages and posts. You can use shortcodes (tabs,galleries,layout shortodes etc.) to create a better result page.
Season: Result will be displayed under this season on fixture tables.
Date and Time: You should set match date and time. Matches ordered by this date on fixture tables, latest results box etc. You should use valid date and time formats. You can change date and time formats which displayed on your website at Settings->General.

Where is the match: There are two options, "home" and "away". If you select "home", your team name will be displayed on the left side. If you select "away", your team name will be displayed on the right side.
Your team: If you leave this field blank, Appearance->Theme Settings->General->Your team name will be displayed as your team. If you have multiple team, this field may be useful...
Opponent team: Opponent team name.
Score (Home): Home team's score.
Score (Away): Away team's score.
Stadium: If you don't want to add stadium name, leave this field blank.
Buy Ticket Link: It is optional and it displayed only on not played matches.
Featured Image: You can add featured images to the result pages.
Sponsors
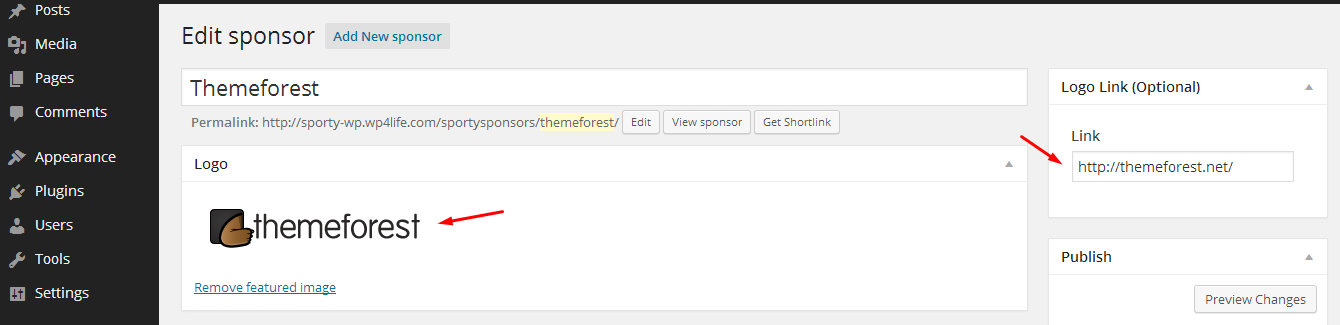
Adding sponsors
You should add each sponsor individually.
Just upload sponsor's logo, add a link (optional) and click publish button.
You can change sponsors box settings from Theme Settings page.
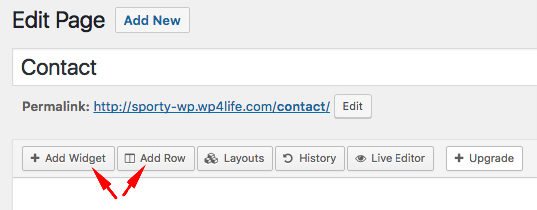
Page Builder
You should install/activate following plugins to use the page builder and all available widgets to build your pages;
Insurgent Features
Siteorigin Page Builder
Page Builder by SiteOrigin is the most popular page creation plugin for WordPress. It makes it easy to create responsive column based content, using the widgets you know and love. Your content will accurately adapt to all mobile devices, ensuring your site is mobile-ready.
Siteorigin Widget Bundle
The SiteOrigin widget bundle gives you a collection of widgets that you can use and customize.
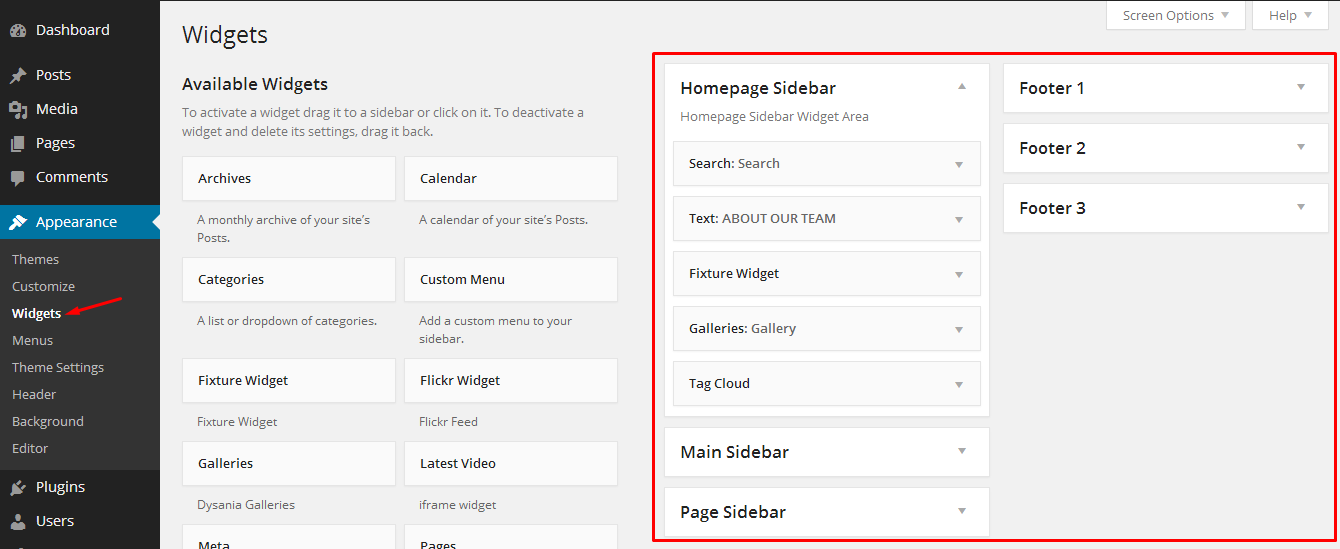
Widgets
Sidebars
There are 6 custom widget field in Sporty-WP. three of them are displayed on the bottom of all pages (Footer 1, Footer 2, Footer 3). You can add widgets to these fields from WordPress Widgets page.
Homepage sidebar is only displayed on homepage templates.
Main Sidebar is only displayed on your blog pages.
Page Sidebar is only displayed on page with sidebar template.
Page builder widgets
You can add all WordPress widgets into your posts and pages with SiteOrigin page builder.
Please read the page builder documentation
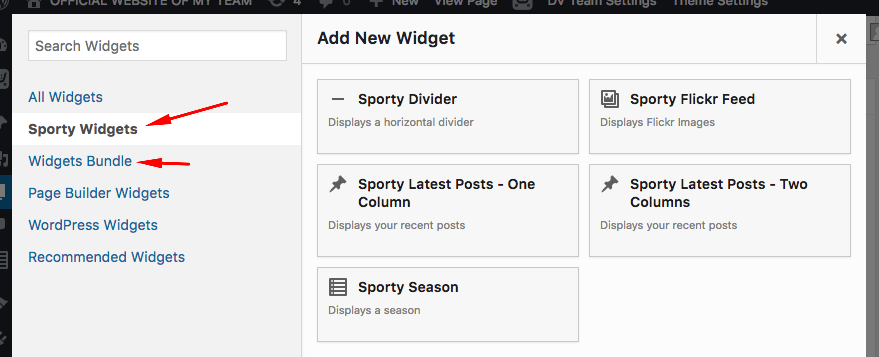
Sporty widgets
There are 5 custom widget.
Sporty Divider
Displays a horizontal divider
Sporty Flickr Feed
Displays your Flickr images
To use this widget you should know your Flickr accont ID. If you don't know your Flickr ID click here
Sporty Latest Posts - One Column
Displays your latest posts in a one column layout.
Title: Title of the widget
Maximum number of posts: Number of posts to display
Category: You can select posts from a specific category.
Add view all button: To add a "view all" button to the bottom of the posts, select "Yes".
Sporty Latest Posts - Two Columns
Displays your latest posts in a two column layout.
Title: Title of the widget
Maximum number of posts: Number of posts to display
Category: You can select posts from a specific category.
Button Link: If you want to add a button to the bottom of the posts, add your blog page link.
Sporty Season
Displays a season. For more information please read fixtures section.
Title: Title of the table
Season: You must select a season
Maximum number of matches: Maximum number of matches to display
The order of the matches: You have two options. Descending or ascending (date).
Home or away: You can display only home or only away matches.
Upcoming matches: You can use this option to display only upcoming matches or to display all matches except upcoming matches.
Shortcodes
You use shortcode generator on the editor to create shortcodes.
We suggest you use "Text" mode of the text editor to edit the shortcodes.
Divider
You can use this shortcode to clear the floats and to divide your page contents.
Latest Posts
You can use this shortcode to add your recent blog posts to any page.
Number: Number of posts to display
Viewall: If you don't want to see a "View All" button at the end of the posts, you can change the value with "false".
Categoryid: If you want to list only a specific category, you can add category id into this field. You can find category ids at Posts->Categories.
If you want to add multiple categories, add comma between category ids like the following example;
Grid Posts
You can use this shortcode to add your recent blog posts to any page.
Number: Number of posts to display
buttonlink: You can add your blog page link
Categoryid: If you want to list only a specific category, you can add category id into this field. You can find category ids at Posts->Categories.
If you want to add multiple categories, add comma between category ids like the following example;
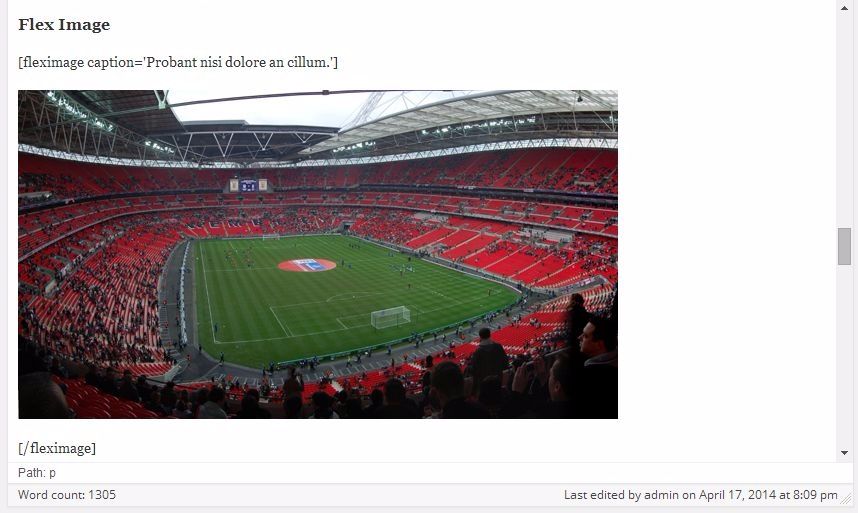
Flex Image
You can add a responsive image with a caption with this shortcode. After adding the shortcode use "Add Media" button to add an image into the shortcode.
Info Boxes
You can use info boxes for notices,warnings etc. Just add texts into the shortcodes.
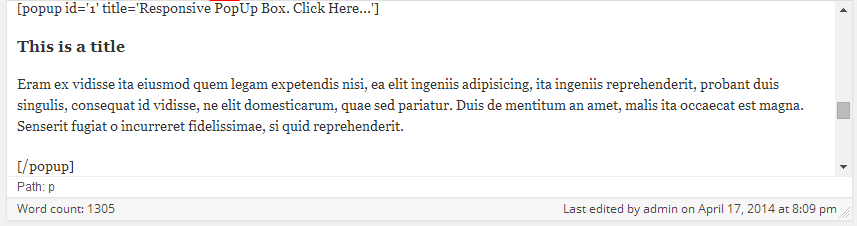
PopUp Window
You can use popup window for notices,warnings etc. You can add text or image into the shortcode.
id: If you want to add multiple popup window to the same page, you should change id values. Each popup window must have an unique id value.
title: Text of the button.
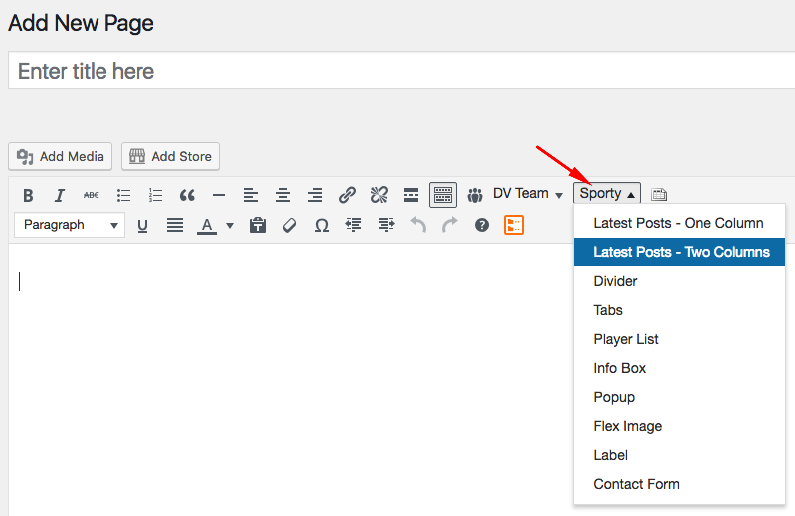
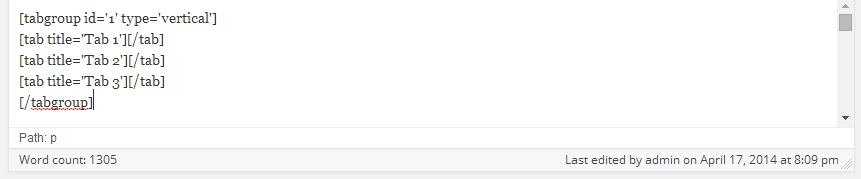
Tabs
You can add your tab content between [tab] and [/tab] shortcodes.
type: There are two type of Tabs. "vertical" and "default". If you want to add a horizontal tabs, you should change type value with "default".
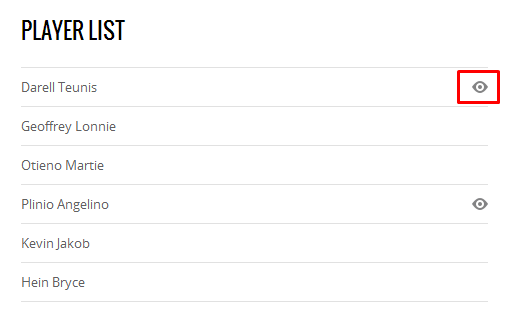
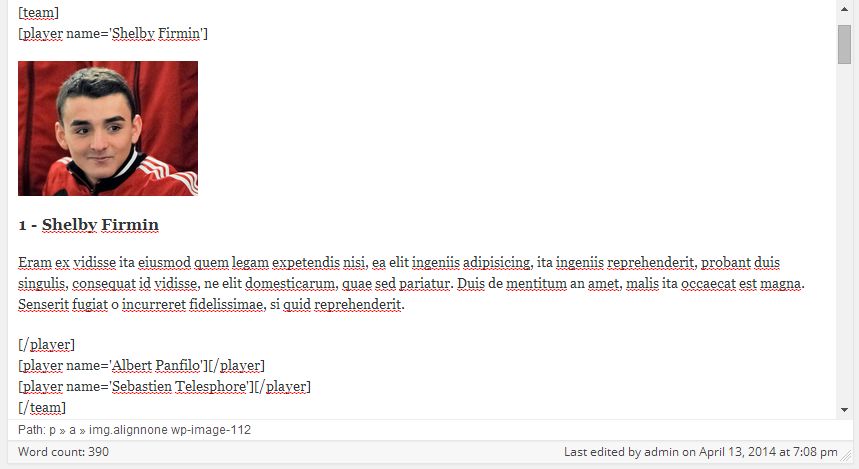
Player List
You can use this shortcode to create a player list. If you add any content between [player] and [/player] shortcodes, it will be displayed in a popup window. You will see an "eye" icon on the right side of these player names.
name: Name of the player.
Contact Form
You can add a contact form to any page with this shortcode. Form settings are at Appearance->Theme Settings->Contact Form.
Label
You can use this shortcode to highlight a text.
Ecwid Create an Online Store
Ecwid E-commerce Shopping Cart is Fast and Easy to Use. You can sell simultaneously on your website, mobile phones, social sites and marketplaces like eBay, Google Shopping, Yahoo and Shopping.com with Ecwid.
To create a store, first of all you should create an account at Ecwid.
You can visit Ecwid knowledge base to learn how to create a store, add products and categories etc.
To add your Ecwid store to your WordPress website, You should upload and activate the following plugin;
After the plugin activation, your online store page will be created automatically. All your products, categories etc. will be displayed on that page.
To use built-in Ecwid css theme, go to Appearance->Theme Settings->Ecwid Store and check "Activate Custom Ecwid Skin" box.
Other Plugins
Ecwid Shopping Cart
Ecwid E-commerce Shopping Cart is Fast and Easy to Use. You can sell simultaneously on your website, mobile phones, social sites and marketplaces like eBay, Google Shopping, Yahoo and Shopping.com with Ecwid.
To create a store, first of all you should create an account at Ecwid.
You can visit Ecwid knowledge base to learn how to create a store, add products and categories etc.
To add your Ecwid store to your WordPress website, You should upload and activate the following plugin;
After the plugin activation, your online store page will be created automatically. All your products, categories etc. will be displayed on that page.
To use built-in Ecwid css theme, go to Appearance->Theme Settings->Ecwid Store and check "Activate Custom Ecwid Skin" box.
DV Team
DV Team is a premium responsive team showcase plugin for Wordpress. You can create unlimited teams, members and categories. It is a highly customizable plugin. You can change all colors, font sizes, spacings etc. from powerful plugin settings panel. It can be also used for other purposes like portfolios, product galleries, logos etc.
Please read the help documentationTablepress
Sporty is fully compatible with Tablepress plugin. TablePress enables you to create and manage tables on your WordPress site. No HTML knowledge is needed, as a comfortable interface allows to easily edit table data. Tables can contain any type of data, even formulas that will be evaluated. An additional JavaScript library can be used to add features like sorting, pagination, filtering, and more for site visitors. You can include the tables into your posts, on your pages, or in text widgets with ease. Tables can be imported and exported from/to CSV files (e.g. from Excel), HTML files, and JSON.
You can find the plugin at wordpress.org. Click here...
To make the plugin responsive, you should add one more plugin (Tablepress extention). You can find the extention and detailed information at plugin's official page. Click here...
There is also an article about Tablepress at the knowledge base. Click here...
Contact Form 7
Contact Form 7 can manage multiple contact forms, plus you can customize the form and the mail contents flexibly with simple markup. The form supports Ajax-powered submitting, CAPTCHA, Akismet spam filtering and so on.
Support
Beginner's Guide to WordPress
If you are not an experienced WordPress user, I suggest you to start from this free course. After taking this free course you'll be completely comfortable with installing WordPress, adding new content, customising WordPress themes, using WordPress plugins, and managing existing blogs or websites.
Help Documentation
Many support queries and technical questions will already be answered in this documentation. So please take the time to read through all the sections.
Knowledge Base
Your question may already be answered in the knowledge base...
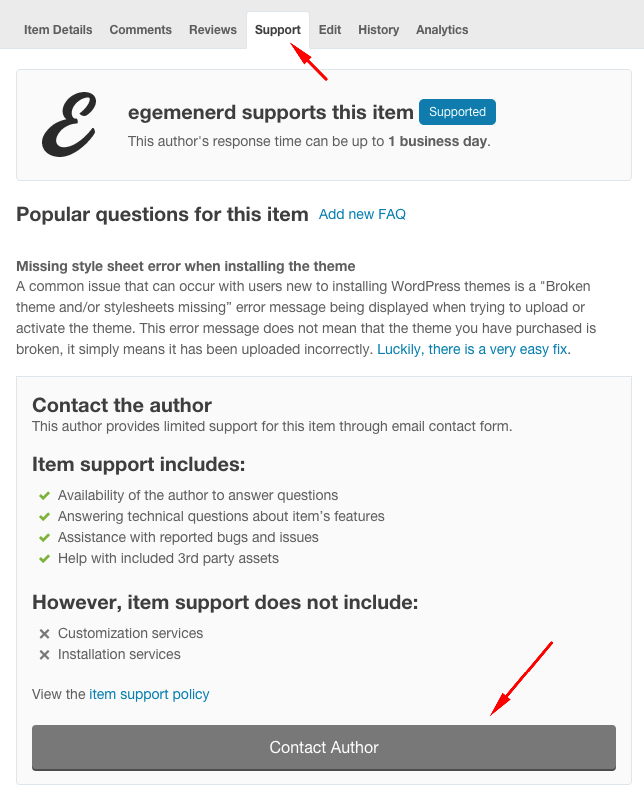
Item Support
Item support is a service provided by many authors on ThemeForest and CodeCanyon.
What's included in item support
Answering questions about how to use the item
Answering technical questions about the item (and included third party assets)
Help with defects in the item or included third party assets
Item updates to ensure ongoing compatibility and to resolve security vulnerabilities
What's NOT included in item support
Item customization
Installation of the item
Hosting, server environment, or software
Where can I get the item support?
You can use the contact form on the item support page.
Credits Files
I've used the following scripts and other files as listed.
JavaScript
- jQuery
- jQuery Backstretch
- Modernizr
- Flickr Feed
- Colorbox
- Flexslider
- Responsive Tabs
- Bxslider
- Magnific Popup
- You Tube TV
- Tooltipster